Data access using HTTPS
|
Collect
Sensors Analytics is committed to helping customers build an open data platform to facilitate customers to make more in-depth use of data. This document covers technical details and is intended for users who are experienced in related functions. If you have any doubts about the content of the document, please consult the student on duty for one-on-one assistance.
1. When do I need to use HTTPS for data access
- By default, the data access API uses the HTTP protocol
- Configure HTTPS data access based on the following requirements:
1)Hope to further improve the security of the data transmission layer;
2)The JavaScript SDK needs to be deployed on the HTTPS site to properly send data.
Sensors recommends: Use HTTPS when you need to access the public network.
2. How to configure HTTPS data access
Users of different versions can select the corresponding configuration mode according to the actual situation. For other special cases, contact Shentze technical support.
2.1 Data access solution for cloud customers using HTTPS
2.2 Private deployment Customers:
1)Enable HTTPS on the cloud vendor's load balancer or hardware load device(This method is recommended)
2)Configure HTTPS on other independently deployed open source applications
2.1. The cloud version uses HTTPS for data access
By default, HTTPS data access is configured for the cloud version. You can directly obtain the corresponding HTTPS data access address.
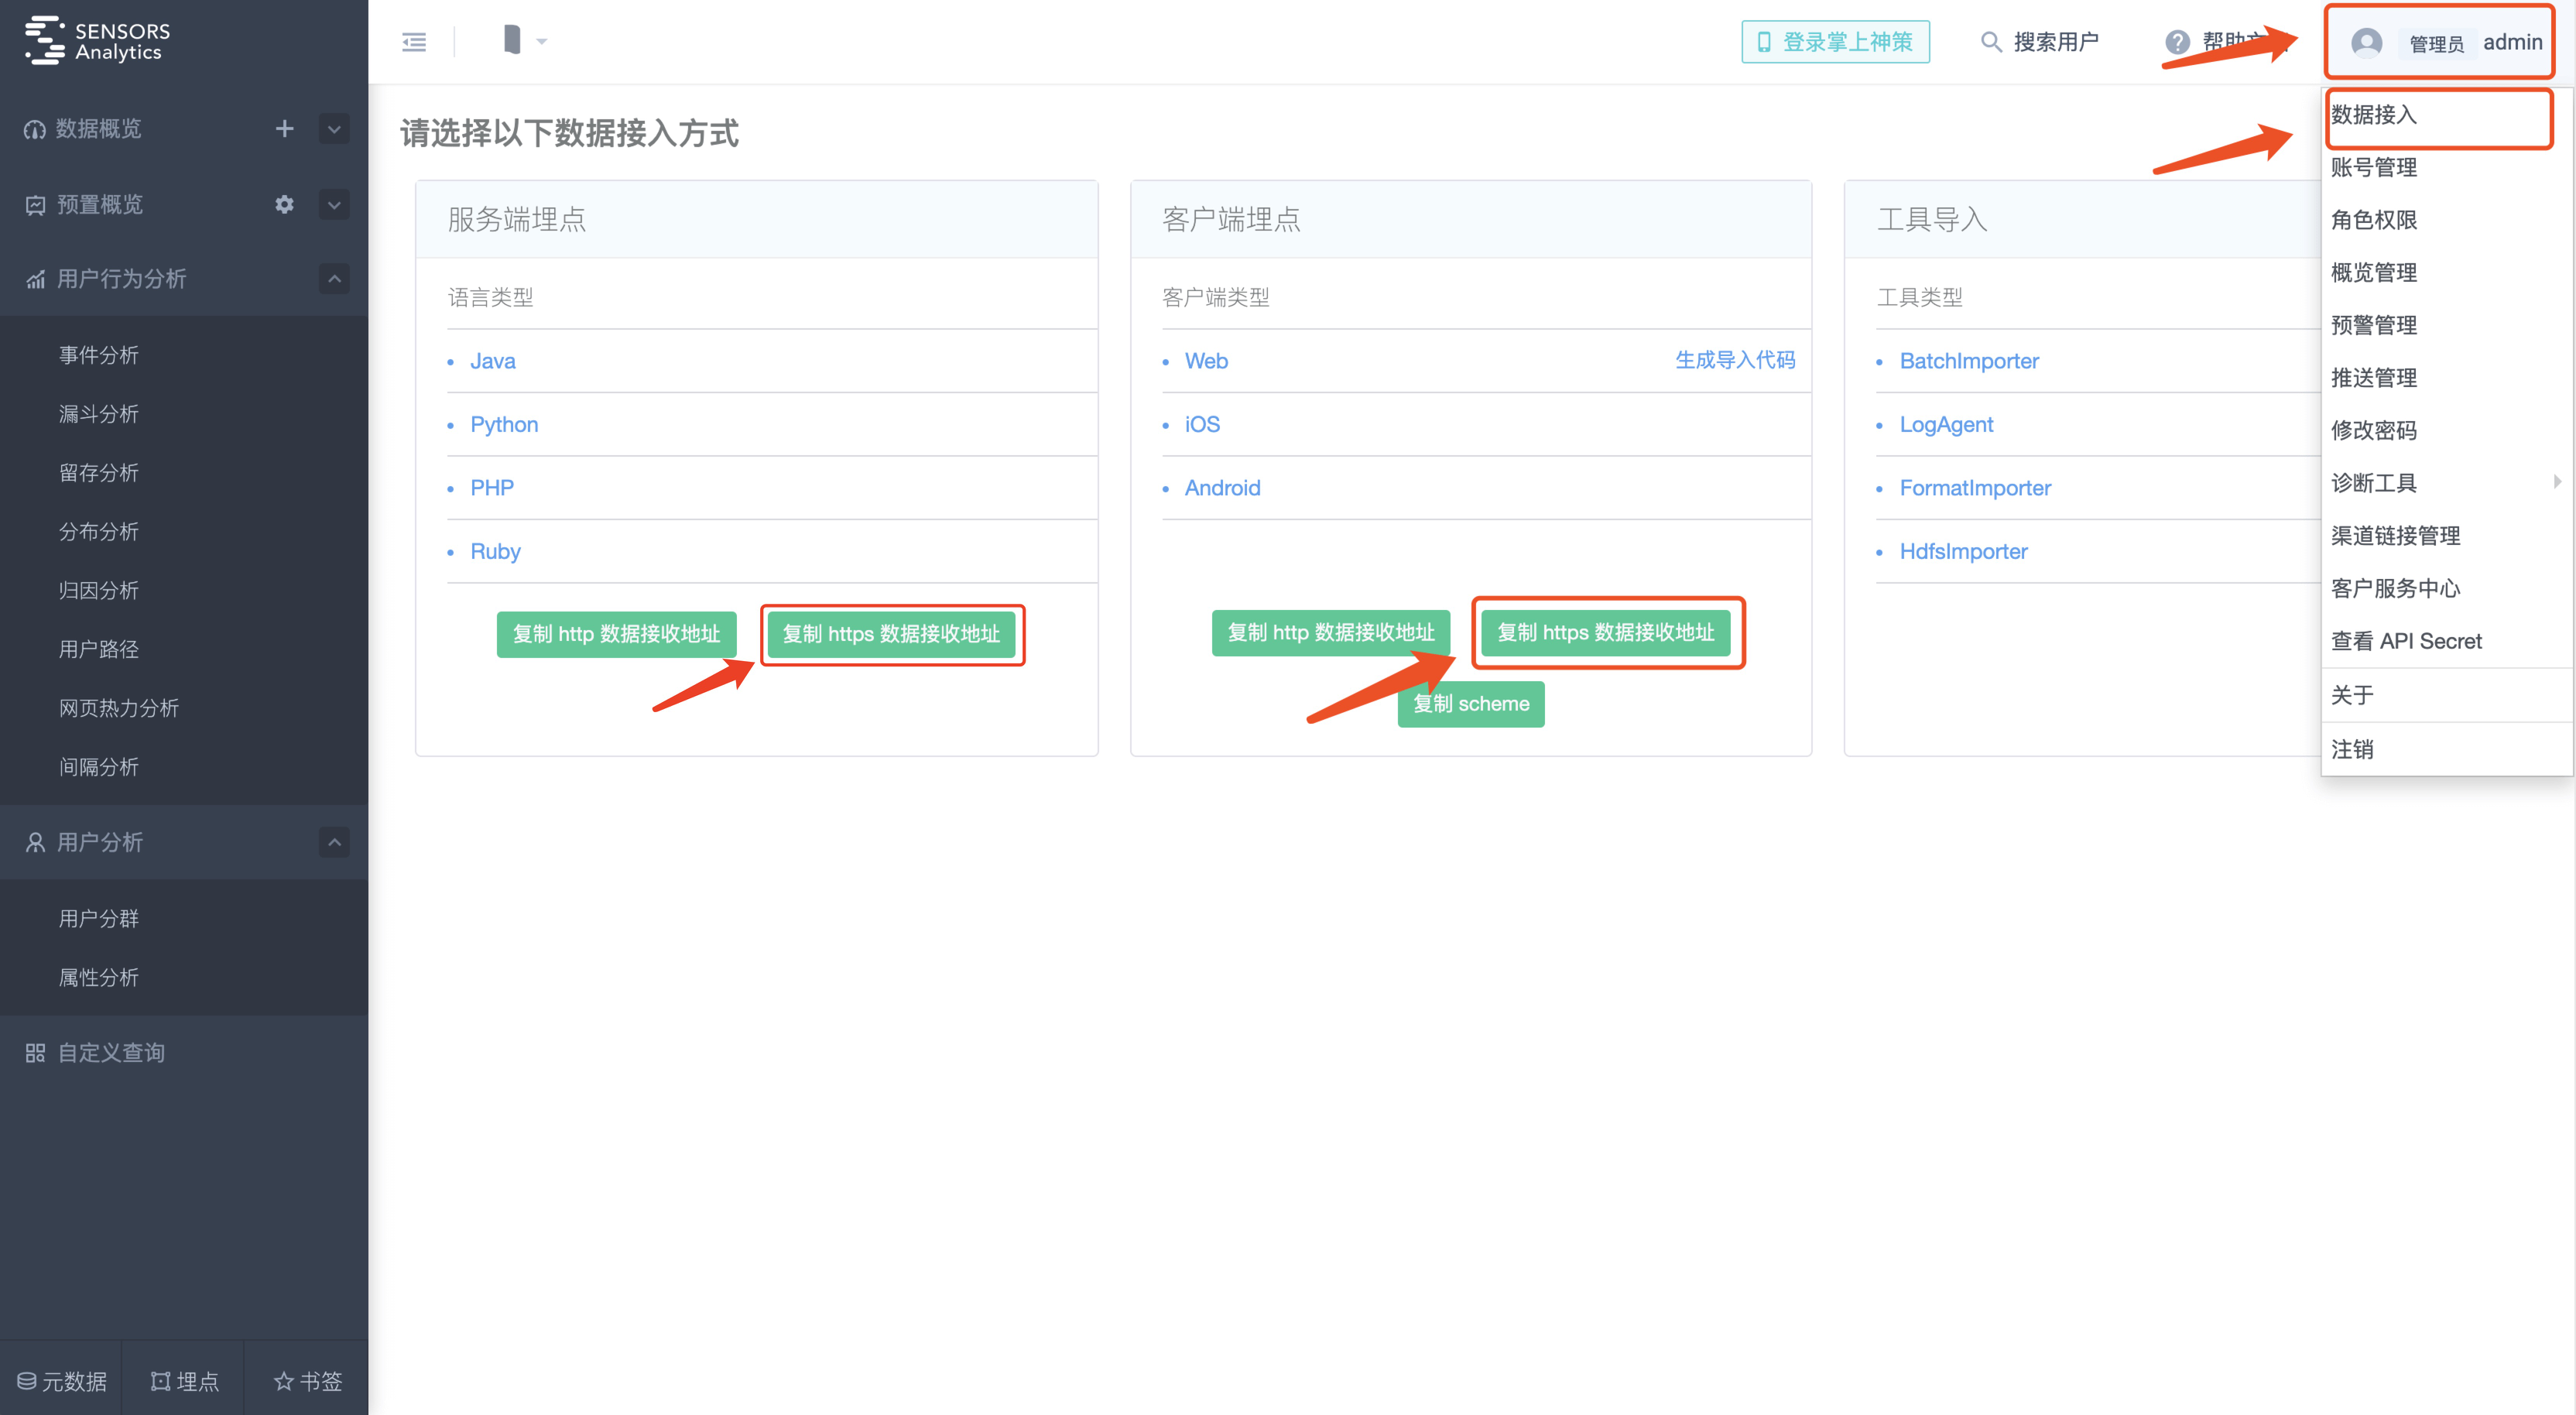
2.1.1. Obtain the HTTPS data access address
Get the HTTPS data access address on our analytics page,need use Administrator Account:
2.1.2. Cloud version data access address format
| agreement | Data access address (The domain name is subject to actual conditions) |
|---|---|
| HTTP | http://domain:8106/sa?token=xxx |
HTTPS (Both types of addresses can be used, choose one to use) | https://domain:4006/sa?token=xxx |
| https://domain+datasink./sa?token=xxx |
Example:
HTTP data receiving URL:
http://test.cloud.sensorsdata.cn:8106/sa?token=xxxThe corresponding HTTPS data receiving URL, both addresses can be used, choose one to use:
地址一:scheme协议 由 HTTP 改为 HTTPS,端口由 8106 改为 4006。 https://test.cloud.sensorsdata.cn:4006/sa?token=xxx 地址二:使用数据接收专用域名。 https://test.datasink.sensorsdata.cn/sa?token=xxxUse data receiving dedicated datasink domain, you can omit the port number, 443 is the data receiving service port.
2.2. Use HTTPS data receiving solution for private deployment version
2.2.1. Enable HTTPS on cloud provider's load balancing or hardware load devices
It is strongly recommended to use this method.
2.2.1.1. Precautions for configuring HTTPS with this solution
- Common load devices provide HTTPS access function. You can choose different cloud providers' LB or hardware load devices to enable HTTPS according to the actual situation;
- Using HTTPS encryption transmission requires providing SSL certificate. Sensing does not provide any SSL certificate. The certificate can be obtained through various channels. If using a self-signed certificate, please ensure that the client trusts the certificate;
- When using HTTPS, pay attention to the expiration time of the certificate. If the certificate expires, it may cause data sending failure;
- If it is the first time to use the cloud provider's load balancing, it is recommended to check the official documentation of each vendor's load balancing configuration. If necessary, you can submit a work order to the corresponding vendor to inquire;
- If you still cannot complete the forwarding configuration, please contact Sensing technical support.
Reference for cloud provider's load balancing configuration official documentation:
2.2.1.2. Update the Sensors background configuration
2.2.1.3. Verify that the configuration is correct
2.2.2. Configure HTTPS on other independently deployed open source applications
Considering machine cost and labor cost, we do not recommend this solution if it is not necessary.
2.2.2.1. Precautions for configuring HTTPS with this scheme
- One or more additional (highly available) machines are required to deploy the open source load balancing application and cannot be deployed on a God-designed machine.
- Plan the configuration, high availability, and monitoring solutions for the machine where the load balancing application resides.
- SSL certificates are required for encrypted transmission using HTTPS. Shenze does not provide any SSL certificates. The certificate can be obtained through various channels. If you use a self-issued visa, ensure that the client trusts the certificate.
- If HTTPS is used, pay attention to the certificate expiration time. If the certificate expires, data cannot be sent successfully.
- The following section provides the server segment configuration for enabling SSL based on Nginx. Configure other segments as required. If you use other open source applications, you can use this as a reference configuration.
2.2.2.2. Configure HTTPS for data access services
Confirm Nginx version
The mode of enabling SSL varies with the version of Nginx. You need to check the Nginx version that is currently deployed.
For the confirmation method, see:
Go to the Nginx deployment directory and run: sbin/nginx -V to view the nginx version: field in the output.
The Nginx server segment reference configuration is as follows:
# 定义数据接入服务的 server # 默认端口 8106。 upstream sensors_data_api { # 若是单机版,只需要留下一个 server; 若是集群版,需要把 ip 地址改成每个节点的内网地址 server 10.0.0.1:8106; # 这里需要改: 只需把 10.0.0.1 改成对应的ip地址 server 10.0.0.2:8106; # 这里需要改: 只需把 10.0.0.2 改成对应的ip地址 server 10.0.0.3:8106; # 这里需要改: 只需把 10.0.0.3 改成对应的ip地址 # 必须使用 ip_hash 以保证数据接入顺序 ip_hash; keepalive 100; } # 转发数据接入服务 server { # 转发之后的端口号,可自定义 listen 443; # 域名,根据实际情况填写 server_name xxx.yyy.zzz; access_log off; # 以下配置如果开启 ssl 则需要 ssl on; # 开启 ssl ssl_certificate /etc/ssl/server.crt; # 配置 ssl 证书信任链,路径以实际为准 ssl_certificate_key /etc/ssl/server.key; # 配置 ssl 私钥,路径以实际为准 # 其他 ssl 参数可以参考 https://mozilla.github.io/server-side-tls/ssl-config-generator/ ,例如: # ssl_protocols TLSv1 TLSv1.1 TLSv1.2; # ssl_ciphers 'ECDHE-ECDSA-CHACHA20-POLY1305:ECDHE-RSA-CHACHA20-POLY1305:ECDHE-ECDSA-AES128-GCM-SHA256:ECDHE-RSA-AES128-GCM-SHA256:ECDHE-ECDSA-AES256-GCM-SHA384:ECDHE-RSA-AES256-GCM-SHA384:DHE-RSA-AES128-GCM-SHA256:DHE-RSA-AES256-GCM-SHA384:ECDHE-ECDSA-AES128-SHA256:ECDHE-RSA-AES128-SHA256:ECDHE-ECDSA-AES128-SHA:ECDHE-RSA-AES256-SHA384:ECDHE-RSA-AES128-SHA:ECDHE-ECDSA-AES256-SHA384:ECDHE-ECDSA-AES256-SHA:ECDHE-RSA-AES256-SHA:DHE-RSA-AES128-SHA256:DHE-RSA-AES128-SHA:DHE-RSA-AES256-SHA256:DHE-RSA-AES256-SHA:ECDHE-ECDSA-DES-CBC3-SHA:ECDHE-RSA-DES-CBC3-SHA:EDH-RSA-DES-CBC3-SHA:AES128-GCM-SHA256:AES256-GCM-SHA384:AES128-SHA256:AES256-SHA256:AES128-SHA:AES256-SHA:DES-CBC3-SHA:!DSS'; # ssl_prefer_server_ciphers on; # ssl_session_timeout 5m; # ssl_session_cache shared:SSL:50m; # 以上 ssl 配置可视情况添加、修改 location / { proxy_set_header X-Real-IP $remote_addr; proxy_set_header X-Forwarded-For $proxy_add_x_forwarded_for; proxy_set_header Host $host; proxy_pass http://sensors_data_api; proxy_ignore_client_abort on; proxy_http_version 1.1; proxy_set_header Connection ""; } }# 定义数据接入服务的 server # 默认端口 8106。 upstream sensors_data_api { # 若是单机版,只需要留下一个 server; 若是集群版,需要把 ip 地址改成每个节点的内网地址 server 10.0.0.1:8106; # 这里需要改: 只需把 10.0.0.1 改成对应的ip地址 server 10.0.0.2:8106; # 这里需要改: 只需把 10.0.0.2 改成对应的ip地址 server 10.0.0.3:8106; # 这里需要改: 只需把 10.0.0.3 改成对应的ip地址 # 必须使用 ip_hash 以保证数据接入顺序 ip_hash; keepalive 100; } # 转发数据接入服务 server { # 转发之后的端口号,可自定义 listen 443 ssl; # 开启 ssl # 域名,根据实际情况填写 server_name xxx.yyy.zzz; access_log off; # 以下配置如果开启 ssl 则需要 ssl_certificate /etc/ssl/server.crt; # 配置 ssl 证书信任链,路径以实际为准 ssl_certificate_key /etc/ssl/server.key; # 配置 ssl 私钥,路径以实际为准 # 其他 ssl 参数可以参考 https://mozilla.github.io/server-side-tls/ssl-config-generator/ ,例如: # ssl_protocols TLSv1 TLSv1.1 TLSv1.2; # ssl_ciphers 'ECDHE-ECDSA-CHACHA20-POLY1305:ECDHE-RSA-CHACHA20-POLY1305:ECDHE-ECDSA-AES128-GCM-SHA256:ECDHE-RSA-AES128-GCM-SHA256:ECDHE-ECDSA-AES256-GCM-SHA384:ECDHE-RSA-AES256-GCM-SHA384:DHE-RSA-AES128-GCM-SHA256:DHE-RSA-AES256-GCM-SHA384:ECDHE-ECDSA-AES128-SHA256:ECDHE-RSA-AES128-SHA256:ECDHE-ECDSA-AES128-SHA:ECDHE-RSA-AES256-SHA384:ECDHE-RSA-AES128-SHA:ECDHE-ECDSA-AES256-SHA384:ECDHE-ECDSA-AES256-SHA:ECDHE-RSA-AES256-SHA:DHE-RSA-AES128-SHA256:DHE-RSA-AES128-SHA:DHE-RSA-AES256-SHA256:DHE-RSA-AES256-SHA:ECDHE-ECDSA-DES-CBC3-SHA:ECDHE-RSA-DES-CBC3-SHA:EDH-RSA-DES-CBC3-SHA:AES128-GCM-SHA256:AES256-GCM-SHA384:AES128-SHA256:AES256-SHA256:AES128-SHA:AES256-SHA:DES-CBC3-SHA:!DSS'; # ssl_prefer_server_ciphers on; # ssl_session_timeout 5m; # ssl_session_cache shared:SSL:50m; # 以上 ssl 配置可视情况添加、修改 location / { proxy_set_header X-Real-IP $remote_addr; proxy_set_header X-Forwarded-For $proxy_add_x_forwarded_for; proxy_set_header Host $host; proxy_pass http://sensors_data_api; proxy_ignore_client_abort on; proxy_http_version 1.1; proxy_set_header Connection ""; } }2.2.2.3. Back-end analysis service configuration HTTPS
Confirm Nginx version
The way to enable SSL differs for different versions of Nginx. You need to confirm the version of Nginx deployed. The confirmation method can refer to:To confirm, go to the deployment directory of Nginx and execute:
sbin/nginx -V, and check the output "nginx version" field, which corresponds to the version of Nginx.
Nginx server section reference configuration is as follows:
# 定义神策后台服务的 server # 默认端口是 8107 upstream sensors_data_web { # 若是单机版,只需要留下一个 server ,若是集群版,需要把 ip 地址改成每个节点的内网地址 server 10.0.0.1:8107; # 这里需要改: 只需把 10.0.0.1 改成对应的ip地址 server 10.0.0.2:8107; # 这里需要改: 只需把 10.0.0.2 改成对应的ip地址 server 10.0.0.3:8107; # 这里需要改: 只需把 10.0.0.3 改成对应的ip地址 ip_hash; } # 转发神策后台界面 server { # 端口号,可自定义 listen 443; # 域名,根据实际情况填写 server_name xxx.yyy.zzz; access_log off; # 以下配置如果开启 ssl 则需要 ssl on; # 开启 ssl ssl_certificate /etc/ssl/server.crt; # 配置 ssl 证书信任链,路径以实际为准 ssl_certificate_key /etc/ssl/server.key; # 配置 ssl 私钥,路径以实际为准 # 其他 ssl 参数可以参考 https://mozilla.github.io/server-side-tls/ssl-config-generator/ ,例如: # ssl_protocols TLSv1 TLSv1.1 TLSv1.2; # ssl_ciphers 'ECDHE-ECDSA-CHACHA20-POLY1305:ECDHE-RSA-CHACHA20-POLY1305:ECDHE-ECDSA-AES128-GCM-SHA256:ECDHE-RSA-AES128-GCM-SHA256:ECDHE-ECDSA-AES256-GCM-SHA384:ECDHE-RSA-AES256-GCM-SHA384:DHE-RSA-AES128-GCM-SHA256:DHE-RSA-AES256-GCM-SHA384:ECDHE-ECDSA-AES128-SHA256:ECDHE-RSA-AES128-SHA256:ECDHE-ECDSA-AES128-SHA:ECDHE-RSA-AES256-SHA384:ECDHE-RSA-AES128-SHA:ECDHE-ECDSA-AES256-SHA384:ECDHE-ECDSA-AES256-SHA:ECDHE-RSA-AES256-SHA:DHE-RSA-AES128-SHA256:DHE-RSA-AES128-SHA:DHE-RSA-AES256-SHA256:DHE-RSA-AES256-SHA:ECDHE-ECDSA-DES-CBC3-SHA:ECDHE-RSA-DES-CBC3-SHA:EDH-RSA-DES-CBC3-SHA:AES128-GCM-SHA256:AES256-GCM-SHA384:AES128-SHA256:AES256-SHA256:AES128-SHA:AES256-SHA:DES-CBC3-SHA:!DSS'; # ssl_prefer_server_ciphers on; # ssl_session_timeout 5m; # ssl_session_cache shared:SSL:50m; # 以上 ssl 配置可视情况添加、修改 location / { proxy_set_header X-Real-IP $remote_addr; proxy_set_header X-Forwarded-For $proxy_add_x_forwarded_for; proxy_set_header Host $host; proxy_read_timeout 1800s; proxy_redirect http://sensors_data_web:8107 .; proxy_pass http://sensors_data_web; proxy_ignore_client_abort on; } }# 定义神策后台服务的 server # 默认端口是 8107 upstream sensors_data_web { # 若是单机版,只需要留下一个 server ,若是集群版,需要把 ip 地址改成每个节点的内网地址 server 10.0.0.1:8107; # 这里需要改: 只需把 10.0.0.1 改成对应的ip地址 server 10.0.0.2:8107; # 这里需要改: 只需把 10.0.0.2 改成对应的ip地址 server 10.0.0.3:8107; # 这里需要改: 只需把 10.0.0.3 改成对应的ip地址 ip_hash; } # 转发神策后台界面 server { # 端口号,可自定义 listen 443 ssl; # 开启 ssl # 域名,根据实际情况填写 server_name xxx.yyy.zzz; access_log off; # 以下配置如果开启 ssl 则需要 ssl_certificate /etc/ssl/server.crt; # 配置 ssl 证书信任链,路径以实际为准 ssl_certificate_key /etc/ssl/server.key; # 配置 ssl 私钥,路径以实际为准 # 其他 ssl 参数可以参考 https://mozilla.github.io/server-side-tls/ssl-config-generator/ ,例如: # ssl_protocols TLSv1 TLSv1.1 TLSv1.2; # ssl_ciphers 'ECDHE-ECDSA-CHACHA20-POLY1305:ECDHE-RSA-CHACHA20-POLY1305:ECDHE-ECDSA-AES128-GCM-SHA256:ECDHE-RSA-AES128-GCM-SHA256:ECDHE-ECDSA-AES256-GCM-SHA384:ECDHE-RSA-AES256-GCM-SHA384:DHE-RSA-AES128-GCM-SHA256:DHE-RSA-AES256-GCM-SHA384:ECDHE-ECDSA-AES128-SHA256:ECDHE-RSA-AES128-SHA256:ECDHE-ECDSA-AES128-SHA:ECDHE-RSA-AES256-SHA384:ECDHE-RSA-AES128-SHA:ECDHE-ECDSA-AES256-SHA384:ECDHE-ECDSA-AES256-SHA:ECDHE-RSA-AES256-SHA:DHE-RSA-AES128-SHA256:DHE-RSA-AES128-SHA:DHE-RSA-AES256-SHA256:DHE-RSA-AES256-SHA:ECDHE-ECDSA-DES-CBC3-SHA:ECDHE-RSA-DES-CBC3-SHA:EDH-RSA-DES-CBC3-SHA:AES128-GCM-SHA256:AES256-GCM-SHA384:AES128-SHA256:AES256-SHA256:AES128-SHA:AES256-SHA:DES-CBC3-SHA:!DSS'; # ssl_prefer_server_ciphers on; # ssl_session_timeout 5m; # ssl_session_cache shared:SSL:50m; # 以上 ssl 配置可视情况添加、修改 location / { proxy_set_header X-Real-IP $remote_addr; proxy_set_header X-Forwarded-For $proxy_add_x_forwarded_for; proxy_set_header Host $host; proxy_read_timeout 1800s; proxy_redirect http://sensors_data_web:8107 .; proxy_pass http://sensors_data_web; proxy_ignore_client_abort on; } }2.2.2.4. Update Sensors Analytics backend configuration
2.2.2.5. Verify the configuration
3. Update Sensors Analytics backend configuration
After configuring HTTPS, Sensors Analytics backend needs to know the corresponding HTTPS URL. Therefore, you need to configure the HTTPS URL in the Sensors Analytics service. Otherwise, it will affect the use of some functions, including:
- Generate tracking code
- Channel management function
Assuming that the address after the forwarding configuration is (the following addresses are for illustration only, please use your own actual addresses):
- Data receiving URL:https://datasink.cloud.sensorsdata.cn/
- Back-end analysis URL:https://web.cloud.sensorsdata.cn/
The operation for updating the relevant configuration is as follows:
Note: All the following addresses are examples, and you need to configure them according to your actual data receiving address.
# 登录到任意一台神策服务节点并切换到神策管理账号 su - sa_cluster # 更新 HTTPS 数据接入服务地址 edgeadmin data_sink set -n secure_data_sink_url -v 'https://10.129.31.36:8106' # 更新 HTTPS 后台分析服务地址 sbpadmin business_config -a set -p sa -n web -k web_url -v https://web.cloud.sensorsdata.cn/ # 重启服务 aradmin restart -m web -p sa Check the operation method of the related configuration as follows:
# 登录到任意一台神策服务节点并切换到神策管理账号 su - sa_cluster # 检查 HTTPS 数据接入服务地址 edgeadmin data_sink get -n secure_data_sink_url # 检查 HTTPS 后台分析服务地址 sbpadmin business_config -a get -p sa -n web -k web_url# 登录到任意一台神策服务节点并切换到神策管理账号 su - sa_cluster # 更新 HTTPS 数据接入服务地址 spadmin config set global -n secure_data_sink_url -v "https://datasink.cloud.sensorsdata.cn/" # 更新 HTTPS 后台分析服务地址 spadmin config set global -n secure_web_url -v "https://web.cloud.sensorsdata.cn/" # 重启服务 spadmin restart -m web -p saCheck the operation method of the related configuration as follows:
# 登录到任意一台神策服务节点并切换到神策管理账号 su - sa_cluster # 检查 HTTPS 数据接入服务地址 spadmin config get global -n secure_data_sink_url # 检查 HTTPS 后台分析服务地址 spadmin config get global -n secure_web_url4. How to verify if the configuration is correct
- Get the HTTPS data access address (the HTTPS address forwarded to port 8106) plus /debug (e.g.
https://datasink.cloud.sensorsdata.cn/debug), access it directly in the browser,if it returns"Sensors Analytics is ready to receive your data!" , it means the address is correctly configured.
- Access the HTTPS backend analysis address (the HTTPS address forwarded to port 8107) directly in the browser, if the Sensory Analytics login page is returned normally, it means the address configuration is correct.
Note: The content of this document is a technical document that provides details on how to use the Sensors product and does not include sales terms; the specific content of enterprise procurement products and technical services shall be subject to the commercial procurement contract.
 Popular Searches