Integrated document(iOS)
|
Collect
- Please read it before useData model
- The SDK update log is available Release Notes
iOS SDK compliance
- You need to ensure that the App has a Privacy Policy and that the Privacy Policy pops up when the user first launches the App to obtain user consent.
- You need to inform users that your App integrates the Sensors Analytics SDK:
- If you are not using IDFA, please add the following reference to your privacy policy:
“We use the Sensors SDK to collect your IDFV information for statistical analysis of your use in the App.” - If you use IDFA, please add the following reference to your privacy policy:
“We use the Sensors SDK to collect your IDFA information for statistical analysis of your use in the App.”
- If you are not using IDFA, please add the following reference to your privacy policy:
- You must ensure that users agree to the Privacy Policy before initializing the Sensors SDK.
1. Integrate the sensors analytics SDK
- In Podfile file addpod 'SensorsAnalyticsSDK'
- Open the terminal and switch to the project directory
- Execute pod install 或 pod update
Note: If executedpod update the latest version cannot be detected. You can run it firstpod cache clean SensorsAnalyticsSDKclear local cache.
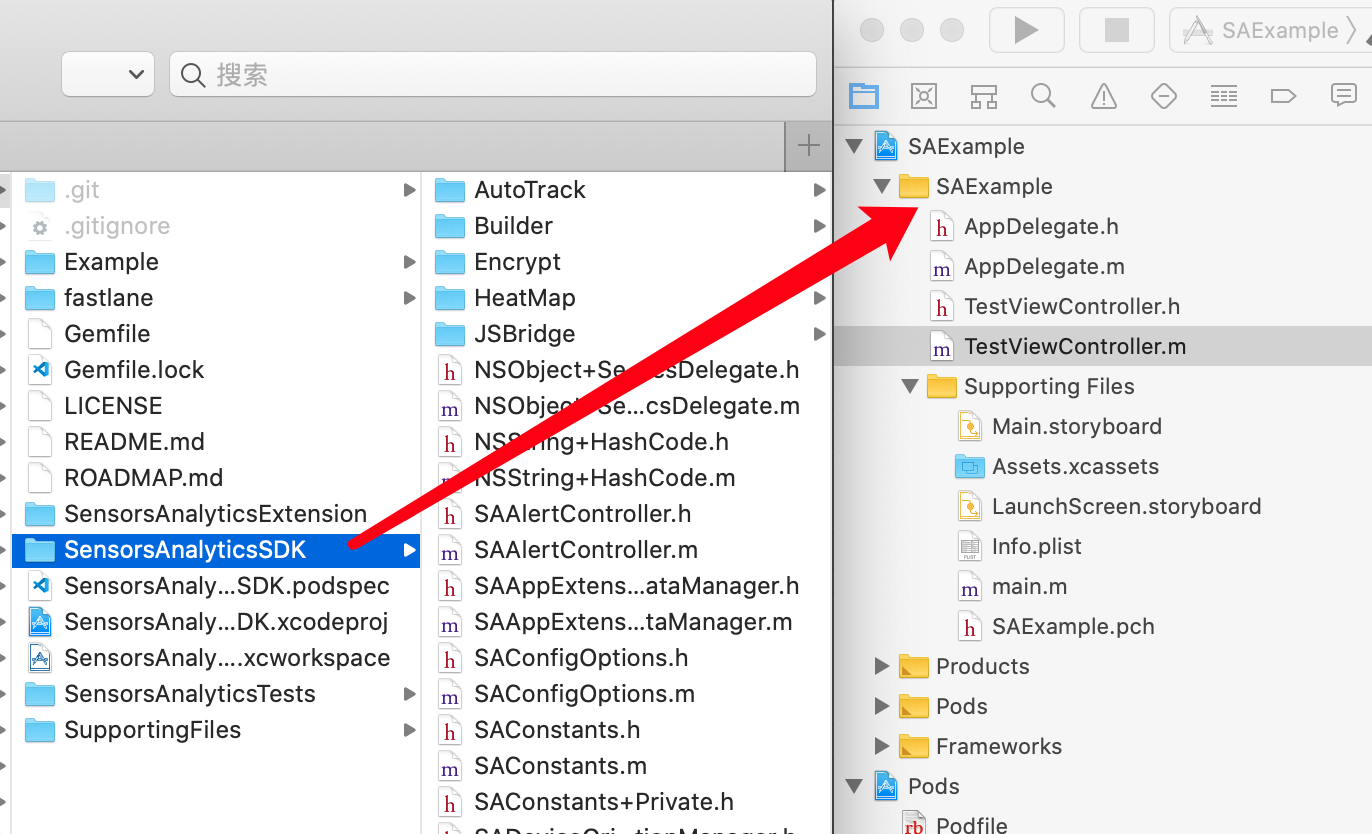
- From GitHub get the SDK source code
- From source codeSensorsAnalyticsSDK directory import the App project and select it Copy items if needed
- Project set "Build Phase" -> "Link Binary With Libraries" to add a dependent library:libicucore、libsqlite3 and libz
- Add the following configuration to the Cartfile:
github "sensorsdata/sa-sdk-ios"- Execute carthage update --platform iOS and add SensorsAnalyticsSDK.framework to your project
- Integrating the SDK will increase the size of the app installation package by about 350 KB
- The SDK is compatible with iOS 9.0 and above
2. Initialize the Sensors Analytics SDK
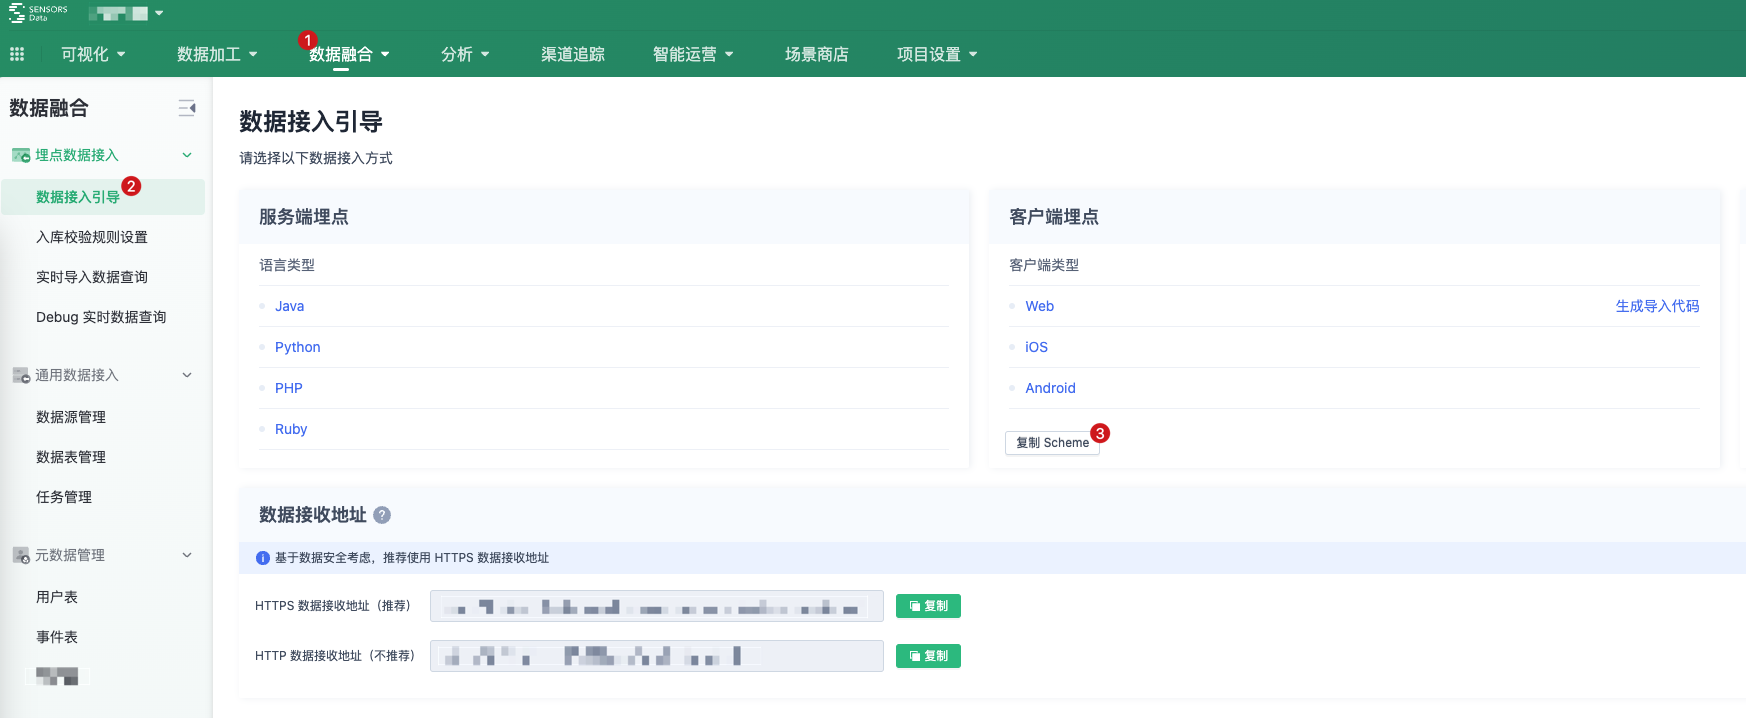
2.1. Get the data receiving URL for your project
- Each project has a separate data receiving URL
- Please use the administrator account to obtain the data receiving URL for the corresponding project

2.2. Initialize the SDK
Add the initialization code in AppDelegate's - application: didFinishLaunchingWithOptions::
// 引入神策分析 SDK #import <SensorsAnalyticsSDK/SensorsAnalyticsSDK.h> - (BOOL)application:(UIApplication *)application didFinishLaunchingWithOptions:(NSDictionary *)launchOptions { // 初始化配置 SAConfigOptions *options = [[SAConfigOptions alloc] initWithServerURL:<#数据接收地址#> launchOptions:launchOptions]; // 开启全埋点 options.autoTrackEventType = SensorsAnalyticsEventTypeAppStart | SensorsAnalyticsEventTypeAppEnd | SensorsAnalyticsEventTypeAppClick | SensorsAnalyticsEventTypeAppViewScreen; #ifdef DEBUG // 开启 Log options.enableLog = YES; #endif /** * 其他配置,如开启可视化全埋点 */ // 初始化 SDK [SensorsAnalyticsSDK startWithConfigOptions:options]; return YES; }func application(_ application: UIApplication, didFinishLaunchingWithOptions launchOptions: [UIApplication.LaunchOptionsKey: Any]?) -> Bool { let options = SAConfigOptions.init(serverURL: <#数据接收地址#>, launchOptions: launchOptions) //开启全埋点 options.autoTrackEventType = [.eventTypeAppStart, .eventTypeAppEnd, .eventTypeAppClick, .eventTypeAppViewScreen] #ifdef DEBUG //开启log options.enableLog = true #endif /** * 其他配置,如开启可视化全埋点 */ //初始化SDK SensorsAnalyticsSDK.start(configOptions: options) return true }3. Configure Scheme
3.1. Get the project Scheme
- The project Scheme needs to be obtained using the administrator account
- The App project can configure the Scheme of multiple projects at the same time
3.2. Add a Scheme to the App
App project selection target -> Info -> Types, Click the plus sign(+), Configure the Scheme obtained in the previous step into URL Types: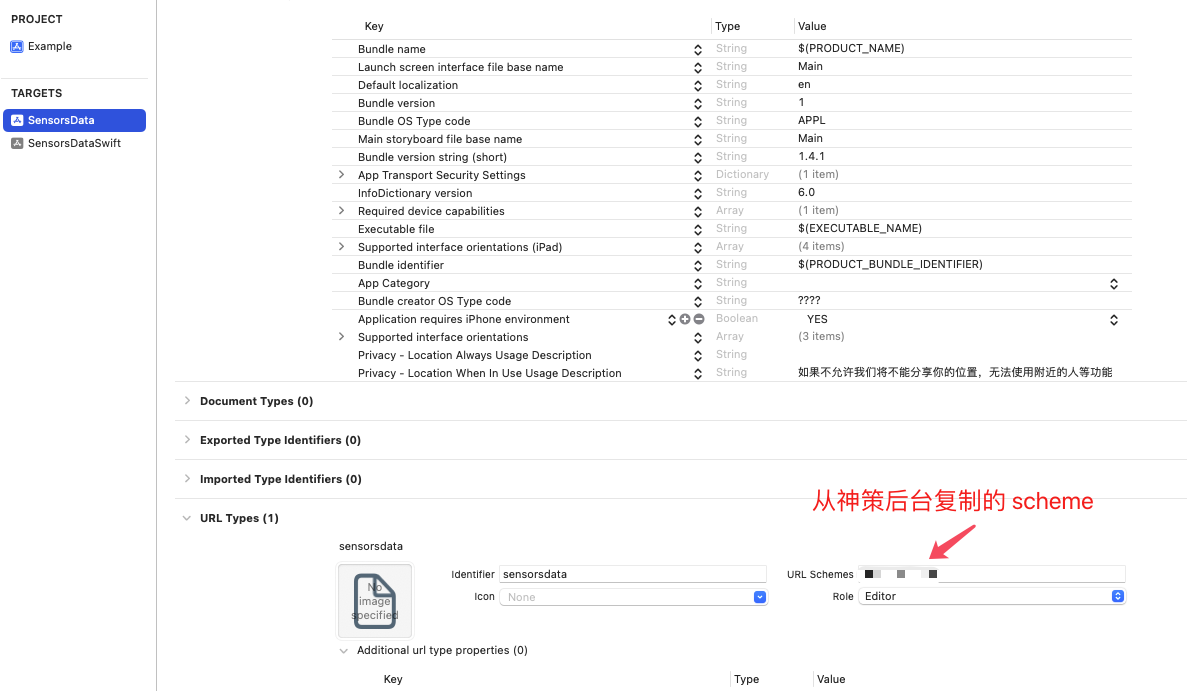
3.3. Process the incoming URL
In AppDelegate - application:openURL:options: Call in method - handleSchemeUrl: Process the sensors analytics Scheme:
- (BOOL)application:(UIApplication *)app openURL:(NSURL *)url options:(NSDictionary<UIApplicationOpenURLOptionsKey,id> *)options { if ([[SensorsAnalyticsSDK sharedInstance] handleSchemeUrl:url]) { return YES; } return NO; }func application(_ app: UIApplication, open url: URL, options: [UIApplication.OpenURLOptionsKey : Any] = [:]) -> Bool { if SensorsAnalyticsSDK.sharedInstance()?.handleSchemeUrl(url) ?? false{ return true } return true } - If - application:openURL:options: there are other logical processes that need to be processed- handleSchemeUrl: lead as far as possible, in order to ensure - handleSchemeUrl: to be executed.
- If used in the project SceneDelegate, need in - scene:openURLContexts: call in method - handleSchemeUrl: for sensors analytics Scheme process
4. SDK Basic configuration
4.1. Open the full burial point
When initializing the SDK,autoTrackEventType Property to set the type of full burial point to be enabled. See the full burial site usage documentationBasic API function introduction.
4.2. User association
The purpose of user association is to uniquely identify users and improve the accuracy of user behavior analysis. At present, we provide simple user association and global user association to support different business scenarios.
4.3. Set the event public properties
Properties that need to be added for all events can be used after initializing the SDK - registerSuperProperties: Register the property as a public property. See the detailed usage documentation Basic API function introduction.
4.4. Record activation event
Can call - trackAppInstallWithProperties: Method records activation events, and calling this method multiple times only triggers the activation event on the first call. See the detailed usage documentationChannel tracking and advertising.
4.5. Code bury trace event
After SDK initialization, you can track user behavior events and add custom properties to events using the - track: and - track:withProperties: methods. For detailed usage documentation, refer to the Introduction to Basic API Functions.
5. View event information for debugging
To enable SDK log output, configure the following during SDK initialization:
// 打开 SDK log 功能 options.enableLog = YES;//开启log options.enableLog = trueThen filter the SALog keyword in the IDE (such as Xcode) log console:
- When a built-in event is triggered successfully, the SDK outputs the event data that starts with [track event].
- If a track event fails to trigger, the SDK will output the corresponding error reason
- When the event data is reported successfully, the SDK outputs the event data that starts with the [valid message] field.
- When the event data fails to be reported, the SDK outputs the event data that starts with the [invalid message] field and outputs the error reason.
6. Optional SDK configurations
6.1. App and H5 Integration
Version Requirement
iOS SDK version v2.0.8 and above.
Configure the following during SDK initialization to enable App-to-H5 bridging:
// 开启 App 打通 H5 options.enableJavaScriptBridge = YES;// 开启 App 打通 H5 options.enableJavaScriptBridge = trueThe bridging feature requires both the App and H5 to be enabled to take effect. For instructions on enabling H5, please refer to the *App to H5 Bridging
6.2. Visualized Auto Track
Call *enableVisualizedAutoTrack* during SDK initialization to enable visualized auto tracking. For detailed usage documentation, please refer to the Basic API Function Introduction
7. iOS App Extension Integration
7.1. Integration of Sensors Analytics SDK in App Extension
- Integration of Sensors Analytics SDK in App Extension, with support for full instrumentation in host App, relying on SensrsAnalyticsSDK v4.5.16 or above
- Please ensure that the main target and the target corresponding to the Extension are integrated with the same subspec of SensrsAnalyticsSDK, otherwise Archive may fail
For the integration of Sensors Analytics SDK in iOS App Extension, it is recommended to use CocoaPods. And for the main target and the target corresponding to the Extension, it is recommended to integrate with the same subspec of SensrsAnalyticsSDK. The default subspec is recommended. The integration steps are as follows
- In the Podfile file, both the main target and the Extension need to add 'SensorsAnalyticsSDK'. The configuration is as follows
- Open the terminal and switch to the project directory
- Execute pod install or pod update
Note: If executing pod update does not detect the latest version, you can first execute pod cache clean SensorsAnalyticsSDK to clear the local cache.
- In the Podfile of the main target, add 'pod SensrsAnalyticsSDK', and the Extension will inherit the third-party libraries that the main target depends on, as shown in the following reference:
- Open the terminal and switch to the project directory
- Execute pod install or pod update
Note: If executing pod update does not detect the latest version, you can first execute pod cache clean SensorsAnalyticsSDK to clear the local cache.
7.2. Using Sensors Analytics SDK in App Extension
7.2.1. Initialize the Sensors Analytics SDK
In the App Extension, import SensorsAnalyticsExtension.h header file to use the Sensors Analytics SDK. Some interfaces in SensorsAnalyticsSDK.h are not available in the Extension, so do not import them
In the App Extension, such as Today Extension, Share Extension, etc., please initialize the Sensors Analytics SDK in the corresponding ViewController.m's - (instancetype)initWithCoder or - (void)viewDidLoad method
// 引入神策分析 SDK Extension 依赖头文件 #import <SensorsAnalyticsSDK/SensorsAnalyticsExtension.h> - (void)viewDidLoad { [super viewDidLoad]; // 初始化配置 SAConfigOptions *options = [[SAConfigOptions alloc] initWithServerURL:<#数据接收地址#> launchOptions:launchOptions]; #ifdef DEBUG // 开启 Log options.enableLog = YES; #endif /** * 其他配置,Extension 只支持基础埋点,不支持全埋点、可视化全埋点等功能 */ // 初始化 SDK [SensorsAnalyticsSDK startWithConfigOptions:options]; }override func viewDidLoad() { super.viewDidLoad() let options = SAConfigOptions.init(serverURL: <#数据接收地址#>, launchOptions: launchOptions) #ifdef DEBUG //开启log options.enableLog = true #endif /** * 其他配置,Extension 只支持基础埋点,不支持全埋点、可视化全埋点等功能 */ //初始化SDK SensorsAnalyticsSDK.start(configOptions: options) } 7.2.2. Track Events
In the App Extension, trigger events by setting up tracking points. It is the same as in a regular app, for example, set up tracking points in the didSelectPost callback of ShareViewController. For more information, see Basic API introduction (iOS).
[SensorsAnalyticsSDK.sharedInstance track:"<#事件名#>" withProperties:@{@"<#属性名#>": @"<#属性值#>"}];Note: The content of this document is a technical document that provides details on how to use the Sensors product and does not include sales terms; the specific content of enterprise procurement products and technical services shall be subject to the commercial procurement contract.
 Popular Searches