Integration Documentation (PHP)
|
Collect
1. PHP SDK Usage Instructions
Before using, please read the introduction of the data-model.
2. Integrate Sensors Analytics SDK
Integrate Sensors Analytics SDK in PHP scripts to collect and analyze user data. The SDK is compatible with PHP 5.X or above, and some features require the curl extension. There are two ways to integrate:
Integrate using composer.
{ "require": { "sensorsdata/sa-sdk-php": "v2.0.0" } }Obtain the source code of SDK from GitHub and integrate it into the project.
2.1. Initialize Sensors Analytics SDK
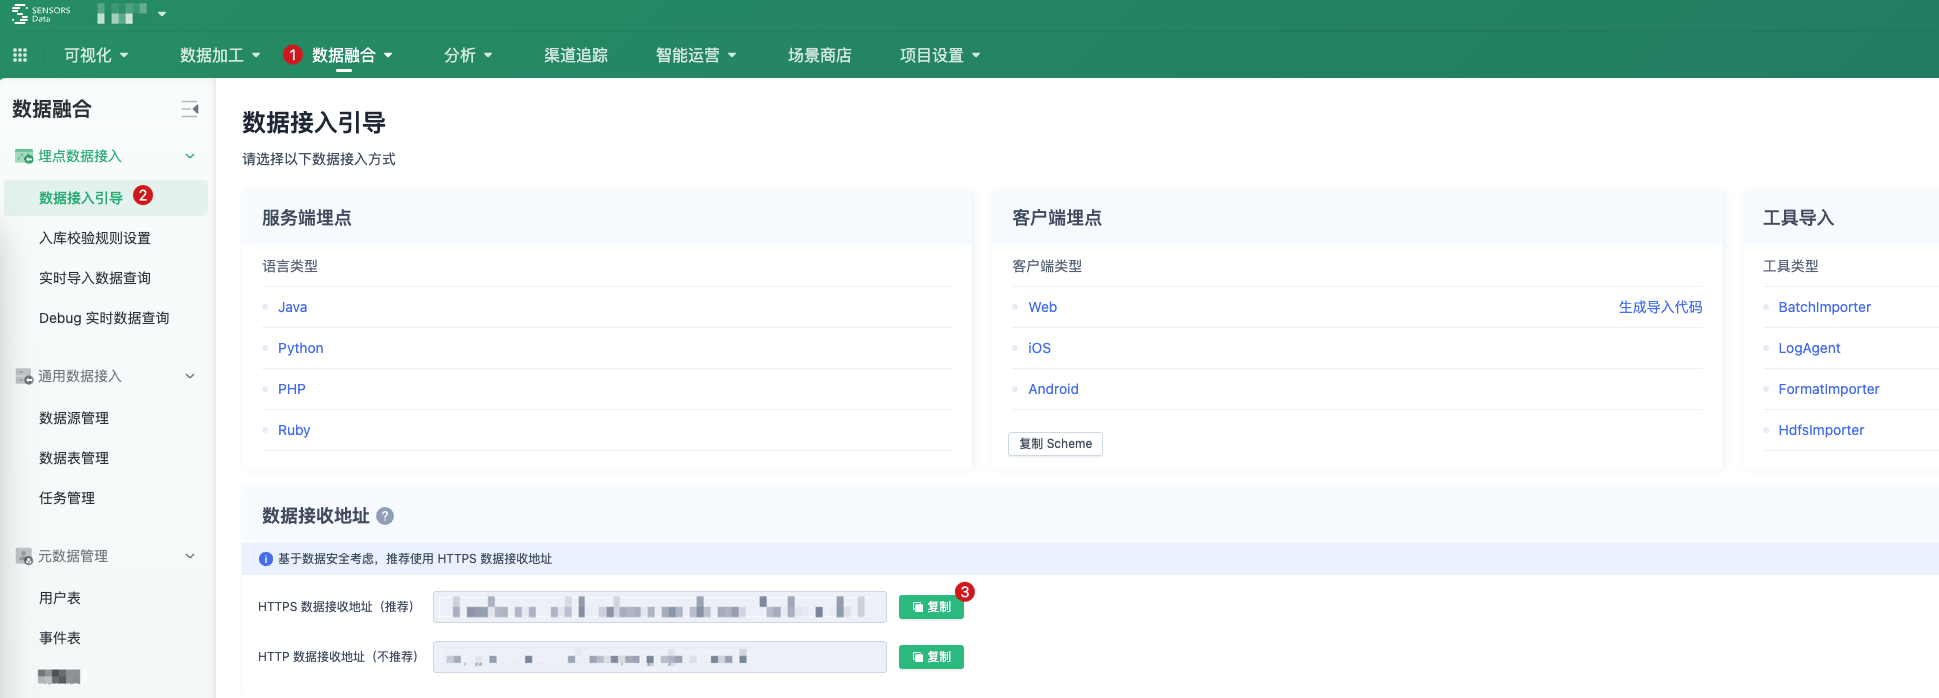
2.1.1. Get configuration information
Obtain the data receiving URL as shown in the figure below:
2.2. Initialize the SDK in the program
In the initialization code of the program, create an instance of Sensors Analytics SDK:
Note: BatchConsumer is used for synchronous data sending and should only be used for testing. Do not use this Consumer in any production service. It is recommended to use FileConsumer in production.
<?php require_once("SensorsAnalytics.php"); # 从神策分析配置页面中获取的数据接收的 URL $SA_SERVER_URL = 'YOUR_SERVER_URL'; # 初始化一个 Consumer,用于数据发送 # BatchConsumer 是同步发送数据,因此不要在任何线上的服务中使用此 Consumer $consumer = new BatchConsumer($SA_SERVER_URL); # 使用 Consumer 来构造 SensorsAnalytics 对象 $sa = new SensorsAnalytics($consumer); # 支持在构造SensorsAnalytics对象时指定project, 后续所有通过这个SensorsAnalytics对象发送的数据都将发往这个project # $sa = new SensorsAnalytics($consumer, "project_name"); # 以下是触发一个事件测试数据发送 $distinct_id = 'ABCDEF123456789'; $sa->track($distinct_id, true, 'UserLogin'); $sa->flush(); ?>Where YOUR_SERVER_URL is the data receiving URL obtained from Sensors Analytics. The user program should hold this instance until the program ends. Before exiting the program, use the `close()` method to explicitly close it to avoid possible loss of cached data.
Now we can use Sensors Analytics SDK normally. To learn more about the usage of the SDK, you can refer to the section "Setting up Sensors Analytics SDK" at the end of this article.
3. Usage of Different Consumers
PHP SDK consists of the following two components:
SensorsAnalytics: Interface object for sending data, the constructor requires an instance of Consumer. Consumer: Performs the actual data sending.
For the sake of enabling developers to access data more flexibly, the Sensors Analytics SDK implements the following Consumers:
FileConsumer: Writes the data to be sent to a specified local file, which can be imported using LogAgent or BatchImporter later.
<?php require_once("SensorsAnalytics.php"); # 初始化一个 Consumer,用于数据发送 $consumer = new FileConsumer("sa.log." . date('Y-m-d')); # 使用 Consumer 来构造 SensorsAnalytics 对象 $sa = new SensorsAnalytics($consumer); ?>BatchConsumer: It is usually used for importing small-scale historical data or offline/side-loaded data. As data is sent directly over the network, if there is a network exception, data may be resent or lost. Therefore, do not use it in any online service. Uses CURL to send data in bulk, only when the data reaches a specified amount.
<?php require_once("SensorsAnalytics.php"); # 从神策分析配置页面中获取的数据接收的 URL $SA_SERVER_URL = 'YOUR_SERVER_URL'; # 可选参数,当缓存的数据量达到参数值时,批量发送数据 $SA_BULK_SIZE = 100; # 可选参数,发送数据的超时时间,单位毫秒 $SA_REQUEST_TIMEOUT = 100000; # 可选参数,发送数据请求是否返回详情 $RESPONSE_INFO = false; # 可选参数,发送数据请求的返回状态及数据落盘文件地址,必须同时 $RESPONSE_INFO 为 ture 时,才会记录 $FILENAME = false; # 初始化一个 Consumer,用于数据发送 # BatchConsumer 是同步发送数据,因此不要在任何线上的服务中使用此 Consumer $consumer = new BatchConsumer($SA_SERVER_URL, $SA_BULK_SIZE, $SA_REQUEST_TIMEOUT, $RESPONSE_INFO, $FILENAME); # 使用 Consumer 来构造 SensorsAnalytics 对象 $sa = new SensorsAnalytics($consumer); # 程序结束前调用 flush() ,通知 Consumer 发送所有缓存数据 $sa->flush(); ?># 返回数据请求详情的返回值格式 # 数据进入缓存请求详情返回格式: $result = array( "ret_content" => "data into cache buffers", "ret_origin_data" => "", "ret_code" => 900 ); # 示例 {"ret_content":"data into cache buffers","ret_data":"","ret_code":900} # 数据发送请求详情返回格式: $result = array( "ret_content" => $ret, "ret_origin_data" => $origin_data, "ret_code" => curl_getinfo($ch, CURLINFO_HTTP_CODE) ); # 示例 {"ret_content":"","ret_origin_data":["{"type":"profile_unset","properties":{"City":true,"$is_login_id":true},"time":1595659757260,"distinct_id":"1234","lib":{"$lib":"php","$lib_version":"1.10.7","$lib_method":"code","$lib_detail":"####\/Users\/kakusei\/phpdemo\/test.php##32"}}"],"ret_code":200}DebugConsumer: Used to verify the correctness of data import. For more information about Debug mode, please go to the relevant page to view it.
Please note: Debug mode is a mode set for the convenience of developer debugging. This mode verifies data line by line and throws an exception when verification fails, causing a much lower performance compared to normal mode. Using debug mode in a production environment will significantly affect performance and carry the risk of crashes. Please be sure to replace/close debug mode before the product goes live.
<?php require_once("SensorsAnalytics.php"); # 从神策分析配置页面中获取的数据接收的 URL $SA_SERVER_URL = 'YOUR_SERVER_URL'; # 可选参数,Debug 模式下,是否将数据导入神策分析 # True - 校验数据,并将数据导入到神策分析中 # False - 校验数据,但不进行数据导入 $SA_DEBUG_WRITE_DATA = True; # 可选参数,发送数据的超时时间,单位毫秒 $SA_REQUEST_TIMEOUT = 100000; # 初始化一个 Consumer,用于数据发送 $consumer = new DebugConsumer($SA_SERVER_URL, $SA_DEBUG_WRITE_DATA, $SA_REQUEST_TIMEOUT); # 使用 Consumer 来构造 SensorsAnalytics 对象 $sa = new SensorsAnalytics($consumer); ?>Note: The content of this document is a technical document that provides details on how to use the Sensors product and does not include sales terms; the specific content of enterprise procurement products and technical services shall be subject to the commercial procurement contract.
 Popular Searches