Introduction to Basic API (iOS)
|
Collect
1. User Association
User association is used to uniquely identify users and improve the accuracy of user behavior analysis. Currently, Sensors Analytics provides simple user association and global user association for different business scenarios.
2. User Attribute Settings
- For the difference between event properties and user properties, please refer to Data Model
- Naming constraints for user properties, please refer to Data Format
2.1. Setting User Properties
- set: or - set:to: interface can be used to set user properties. When the same key is set multiple times, the value will be overwritten:
[[SensorsAnalyticsSDK sharedInstance] set:@"Adsource" to:@"userSource"];SensorsAnalyticsSDK.sharedInstance()?.set(["AdSource" : "userSource"])2.2. Preserve Initial Properties
For properties that need to be valid only when first set, such as the initial recharge amount of a user or the initial nickname set, you can use the - setOnce: or - setOnce:to: interface to record them. Unlike the - set: method, if the user property being set already exists, this record will be ignored and the existing data will not be overwritten. If the property does not exist, it will be automatically created:
// 设定用户 AdSource 渠道为为 "App Store" [[SensorsAnalyticsSDK sharedInstance] setOnce:@"AdSource" to:@"App Store"]; // 再次设定用户 AdSource 渠道,设定无效,AdSource 属性值仍然是 "App Store" [[SensorsAnalyticsSDK sharedInstance] setOnce:@"AdSource" to:@"Email"];// 设定用户 AdSource 渠道为为 "App Store" SensorsAnalyticsSDK.sharedInstance()?.setOnce(["AdSource" : "App Store"]) // 再次设定用户 AdSource 渠道,设定无效,AdSource 属性值仍然是 "App Store" SensorsAnalyticsSDK.sharedInstance()?.setOnce(["AdSource" : "Email"])2.3. Numerical Property Accumulation
针对一些数值型属性,如消费总额、用户积分等属性,我们可以使用 - increment: 或 - increment:by: 对原值进行累加,神策会自动计算并保存累加之后的值:
// 将用户游戏次数属性增加一次 // increment:by: 对一个属性进行累加 [[SensorsAnalyticsSDK sharedInstance] increment:@"GamePlayed" by:[NSNumber numberWithInt:1]]; // 增加用户付费次数和积分 // increment: 对一个或多个属性进行累加 [[SensorsAnalyticsSDK sharedInstance] increment:@{@"UserPaid" : [NSNumber numberWithInt:1], @"PointEarned" : [NSNumber numberWithFloat:12.5]}];// 将用户游戏次数属性增加一次 //increment:by: 对一个属性进行累加 SensorsAnalyticsSDK.sharedInstance()?.increment("GamePlayed", by: NSNumber.init(value: 1)) // 增加用户付费次数和积分 //increment: 对一个或多个属性进行累加 SensorsAnalyticsSDK.sharedInstance()?.increment(["UserPaid": NSNumber.init(value: 1), ])2.4. List Attribute Append
For list-type user attributes, such as users' favorite movies or restaurants they have reviewed, you can use the - append:by: interface to append new values:
// 设定用户观影列表属性,设定后属性 "Movies" 为: [@"Sicario", @"Love Letter"] [[SensorsAnalyticsSDK sharedInstance] append:@"Movies" by:[NSSet setWithArray:@[@"Sicario", @"Love Letter"]]];// 设定用户观影列表属性,设定后属性 "Movies" 为: ["Sicario", "Love Letter"] SensorsAnalyticsSDK.sharedInstance()?.append("Movies", by: ["Sicario","Love Letter"] as (NSFastEnumeration & NSObjectProtocol))The elements in the list-type attribute must be of type NSString. For restrictions on list-type attributes, please see Data Format.
2.5. Attribute Cancellation
If you need to cancel a user attribute that has been set, you can use the - unset: method to cancel it:
// 取消设置 gender 属性 [[SensorsAnalyticsSDK sharedInstance] unset:@"Gender"];// 取消设置 gender 属性 SensorsAnalyticsSDK.sharedInstance()?.unset("age")3. Event Tracking
3.1. Code-Buried Tracked Events
After initializing the SDK, you can track user behavior events and add custom properties to events through the - track: and - track: withProperties: methods:
UInt64 productId = 123456; NSString *productCatalog = @"Laptop Computer"; BOOL isAddedToFavorites = NO; [[SensorsAnalyticsSDK sharedInstance] track:@"BuyProduct" withProperties:@{@"ProductID" : [NSNumber numberWithUnsignedLong:productId], @"ProductCatalog" : productCatalog, @"IsAddedToFav" : @(isAddedToFavorites)}];SensorsAnalyticsSDK.sharedInstance()?.track("<#事件名#>", withProperties: ["<#属性名#>" : "<#属性值#>"])For the format specifications of event names and event properties, please refer to Data Format.
3.2. Event Duration Tracking
The version 1.10.6+ of the SDK supports code-buried event duration tracking. You just need to call the - trackTimerStart: method when the behavior starts, and call the - trackTimerEnd: withProperties: interface when the behavior ends. The SDK will automatically calculate the duration and store it in the $event_duration property of the event in seconds (floating point number):
// 开始播放视频时 [[SensorsAnalyticsSDK sharedInstance] trackTimerStart:@"WatchVideo"]; // 暂停播放时 [[SensorsAnalyticsSDK sharedInstance] trackTimerPause:@"WatchVideo"]; // 恢复播放时 [[SensorsAnalyticsSDK sharedInstance] trackTimerResume:@"WatchVideo"]; // 停止或者结束播放时 [[SensorsAnalyticsSDK sharedInstance] trackTimerEnd:@"WatchVideo" withProperties:@{@"VideoType": @"film"}];SensorsAnalyticsSDK.sharedInstance()?.trackTimerStart("WatchVideo") SensorsAnalyticsSDK.sharedInstance()?.trackTimerPause("WatchVideo") SensorsAnalyticsSDK.sharedInstance()?.trackTimerResume("WatchVideo") SensorsAnalyticsSDK.sharedInstance()?.trackTimerEnd("WatchVideo", withProperties: ["VideoType" : "film"])3.2.1. Duration Statistics for Cross Events with the Same Name
By default, the duration statistics are based on the event name. Events with the same name will be automatically matched start-end. If two events with the same name have overlapping time periods, it will cause incorrect matching. To solve this problem, SDK version 1.11.17+ supports duration statistics for events with the same name and overlapping time periods. Developers need to save the return value of - trackTimerStart: for subsequent pause, resume, or stop operations:
// 开始第一个事件计时 NSString *timer1 = [[SensorsAnalyticsSDK sharedInstance] trackTimerStart:@"testTimer"]; // 开始第二个事件计时 NSString *timer2 = [[SensorsAnalyticsSDK sharedInstance] trackTimerStart:@"testTimer"]; //如果需要暂停第一个事件计时 [[SensorsAnalyticsSDK sharedInstance] trackTimerPause:timer1]; //如果需要恢复第一个事件计时 [[SensorsAnalyticsSDK sharedInstance] trackTimerResume:timer1]; // 结束第一个事件计时 [[SensorsAnalyticsSDK sharedInstance] trackTimerEnd:timer1]; // 结束第二个事件计时 [[SensorsAnalyticsSDK sharedInstance] trackTimerEnd:timer2];// 开始第一个事件计时 eventTime1 = SensorsAnalyticsSDK.sharedInstance()?.trackTimerStart("testTimer") // 开始第二个事件计时 eventTime2 = SensorsAnalyticsSDK.sharedInstance()?.trackTimerStart("testTimer") //如果需要暂停第一个事件计时 SensorsAnalyticsSDK.sharedInstance()?.trackTimerPause(eventTime1) //如果需要恢复第一个事件计时 SensorsAnalyticsSDK.sharedInstance()?.trackTimerResume(eventTime1) // 结束第一个事件计时 SensorsAnalyticsSDK.sharedInstance()?.trackTimerEnd("eventTime1") // 结束第二个事件计时 SensorsAnalyticsSDK.sharedInstance()?.trackTimerEnd("eventTime2")- The SDK only records the event when the - trackTimerEnd: method is called.
- When - trackTimerStart: is called multiple times, the last call will be used as the starting point for timing.
- By default, the duration statistics do not include the time when the user's app is in the background.
3.3. Collect page view duration
Version Requirement
- iOS SDK version v3.1.5 and above
The SDK supports automatically collecting page leave events ($AppPageLeave) to measure the duration of page views. Before initializing the SDK, enable page leave event tracking by setting the enableTrackPageLeave property in the SAConfigOptions instance:
// 开启页面离开事件采集 options.enableTrackPageLeave = YES;// 开启页面浏览时长事件采集 options.enableTrackPageLeave = true;Enabling page view duration collection will capture the $AppPageLeave event and record the duration of page views in this event.
3.4. Item Metadata Reporting
In the Sensors Analytics recommendation project, the client needs to report item metadata in order to develop and maintain subsequent recommendation business. The iOS SDK provides methods to set and delete item metadata.
The item_id (item ID) and item_type (item type) together form a unique identifier for an item. All item-related methods must specify both the item ID and item type to complete operations on the item.
3.4.1. Set Item Properties
Set an item directly, and if it already exists, it will be overwritten. In addition to the item ID and item type, other item properties need to be defined in the properties parameter. The constraints on property names and values in item properties are the same as for event properties. For more details, please refer to the data format.
// 设置物品类型为 food 且物品 ID 为 2 的物品设置物品属性 @"name": @"玉米", @"flavour": @"甜" [[SensorsAnalyticsSDK sharedInstance] itemSetWithType:@"food" itemId:@"2" properties:@{@"name": @"玉米", @"flavour": @"甜"}];// 设置物品类型为 food 且物品 ID 为 2 的物品设置物品属性 @"name": @"玉米", @"flavour": @"甜" SensorsAnalyticsSDK.sharedInstance()?.itemSetWithType:("food", itemId:"2", properties:["name": "玉米", "flavour": "甜"])3.4.2. Delete item attribute
If the item needs to be offline when it cannot be recommended, delete the item. If it does not exist, ignore it. Except for item ID and item type, other item attributes are not parsed.
// 删除物品类型为 food 且物品 ID 为 2 的物品 [[SensorsAnalyticsSDK sharedInstance] itemDeleteWithType:@"food" itemId:@"2"];// 删除物品类型为 food 且物品 ID 为 2 的物品 SensorsAnalyticsSDK.sharedInstance()?.itemDeleteWithType("food", itemId:"2")4. Event property
When tracking events, you can define properties for the events based on your needs. The current SDK provides public properties for adding properties to each event. Public properties are divided into static public properties and dynamic public properties. Static public properties are used to set properties with low update frequency, while dynamic public properties are used to set properties with high update frequency. When the same property key appears in the same event, the SDK's priority for overwriting is: preset properties < static public properties < dynamic public properties < custom properties.
4.1. Get preset properties
The front-end SDK will add device-related preset properties when recording events. In order to ensure the consistency of event properties on the front and back ends, you may need to obtain SDK preset properties on the front-end in some cases.1.8.19+ version SDK can use - getPresetProperties method obtain the preset event attributes and send them to the server through the service interface. Then the server adds them to the event attributes:
// 获取事件预置属性 [[SensorsAnalyticsSDK sharedInstance] getPresetProperties];// 获取事件预置属性 SensorsAnalyticsSDK.sharedInstance()?.getPresetProperties()4.2. Set event static public properties
For properties that need to be added to all events, after initializing the SDK, you can use the - registerSuperProperties: method to register the properties as public properties:
// 将 AppName 注册为公共属性 [[SensorsAnalyticsSDK sharedInstance] registerSuperProperties:@{@"AppName" : @"<#YOUR APP NAME#>"}];// 将 AppName 注册为公共属性 SensorsAnalyticsSDK.sharedInstance()?.registerSuperProperties(["AppName" : "<#YOUR APP NAME#>"])- The public properties are saved in the local cache of the app. You can use the - unregisterSuperProperty: method to remove the specified public property, and use the - clearSuperProperties: method to remove all event public properties that have been set
You can use the -currentSuperProperties to get the set public properties.
4.3. Event dynamic public properties
The difference between dynamic public properties and public properties is: the former is suitable for marking age, while the latter is suitable for marking gender.
For some public attributes whose values change, such as the current game level, the latest gold balance, etc.,1.10.8+ version SDK provides- registerDynamicSuperProperties: interface to set dynamic public properties:
[[SensorsAnalyticsSDK sharedInstance] registerDynamicSuperProperties:^NSDictionary<NSString *,id> * _Nonnull{ return @{@"level": <#当前游戏等级#>, @"balance": <#最新金币余额#>}; }];SensorsAnalyticsSDK.sharedInstance()?.registerDynamicSuperProperties({ () -> [String : Any] in return ["level": <#当前游戏等级#>, "balance", <#最新金币余额#>] })- Priority of event properties: properties passed in when tracking events > dynamic common properties > common properties > preset properties
- Constraints for dynamic common properties are the same as event properties. For details, refer to Data Format
5. Data Storage and Send
To reduce performance and power consumption, the events triggered by the Android SDK and iOS SDK are not reported immediately, but are first cached locally and then sent in batches at regular intervals.
5.1. Reporting Conditions
The iOS SDK checks the following conditions every time an event is triggered to determine whether to upload data to the server:
1. Whether the current network meets the flushNetworkPolicy (default: 3G, 4G, 5G, WiFi)
2. Whether the time interval since the last sending is greater than flushInterval (default: 15 seconds)
3. Whether the number of event entries cached locally is greater than flushBulkSize (default: 100 entries)
The SDK will only send data if conditions 1 and 2 or conditions 1 and 3 are met. The above parameters can be customized. You can modify the parameter values to control the frequency of event reporting:
SAConfigOptions *options = [[SAConfigOptions alloc] initWithServerURL:@"<#数据接收地址#>" launchOptions:launchOptions]; // 设置触发间隔,默认 15 * 1000 毫秒 options.flushInterval = 10 * 1000; // 设置触发条数,默认 100 条 options.flushBulkSize = 50; [SensorsAnalyticsSDK startWithConfigOptions:options]; // 设置上报网络策略,默认 3G、4G、5G、WiFi,注意需要初始化 SDK 之后设置 [[SensorsAnalyticsSDK sharedInstance] setFlushNetworkPolicy:SensorsAnalyticsNetworkTypeALL];let options = SAConfigOptions.init(serverURL: "<#数据接收地址#>", launchOptions: launchOptions) // 设置触发间隔,默认 15 * 1000 毫秒 options.flushInterval = 10 * 1000 // 设置触发条数,默认 100 条 options.flushBulkSize = 50 SensorsAnalyticsSDK.start(configOptions: options) //设置上报网络策略,默认 3G、4G、5G、WiFi,注意需要初始化 SDK 之后设置 SensorsAnalyticsSDK.sharedInstance()?.setFlushNetworkPolicy(SensorsAnalyticsNetworkType.typeALL)5.2. Force Reporting
If a specific event needs to be reported immediately, you can call the - flush interface to force reporting after the event is triggered:
// 立即上报 [[SensorsAnalyticsSDK sharedInstance] flush];// 立即上报 SensorsAnalyticsSDK.sharedInstance()?.flush()5.3. Cache Limit
If the reporting conditions are not met after an event is triggered, the number of cached data locally will continue to increase. When the number of cached events reaches maxCacheSize, the SDK will discard old data and retain only the latest data when a new event is triggered.maxCacheSize is set to 10000 entries by default and can be customized by customers:
// 设置最大缓存量,默认 10000 条 options.maxCacheSize = 20000;// 设置最大缓存量,默认 10000 条 options.maxCacheSize = 200005.4. Clear Local Cached Events
In order to comply with GDPR requirements,1.10.8+ version SDK add - deleteAll method to clear all events in the local cache:
[[SensorsAnalyticsSDK sharedInstance] deleteAll];SensorsAnalyticsSDK.sharedInstance()?.deleteAll()5.5. Local certificate verification
2.2.2+ Version SDK supports local certificate verification when sending data. Perform the following steps to configure the SDK:
- The server generates an SSL certificate if not .cer format, need use OpenSSL to format conversion:
openssl x509 -in 你的证书.crt -out 你的证书.cer -outform der- Drag the certificate into the project, select the appropriate Target and select Copy items if needed.
- Configure the Sensors SDK certificate verification mode:
/* 设置证书校验方式,默认为 SASSLPinningModeNone */ SASecurityPolicy *securityPolicy = [SASecurityPolicy policyWithPinningMode:SASSLPinningModePublicKey]; /* 是否允许无效证书(自建证书),默认为 NO , 如果是需要验证自建证书,需要设置为 YES 。 */ securityPolicy.allowInvalidCertificates = YES; /* 是否需要验证域名,默认为 YES , 如证书的域名与请求的域名不一致,需把该项设置为 NO 。 */ securityPolicy.validatesDomainName = NO; /* 配置本地证书路径 */ securityPolicy.pinnedCertificates = [SASecurityPolicy certificatesInBundle:[NSBundle mainBundle]]; // SDK 初始化配置 SAConfigOptions *options = [[SAConfigOptions alloc] initWithServerURL:<#数据接收地址#> launchOptions:launchOptions]; ... /* 设置证书策略 */ options.securityPolicy = securityPolicy; // 初始化 SDK [SensorsAnalyticsSDK startWithConfigOptions:options];/* 设置证书校验方式,默认为 SASSLPinningModeNone,客户端无条件信任服务端返回证书,不做 App 本地证书校验 */ let securityPolity = SASecurityPolicy.init(pinningMode: .publicKey) /** 是否允许无效证书(自建证书),默认为 NO , 如果是需要验证自建证书,需要设置为 YES 。 */ securityPolity.allowInvalidCertificates = true /** 是否需要验证域名,默认为 YES , 如证书的域名与请求的域名不一致,需把该项设置为 NO 。 */ securityPolity.validatesDomainName = false /* 配置本地证书路径 */ securityPolity.pinnedCertificates = SASecurityPolicy.certificates(in: Bundle.main) /* 设置证书策略 */ SensorsAnalyticsSDK.sharedInstance()?.securityPolicy = securityPolity // SDK 初始化配置 let options = SAConfigOptions.init(serverURL: <#数据接收地址#>, launchOptions: launchOptions) ... /* 设置证书策略 */ options.securityPolicy = securityPolicy //初始化SDK SensorsAnalyticsSDK.start(configOptions: options)
SSLPinningMode has the following three modes:
· SASSLPinningModeNone:默认模式,客户端无条件信任服务端返回证书,不做 App 本地证书校验 · SASSLPinningModePublicKey:只验证证书中公钥,不验证证书的有效期等信息 · SASSLPinningModeCertificate:校验本地证书的所有信息
SASSLPinningModeCertificate mode will check the validity of the certificate and other information, if you can't ensure that users remain the state of unexpired certificate of App, it is recommended to use SASSLPinningModePublicKey mode.
6. SDK encryption
6.1. Encryption function of buried data
In order to enhance the security of buried data, Shenze Analysis supports the encryption of buried data, and stores and sends the data in ciphertext.
Note
This function requires the cooperation of the server, you can contact the customer success/project manager to help open the server decryption function. The default key is RSA. You can specify an EC key.
6.1.1. Enable encryption on the SDK
For 2.1.0+ version SDK, before initializing SAConfigOptions instance enableEncrypt Set the property to YES to enable the encryption function of the SDK:
// 开启 SDK 加密功能 options.enableEncrypt = YES;// 开启 SDK 加密功能 options.enableEncrypt = trueFor 2.3.1+ version SDK supports the EC encryption algorithm. You can switch to EC encryption by integrating EC encryption library on the basis of enabling encryption with enableEncrypt:
pod 'SensorsAnalyticsEncrypt'SensorsAnalyticsEncrypt Encapsulated to support iOS systemv8.3 version of the EC algorithm library.
6.1.2. Authentication of encryption keys
Before using this function, ensure that the Scheme of the current project is configured in your App. For details, seeConfigure Scheme
In the Sensors Analytics platform, enter the key management function, enter the path: "More" → "Basic Settings" → "Data Access" → "Key Management"

Click "Key Management" button to enter the key management page
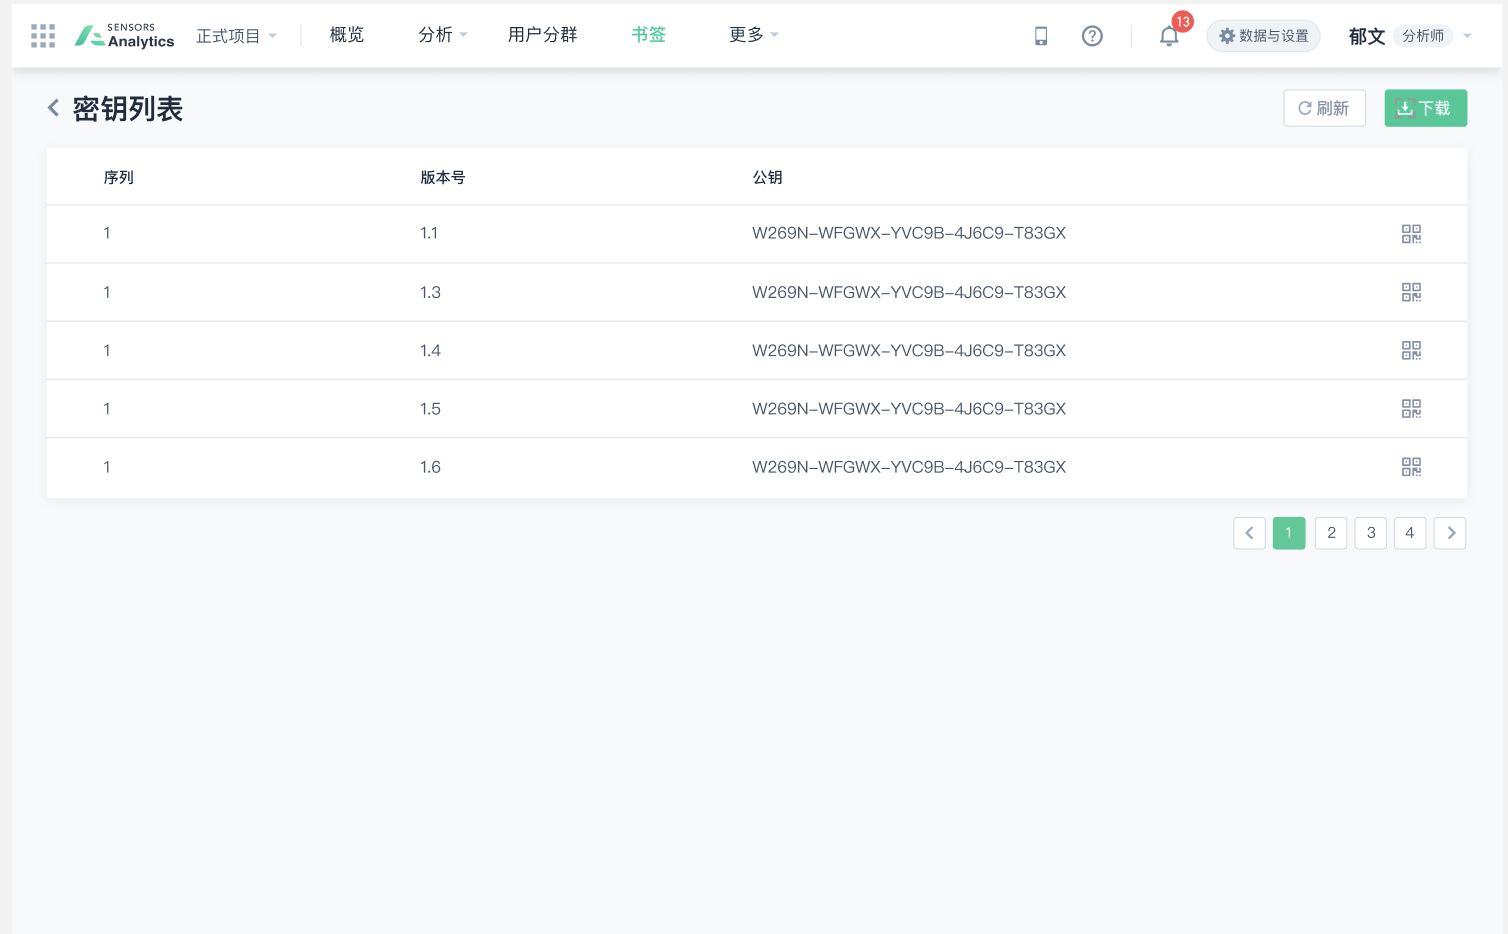
Click the corresponding keyScan the QR code with the browser to open the App for key verification.
- If the verification is consistent, the App prompts "Key verification passed, the selected key is the same as the App key".
- If the authentication is inconsistent, the App displays the message "The key authentication fails because the selected key is different from the App key." Selected key version :v1, App key version :v2"
- If the local key is empty, the App displays the message "Key authentication failed, App key is empty."
- If the scan key is empty, the App prompts "Key verification fails, the selected key is invalid".

6.2. Cache data encryption
version requirements
iOS SDK v4.2.0 version and above
The SDK supports the encryption of cache contents, such as public attributes and loginids, which need to be manually enabled.
6.2.1. Manual encryption mode
SDK has built-in AES encryption, AES 128 offset 16 bits, use the following code to enable encryption:
SAConfigOptions *options = [[SAConfigOptions alloc] initWithServerURL:<#数据接收地址#> launchOptions:launchOptions]; //注册加密插件 SAAESStorePlugin *plugin = [[SAAESStorePlugin alloc] init]; [options registerStorePlugin:plugin]; [SensorsAnalyticsSDK startWithConfigOptions:options];let options = SAConfigOptions.init(serverURL: <#数据接收地址#>, launchOptions: launchOptions) //注册加密插件 let plugin = SAAESStorePlugin() options.register(plugin) SensorsAnalyticsSDK.start(configOptions: options)If there are requirements for encryption, the default encryption provided by Sensors Analytics may not meet the requirements. You can implement custom encryption. For custom encryption methods, you can consult with the SDK team.
Once compliant encryption or custom encryption is implemented, the encrypted data cannot be restored to unencrypted data.
7. Full tracking
Full tracking refers to four types of events: $AppStart (App startup), $AppEnd (App exit), $AppViewScreen (Page browsing), and $AppClick (Control click).
7.1. Enable full tracking
Before SDK initialization, configure the SAConfigOptions instance, and the autoTrackEventType property can be used to configure the types of full tracking to be enabled:
// 可根据需求进行组合 options.autoTrackEventType = SensorsAnalyticsEventTypeAppStart | SensorsAnalyticsEventTypeAppEnd | SensorsAnalyticsEventTypeAppClick | SensorsAnalyticsEventTypeAppViewScreen;// 可根据需求进行组合 options.autoTrackEventType = [.eventTypeAppStart, .eventTypeAppEnd, .eventTypeAppClick, .eventTypeAppViewScreen]7.2. Description of the App Passive Startup ($AppStartPassively) event
For iOS devices, in addition to the user actively launching the app, under certain conditions in the device (such as receiving notifications, changes in user location, etc.), the system may wake up the app and make it run in the background. When the program starts and runs in the background, the SDK triggers the $AppStartPassively (App Passive Startup) event.
For more information about background startup and running on iOS devices, please refer to the Apple documentation: About the Background Execution Sequence.
7.3. Enable automatic collection of child page browsing events
Before initializing the SDK, enable automatic collection of child page browsing events by setting the enableAutoTrackChildViewScreen property of the SAConfigOptions instance:
// 开启自动采集子页面的浏览事件 options.enableAutoTrackChildViewScreen = YES;// 开启自动采集子页面的浏览事件 options.enableAutoTrackChildViewScreen = true;7.4. Ignored and supplemented events
For App page browsing and App element clicking in full tracking, after enabling full tracking, the SDK supports configuring the collection of certain pages or controls to be ignored.
7.4.1. Ignore browsing events of certain pages
// 该方法支持多次调用,对合集进行忽略 [[SensorsAnalyticsSDK sharedInstance] ignoreAutoTrackViewControllers:@[@"MyViewController", @"BaseViewController"]]; //SDK 自 4.5.10 版本提供了如下接口来忽略某个页面的浏览事件 [[SensorsAnalyticsSDK sharedInstance] ignoreAppViewScreenOnViewControllers:@[MyViewController.class]];// 该方法支持多次调用,对合集进行忽略 SensorsAnalyticsSDK.sharedInstance()?.ignoreAutoTrackViewControllers(["项目名.控制器类名"]) //SDK 自 4.5.10 版本提供了如下接口来忽略某个页面的浏览事件, SensorsAnalyticsSDK.sharedInstance()?.ignoreAppViewScreen(onViewControllers: [MyViewController.self])7.4.2. Ignore click events on certain pages
//SDK 自 4.5.10 版本提供了如下接口来忽略某些页面点击事件 [[SensorsAnalyticsSDK sharedInstance] ignoreAppClickOnViewControllers:@[MyViewController.class]];//SDK 自 4.5.10 版本提供了如下接口来忽略某些页面点击事件 SensorsAnalyticsSDK.sharedInstance()?.ignoreAppClick(onViewControllers: [MyViewController.self])7.4.3. Ignore click and browse events on a specific page
// 该方法支持多次调用,对合集进行忽略 [[SensorsAnalyticsSDK sharedInstance] ignoreAutoTrackViewControllers:@[@"MyViewController", @"BaseViewController"]]; //SDK 自 4.5.10 版本提供了如下接口来忽略某些页面的点击和浏览事件 [[SensorsAnalyticsSDK sharedInstance] ignoreAppClickAndViewScreenOnViewControllers:@[MyViewController.class]];// 该方法支持多次调用,对合集进行忽略 SensorsAnalyticsSDK.sharedInstance()?.ignoreAutoTrackViewControllers(["项目名.控制器类名"]) //SDK 自 4.5.10 版本提供了如下接口来忽略某些页面的点击和浏览事件 SensorsAnalyticsSDK.sharedInstance()?.ignoreAppClickAndViewScreen(onViewControllers: [MyViewController.self])7.4.4. Ignore click events on a specific control
button.sensorsAnalyticsIgnoreView = YES;button.sensorsAnalyticsIgnoreView = true7.4.5. Ignore click events on a specific type of control
// 该方法支持多次调用,对合集进行忽略 [[SensorsAnalyticsSDK sharedInstance] ignoreViewType:[MyButton class]]; [[SensorsAnalyticsSDK sharedInstance] ignoreViewType:[MyView class]]; //SDK 自 4.5.10 版本提供了如下接口来忽略某类控件的点击事件 [[SensorsAnalyticsSDK sharedInstance] ignoreAppClickOnViews:@[MyView.class]];// 该方法支持多次调用,对合集进行忽略 SensorsAnalyticsSDK.sharedInstance()?.ignoreViewType(MyButton.classForCoder()) SensorsAnalyticsSDK.sharedInstance()?.ignoreViewType(MyView.classForCoder()) //SDK 自 4.5.10 版本提供了如下接口来忽略某类控件的点击事件 SensorsAnalyticsSDK.sharedInstance()?.ignoreAppClick(onViews: [MyView.self])If full tracking is not enabled, but you want to collect browsing events on certain pages or click events on certain controls, the SDK provides corresponding interfaces to trigger app page browsing and app element click events through code.
7.5. Manually trigger browsing events on a page
// 可在 viewDidAppear: 中调用代码进行触发 [[SensorsAnalyticsSDK sharedInstance] trackViewScreen:self.childViewControllers[0]];// 可在 viewDidAppear: 中调用代码进行触发 SensorsAnalyticsSDK.sharedInstance()?.trackViewScreen(SecondController())7.6. Manually trigger click events on a control
[[SensorsAnalyticsSDK sharedInstance] trackViewAppClick:button];SensorsAnalyticsSDK.sharedInstance()?.trackViewAppClick(button)7.7. Supplement to Full-Embedding Event Properties
If you encounter the following issues when using full-embedding for App page browsing and App element clicks:
· Need to add custom information to controls or pages · Some predefined properties are not collected, such as the $element_content property for image buttons and the $title property for pages · The collected predefined properties do not meet business requirements
Then you need to manually set the properties collected by the full-link tracking in your code. The SDK will use the values set in the code to supplement or overwrite the properties collected by the full-link tracking.
7.7.1. Set custom information for the page
Implement the - getTrackProperties protocol method to set custom properties for the page:
// 1. UIViewController 遵循 SAAutoTracker 协议 // 2.- getTrackProperties 协议方法中返回自定义的页面信息 - (NSDictionary *)getTrackProperties { return @{@"$title": @"首页", @"test": @"这是一个示例"}; }// 1. UIViewController 遵循 SAAutoTracker 协议 // 2.- getTrackProperties 协议方法中返回自定义的页面信息 func getTrackProperties() -> [AnyHashable : Any] { return ["$title" : "首页", "test" : "这是一个示例"] }7.7.2. Set source ($referrer) information for the page
If you need to add the source information of the current page in the App browsing page event, you can implement the - getScreenUrl: method to return a custom page identifier:
// 1. UIViewController 遵循 SAScreenAutoTracker 协议 // 2.- getScreenUrl 协议方法中返回自定义的页面标识 - (NSString *)getScreenUrl { return @"sa://page/product_detail"; }// 1. UIViewController 遵循 SAScreenAutoTracker 协议 // 2.- getScreenUrl 协议方法中返回自定义的页面标识 func getScreenUrl() -> String { return "sa://page/product_detail" }7.7.3. Set custom properties for controls
Controls that inherit from UIView can set custom information using sensorsAnalyticsViewProperties:
homeBtn.sensorsAnalyticsViewProperties = @{@"$element_content": @"首页"};homeBtn.sensorsAnalyticsViewProperties = ["$element_content" : "首页"]7.7.4. Set custom properties for cells
Since cells have a reuse mechanism, you cannot directly set the sensorsAnalyticsViewProperties property. You need to set it using the following method:
//遵循 SAUIViewAutoTrackDelegate 协议 // 1. 给 tableView 或 collection 设置 sensorsAnalyticsDelegate self.tableView.sensorsAnalyticsDelegate = self; // 2. sensorsAnalyticsDelegate 中实现相应方法并返回自定义属性 -(NSDictionary *) sensorsAnalytics_tableView:(UITableView *)tableView autoTrackPropertiesAtIndexPath:(NSIndexPath *)indexPath { return @{@"customProperty":@"MyValue"}; }//遵循 SAUIViewAutoTrackDelegate 协议 // 1. 给 tableView 或 collection 设置 sensorsAnalyticsDelegate self.tableView.sensorsAnalyticsDelegate = self; // 2. sensorsAnalyticsDelegate 中实现相应方法并返回自定义属性 func sensorsAnalytics_tableView(_ tableView: UITableView, autoTrackPropertiesAt indexPath: IndexPath) -> [AnyHashable : Any] { return ["customProperty" : "MyValue"] }8. Other Features
8.1. Enable Automatic Screen Orientation Tracking
1.10.1+ SDK supports automatic screen orientation tracking starting from version 1.10.1. After initializing the SDK, you can enable it by calling - enableTrackScreenOrientation: . The screen orientation information will be recorded in the $screen_orientation property of the event:
[[SensorsAnalyticsSDK sharedInstance] enableTrackScreenOrientation:YES]; SensorsAnalyticsSDK.sharedInstance()?.enableTrackScreenOrientation(true)To enable this feature, you need to integrate the DeviceOrientation module:
- If you are integrating via Cocoapods: pod 'SensorsAnalyticsSDK', :subspecs => ['DeviceOrientation']
- If integrating with source code directly, please add the DeviceOrientation folder to your project.
8.2. Enable Automatic Location Tracking
1.10.1+ version SDK supports automatic collection of GPS information, which can be invoked after the SDK is initialized- enableTrackGPSLocation: The latitude and longitude information after being enabled will be multiplied by 10⁶ and recorded in the event $longitude、$latitude properties:
// CoreLocation 采集 GPS 信息 [[SensorsAnalyticsSDK sharedInstance] enableTrackGPSLocation:YES];SensorsAnalyticsSDK.sharedInstance()?.enableTrackGPSLocation(true)2.1.13+ 版本 SDK 默认不集成 GPS 模块。
- If using CocoaPods to integrate the SDK, modify the Podfile to add the subspec of the Location module, for example: pod 'SensorsAnalyticsSDK', :subspecs => ['Location'];
- If integrating the SDK with source code directly, please check if the file named SALocationManager is included.
2.6.4+ version add $geo_coordinate_systemproperties, the default value is WGS84.
8.3. Enable automatic collection of push click events
Version requirements
- iOS SDK v2.5.3 及以上版本
Before initializing the SDK, enable the automatic collection of push click events through the enableTrackPush property of the SAConfigOptions instance:
// 开启推送点击事件采集 options.enableTrackPush = YES;// 开启推送点击事件采集 options.enableTrackPush = true;Refer to the 'App SDK Preset Events and Properties' for the description of this preset event.
To enable this feature, integrate the AppPush module:
- If using pod integration: pod 'SensorsAnalyticsSDK', :subspecs => ['AppPush']
- If using source code integration, you need to import the AppPush folder into your project
8.4. Enable click analysis function
Version requirement
- Sensors Analytics v2.2.0.240 and above
- iOS SDK v2.3.0 and above
- This feature depends on the enablement of click event collection in the full-track approach
- Before using this feature, make sure that your App has configured the Scheme of the current project. For detailed instructions, please refer to 'configuration Scheme'
Before SDK initialization, set the enableHeatMap property of the SAConfigOptions instance to YES to enable the click analysis feature of the SDK:
// 开启点击分析功能 options.enableHeatMap = YES;// 开启点击分析功能 options.enableHeatMap = trueAfter enabling App click analysis, this feature will take effect on all clicks on the pages by default. If you only want to use the heatmap on some pages, you can configure it by using - addHeatMapViewControllers:
[[SensorsAnalyticsSDK sharedInstance] addHeatMapViewControllers:@"HomeViewController", "DiscoverViewController"];SensorsAnalyticsSDK.sharedInstance()?.addHeatMapViewControllers(["项目名.控制器文件名"])8.5. Visualized Full Link
8.5.1. Enable Visualized Full Link
Version Requirement
- Sensors Analytics v1.17.2517+
- iOS SDK v2.0.0+
Perform the following configuration during SDK initialization to enable Visualized Full-link Tracking:
// 开启可视化全埋点 options.enableVisualizedAutoTrack = YES;// 开启可视化全埋点 options.enableVisualizedAutoTrack = true8.5.2. Visualized Full-link Tracking Custom Properties
Version Requirement
iOS SDK v4.0.0 and later versions
Enable SDG in SA and SDG version is v0.10.0.134 and above
Edge version: 0.2.9882
Notes:
If you need to use Visualized Full-link Tracking Custom Properties, you need to configure enableVisualizedProperties:
// 开启可视化全埋点自定义属性配置下发 options.enableVisualizedProperties = YES;If this property is set to false, the created visualized custom properties cannot be collected.
- Before using this function, please make sure that you have completed the Scheme configuration in the iOS project
- For the use of Visualized Full-link Tracking in Sensors Analytics, please refer to Visualized Full-link Tracking
8.5.3. Enable Visualized Full-link Tracking on Some Pages
After the visualized full-link is turned on. It takes effect on all pages in the app by default. If you only need to turn on the visualized full-link for part of the pages, you can use addVisualizedAutoTrackViewControllers to add them after SDK initialization:
// 只开启 MainController 的可视化全埋点 [[SensorsAnalyticsSDK sharedInstance] addVisualizedAutoTrackViewControllers:[NSArray arrayWithObject:@"MainController"]];// 只开启某个页面的可视化全埋点 SensorsAnalyticsSDK.sharedInstance()?.addVisualizedAutoTrackViewControllers(["项目名.控制器文件名"])8.5.4. Visualized Full-link Custom Properties
Version Requirements
iOS SDK version v4.0.0 and above
The SA opens SDG and the SDG version is v0.10.0.134 or above.
Edge version number: 0.2.9882
Notes:
If you need to use visualized full-link custom properties, you need to configure enableVisualizedProperties:
// 开启可视化全埋点自定义属性配置下发 options.enableVisualizedProperties = YES;When this property is set to false, the created visualized custom properties cannot be collected.
- Please make sure that you have completed the configuration of Scheme in your iOS project before using this feature. For more information, see Configuring Scheme (iOS)
- For the use of visualized full-link in Sensors Data, see Visualized Full Link
8.6. Turn on automatic collection of crash information
The SDK version 1.8.12+ supports automatic collection of crash information. You can enable it by configuring SAConfigOptions when initializing the SDK. The crash stack information will be recorded in the app_crashed_reason attribute of the AppCrashed event:
SAConfigOptions *options = [[SAConfigOptions alloc] initWithServerURL:SA_SERVER_URL launchOptions:launchOptions]; options.enableTrackAppCrash = YES; [SensorsAnalyticsSDK startWithConfigOptions:options];let options = SAConfigOptions.init(serverURL: SA_SERVER_URL, launchOptions: launchOptions) options.enableTrackAppCrash = true SensorsAnalyticsSDK.start(configOptions: options)The function can be enabled starting from SDK version 3.0.0+. You need to integrate Exception and Core modules:
- If it is integrated using CocoaPods: pod 'SensorsAnalyticsSDK', :subspecs => ['Core', 'Exception']
- If it is integrated using source code, you only need to import the Exception folder into the project.
8.7. Instant Event Collection
The SDK provides the "instantEvents" option during initialization to set up instant events for real-time marketing scenarios.
// 初始化配置 SAConfigOptions *options = [[SAConfigOptions alloc] initWithServerURL:<#数据接收地址#> launchOptions:launchOptions]; options.instantEvents = @[@"instant_event1", @"instant_event2"]; ... [SensorsAnalyticsSDK startWithConfigOptions:options];This interface is suitable for real-time marketing scenarios and has no practical significance for other businesses calling this interface.
Note: The content of this document is a technical document that provides details on how to use the Sensors product and does not include sales terms; the specific content of enterprise procurement products and technical services shall be subject to the commercial procurement contract.
 Popular Searches