Mailing Box Management
|
Collect
The "Mailing Box Management" function is mainly used for sending emails in functions such as "Password Recovery". The specific use of the "Mailing Box Management" function module depends on the version of the installed product component. (The overview function has been integrated with the mailing box function since the implementation of Sensing Analysis 2.4.0, and other functions have not been integrated yet.)
1. Function Entrance
Old navigation entrance: System Management-More-Mailing Box Management
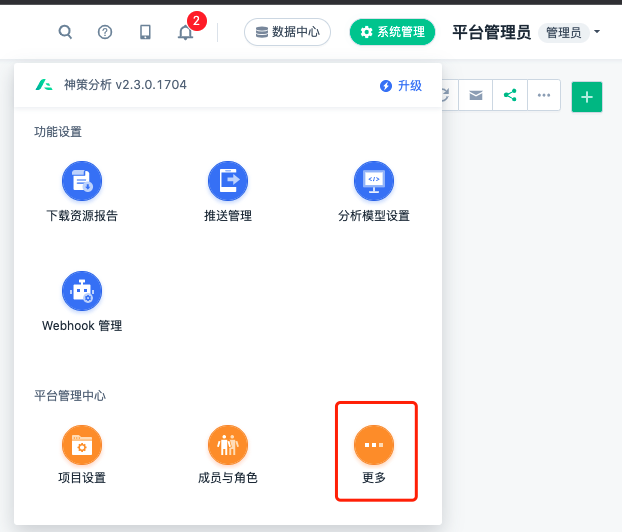

New navigation entrance: Platform Management-Mailing Box Management

(The original entrance "Project Settings-Basic Settings-Mailing Box Settings" has been hidden. If the version of Sensing Analysis is 2.4+, the mailing box configuration entrance in the overview will also be hidden.)
2. Mailing Box Type
The mailing box is divided into three types: platform mailbox, project mailbox, and personal mailbox (the personal mailbox requires Sensing Analysis version 2.4+).
Email Types | Usage Range Description | Quantity Limit | Configuration Permission Limit | View Permission Limit |
|---|---|---|---|---|
| Platform Mailbox | All users can use the platform mailbox to send emails in any project | Maximum 1 | Only platform administrators can add and edit platform mailboxes | All users can view |
| Project Email | All users can send emails using the project email of the project | Maximum of 1 per project | People with the "Manage Project Email" permission can add/edit/delete the project email for the corresponding project (If a user named Zhang San has access to 10 projects, among which 3 projects have the "Manage Project Email" permission and 7 projects do not, Zhang San can only configure the project email for these 3 projects) | Users can view the project email for the projects they have access to |
| Personal Email | Users can only send emails using their own personal email | Maximum of 1 per person | 1. Each person can add/edit/delete their own personal email 2. People with the "Manage Personal Email" permission can add/edit/delete the personal email of other users for the corresponding projects (If a user named Zhang San has access to 10 projects, among which 3 projects have the "Manage Personal Email" permission and 7 projects do not, Zhang San can only configure the personal email of other users in these 3 projects) | 1. Each person can view their own personal email 2. People with the "Manage Personal Email" permission can view the personal email of other users for the corresponding projects |
Email Priority:
1. When a user needs to send an email for a certain project, if all three types of emails are available, the personal email will be used first. If the personal email fails to send, the project email and platform email will be used in order. If all fail to send, the user will be notified.
2. The email priority cannot be manually adjusted.
Permission Explanation:
The "Administrator" role has the default permissions of "Manage Project Email" and "Manage Personal Email".
3. Mailbox Configuration
3.1. Add Mailbox
1. Click the "Add Platform/Project/Individual Mailbox" button to enter the new popup window.
- If the button is not available, it means that the user does not have the configuration permission for this type of mailbox.
- If the button is greyed out, it means that the user has reached the maximum limit for configuring this type of mailbox.

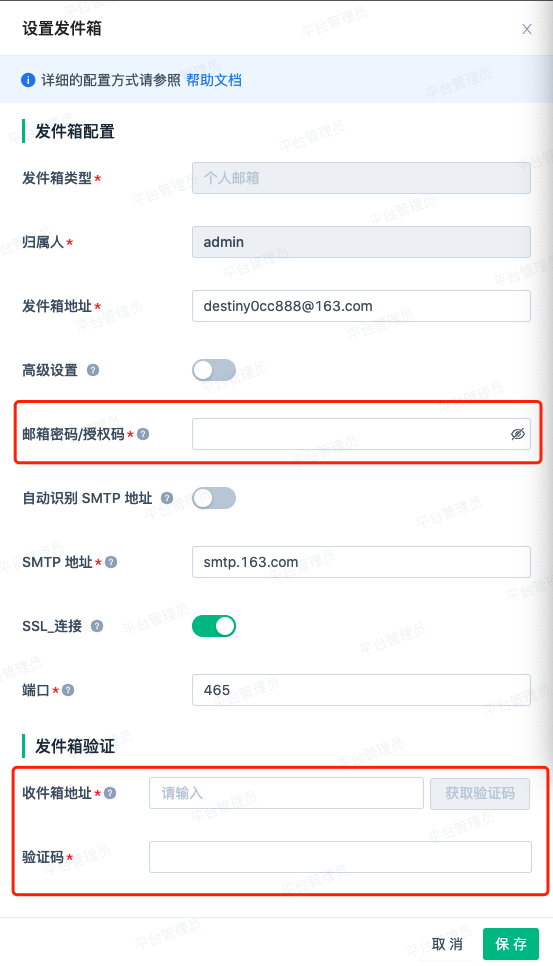
2. Fill in the configuration details:
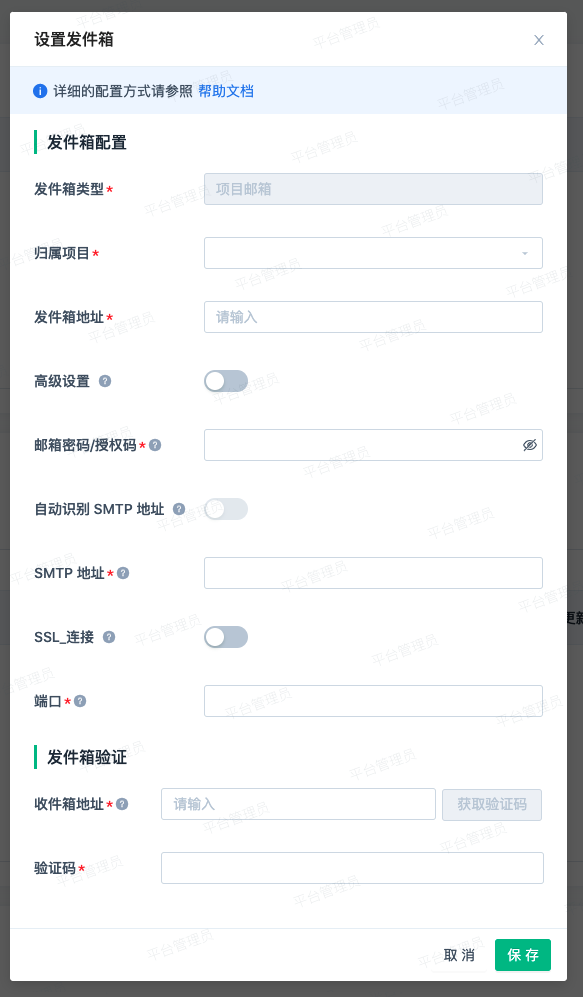
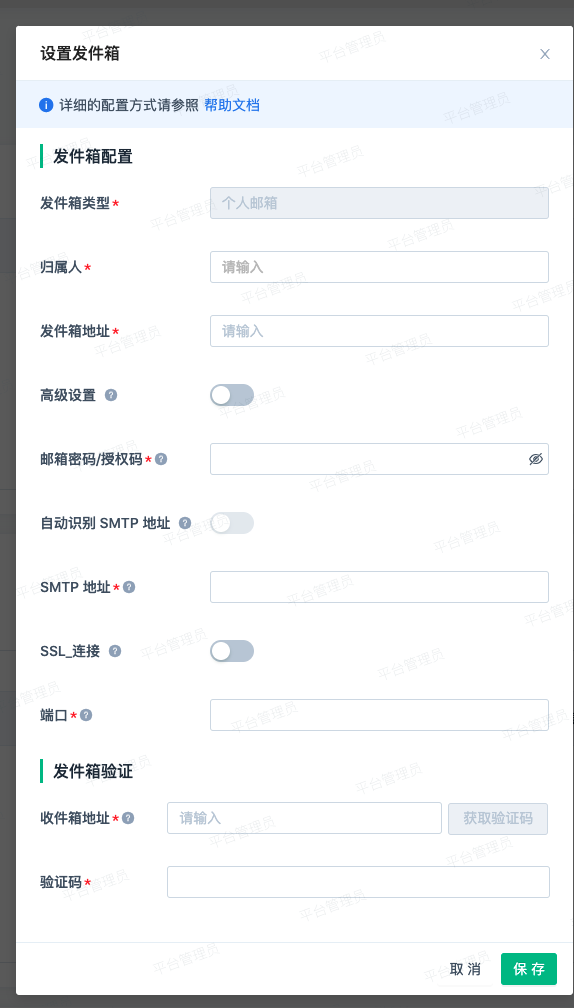
Mailbox Type: Same as the selected entrance, cannot be modified
Belongs to Project (only for Platform Mailbox and Project Mailbox):
- The default project for Platform Mailbox is "All Projects" and cannot be modified;
- For Project Mailbox, you can select a project that you have permission to configure and that has not been configured with a mailbox.
Belongs to Person (only for Individual Mailbox):
- When adding an individual mailbox, the default person is oneself and cannot be modified.
- If you have the "Manage Individual Mailbox" permission, you can enter the username of a person who has permission to configure and has not configured a mailbox.
Mailbox Address: Email address, such as "zhangshan@ceshi.cn".
Advanced Settings: If the email login does not require a suffix, you need to enable advanced settings. After enabling, you need to fill in the account without the suffix in the "Mailbox Account". For example, if the mailbox address is "zhangshan@ceshi.cn", fill in "zhangsan" as the mailbox account. (It is recommended to not enable advanced settings by default if you are not sure if the email login requires a suffix. If a configuration failure occurs, try enabling it)
Email Password: If the mailbox has enabled an authorization code, fill in the authorization code; if not, fill in the login password of the mailbox.
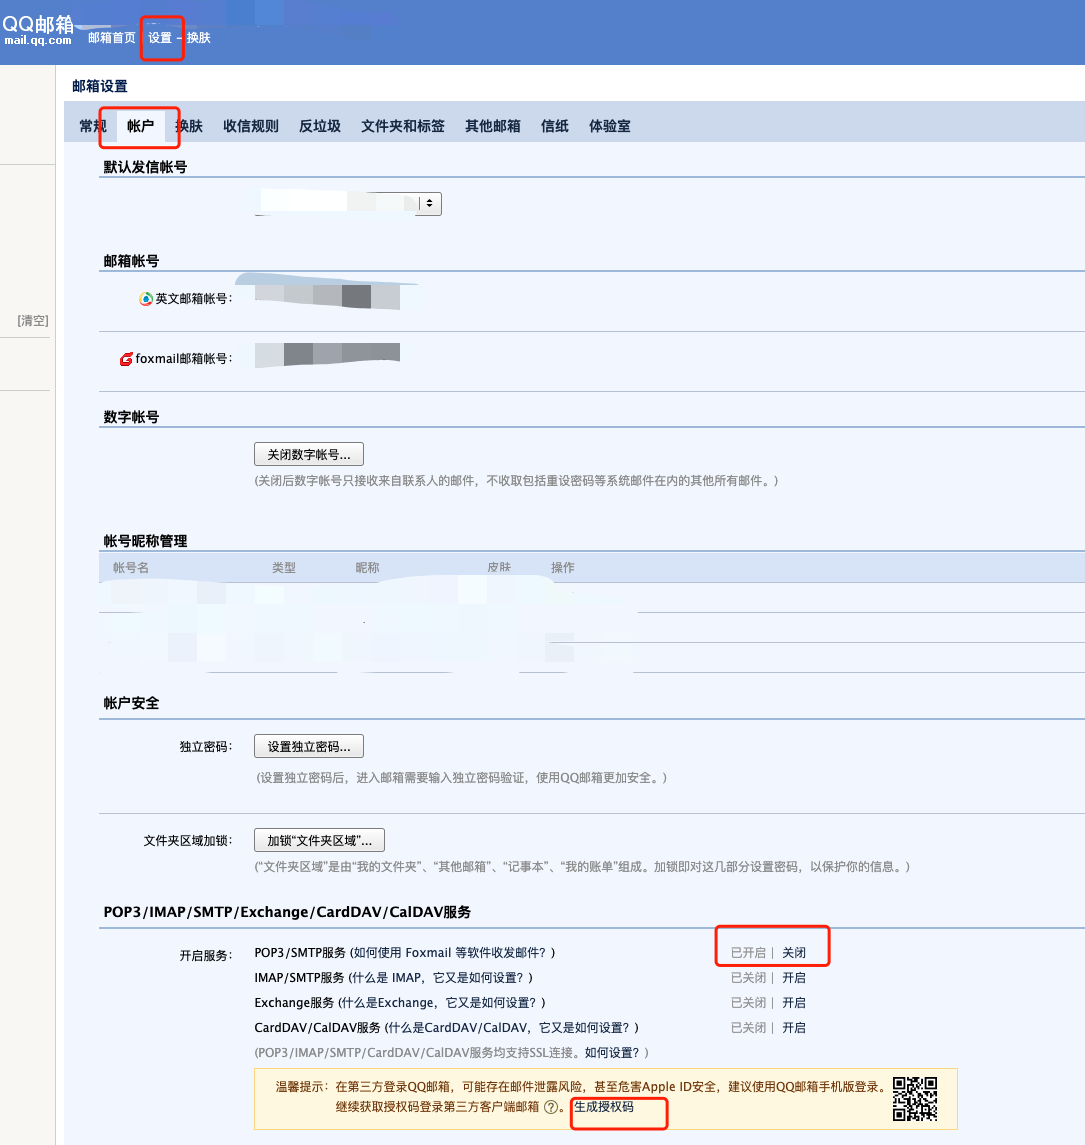
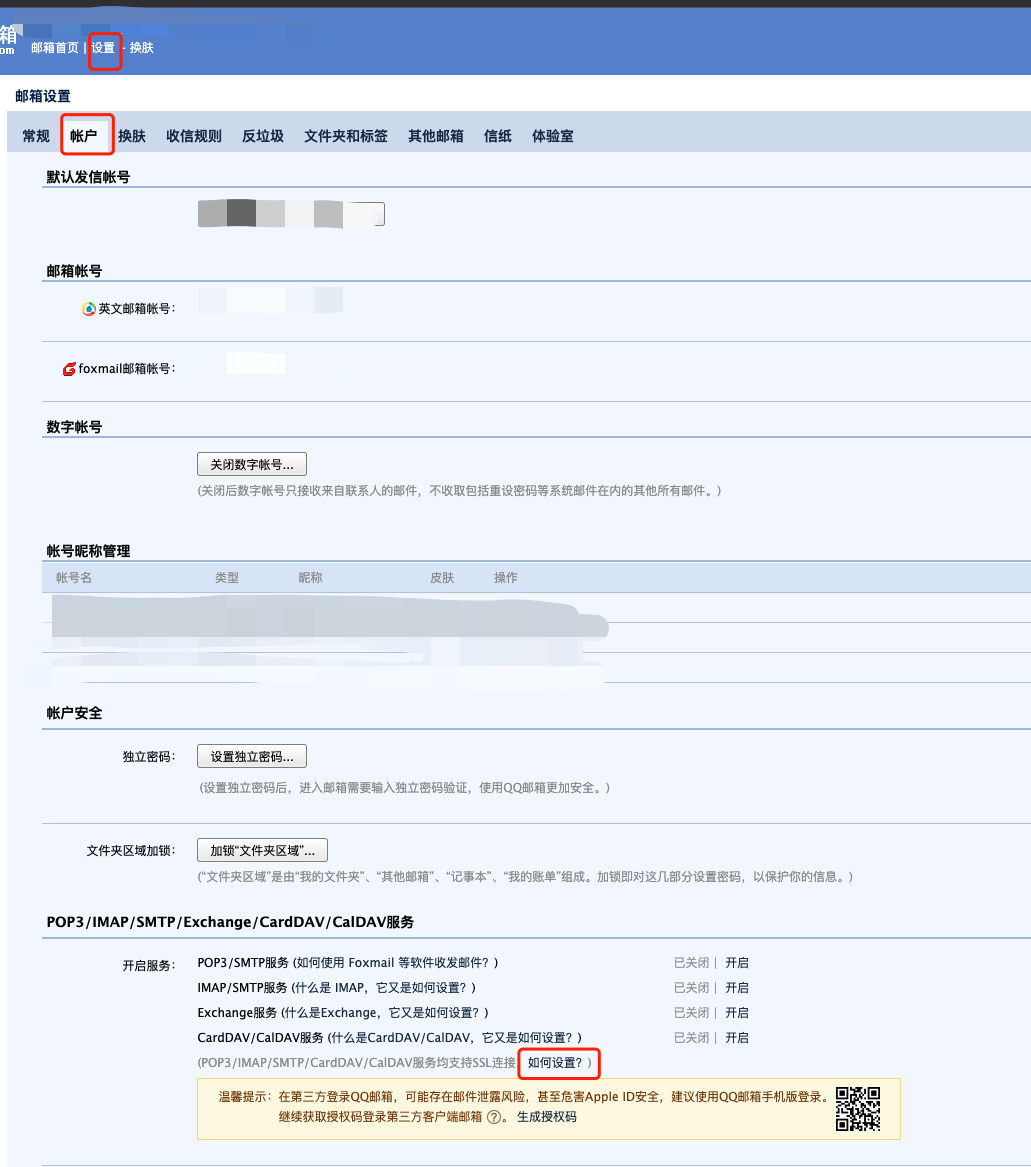
- Take QQ mail as an example, in the "Settings-Account-POP3/IMAP/SMTP/Exchange/CardDAV/CalDAV Services" of the email, click the "Enable" of "POP3/SMTP Services" and generate the authorization code through a mobile phone SMS.
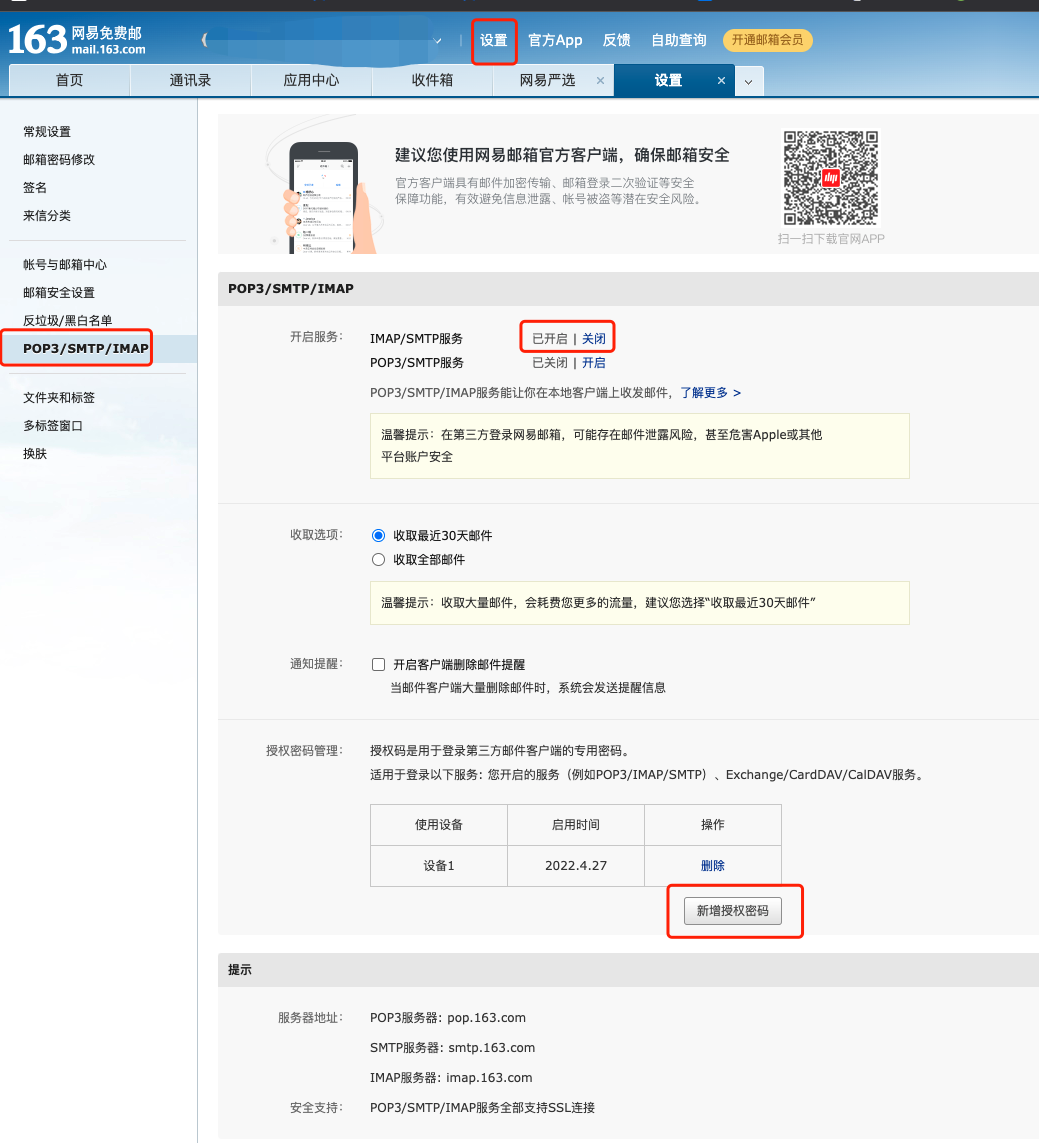
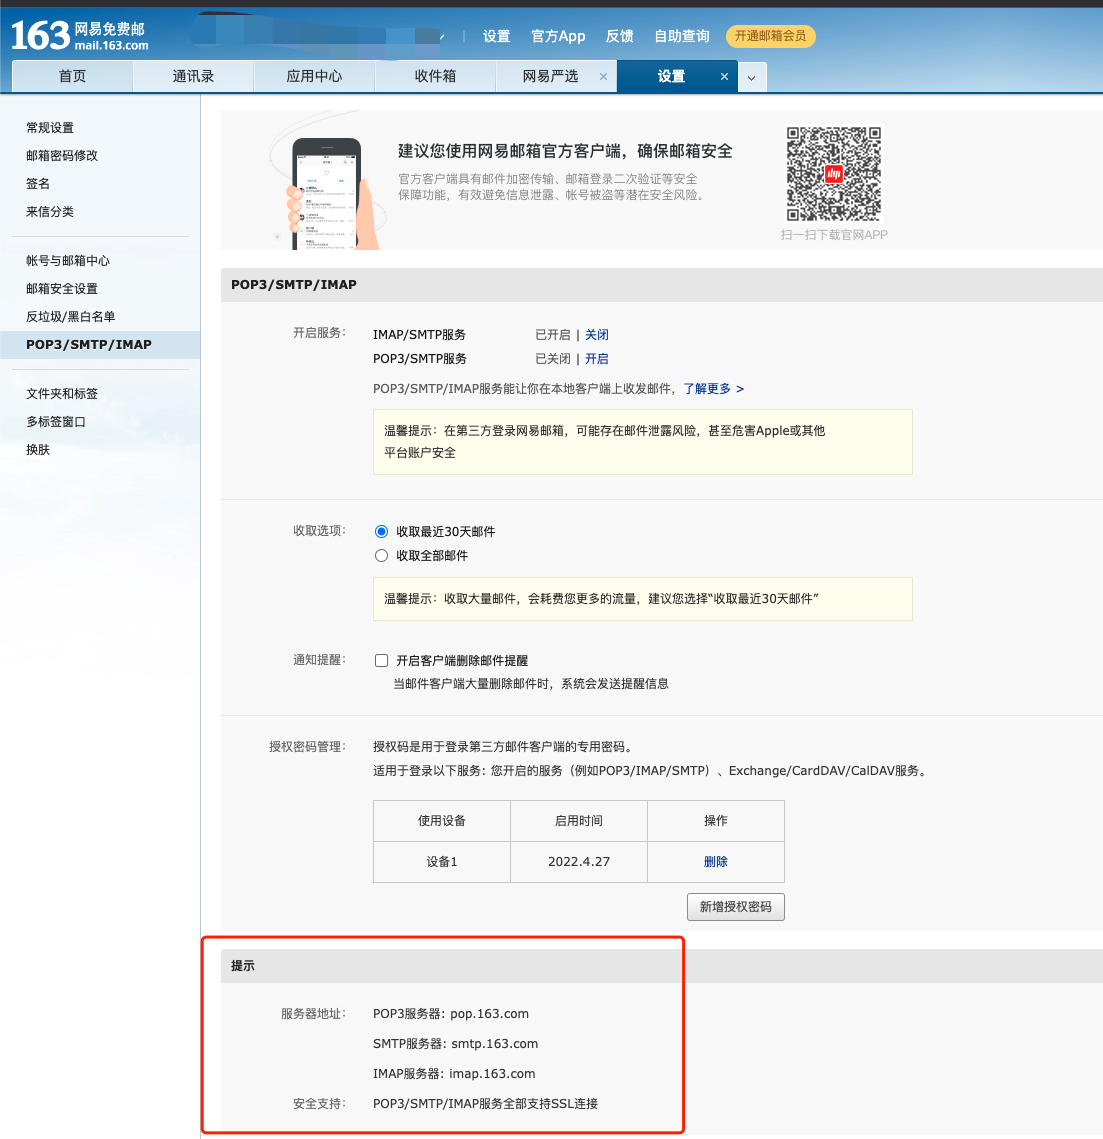
- Using 163 NetEase Mail as an example, you can go to the "Settings - POP3/SMTP/IMAP" page, click on "Enable" for the IMAP/SMTP service, and generate an authorization code through SMS.
Auto-detect SMTP address: When enabled, it will automatically detect the "SMTP address", "SSL connection", and "port" fields. There is a possibility of incorrect detection.
SMTP address: The server address for the outgoing mailbox. Usually, you need to obtain the address information on the mailbox's "Settings" page.
SSL connection: Enable SSL to enable encrypted connection, otherwise, it means no encrypted connection. The mailbox itself needs to support SSL connection in order to enable this feature.
Port: The port number needs to be determined based on whether the SSL connection is enabled. Usually, you need to obtain port information on the mailbox's "Settings" page.
- SMTP address, whether SSL connection is enabled, and the port typically need to be obtained from the corresponding mailbox's help center or settings. For example, for QQ Mail, you can obtain the configuration information on the "Settings - Account - POP3/IMAP/SMTP/Exchange/CardDAV/CalDAV Service - How to set up" page. For 163 NetEase Mail, you can obtain it under "Settings - POP3/SMTP/IMAP - Prompts".
- In most cases, the non-SSL connection port is 25, and the SSL connection port is 465.
Inbox address: It is used to verify whether the outgoing mailbox settings are correct. It is generally recommended not to fill in the same email address as the outgoing mailbox, like "lisi@ceshi.cn".
Verification code: If all the configurations of the outgoing mailbox are correct, a verification email named "Email Configuration Verification" will be sent to the specified inbox. Fill in the four-digit verification code in the email.
3. Click "Save" to complete the configuration of the outgoing mailbox.
3.2. Edit outgoing mailbox
1. Click the "Edit" button on the right to enter the edit mailbox page.

2. The logic of editing the page is the same as that of adding the page. When editing, you must fill in the email password/authorization code, inbox address, and verification code again before saving.
3.3. Delete Outbox
1. Click the "Delete" button on the right side of the operation, and confirm twice to delete the mailbox.
- Due to the platform mailbox being a "fallback mailbox" (accessible to all users and projects), to prevent scheduled mailbox tasks from failing due to a lack of mailboxes in the system, the platform mailbox configuration does not support deletion, only editing.

3.4. Error Prompt
When using the functions related to the Outbox, there may be situations where sending fails.
1. If an email error is reported during the "password recovery" process, please contact the system administrator to check if the configuration of the Outbox is correct.

2. If an email error is reported during mailbox configuration or scheduled email tasks such as the Overview, common error reasons and solutions are as follows:
a) Account password error:
- If the entered password is the email login password, it is recommended to check if the password has been changed or if only an authorization code can be used for login.
- If the entered password is the email authorization code, it is recommended to check if the authorization code has expired at the email client.
b) Port error:
- It is recommended to check if the SSL connection switch and the port correspond.
- It is recommended to obtain port data from the email client's settings/help documentation page.
c) Other error reasons or undisclosed error reasons: For other error reasons that are difficult for users to troubleshoot independently, it is recommended to contact the administrator or Sensinum technical support for assistance in troubleshooting.
3. If the mailbox reports an error, it is recommended to troubleshoot in order of email priority, such as personal email -> project email -> platform email.
Note: The content of this document is a technical document that provides details on how to use the Sensors product and does not include sales terms; the specific content of enterprise procurement products and technical services shall be subject to the commercial procurement contract.
 Popular Searches