Member and Role
|
Collect
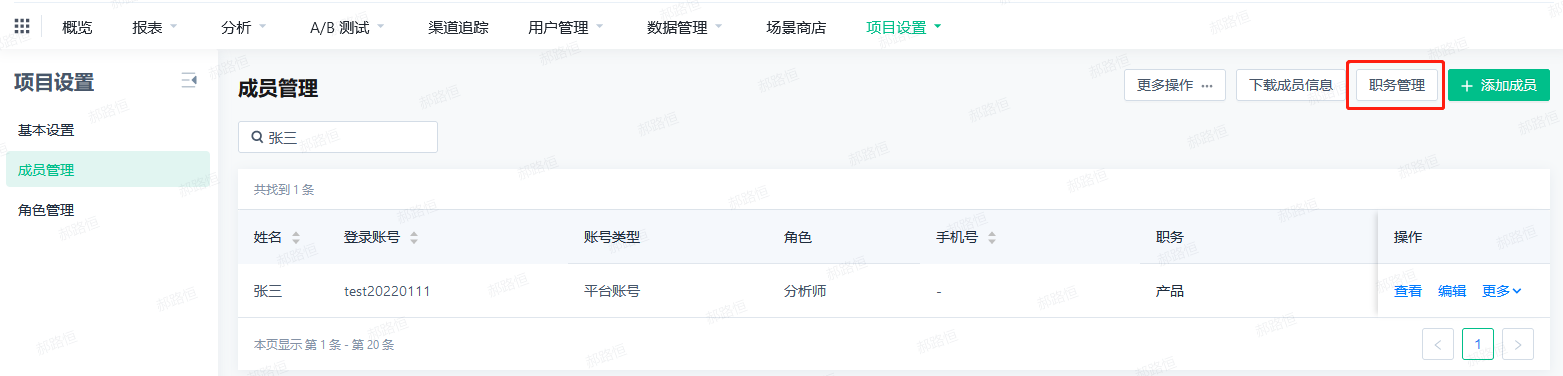
Member Management
SBP provides the following control capabilities for accounts: account list, add account, edit account, view account, transfer work, reset password, remove member, download member information
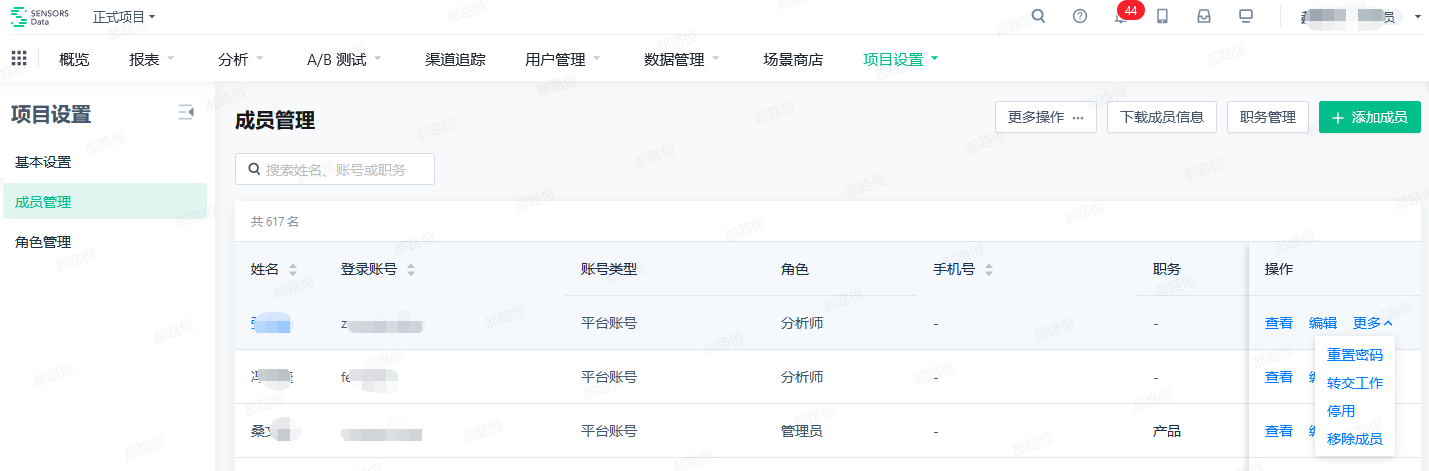
Account List
1. Account list displays the following field information:
(1) Before version 1.4
- Name, the name filled in when creating the account
- Login Account, the login account filled in when creating the account
- Account Type, divided into: platform account and project account; different account types added via different entry points will generate different account types
- Role, the role selected when creating the account, separated by commas for multiple selections
- Mobile Number, the mobile number filled in when creating the account; depending on the status of the desensitization switch, this field will display the information in plain text or desensitized
- Position, the position selected when creating the account
- Other dynamic attributes, if there are other dynamic attributes, they will also be displayed, such as "Organization"
- Validity Period, the validity period selected when creating the account
- Sort Order: sorted in ascending order based on account creation time; the latest created account will be at the end
(2) After version 1.4 (inclusive), the following fields have been added:
- Enable/Disable Status
- Creation time

2. Account list supported filter/query conditions:
(1) Before version 1.4
- Name/login account fuzzy query
(2) After version 1.4, the following filter/query conditions are added:
- Email, manual input query, fuzzy search
- Account type, single choice, enumerated value: platform account, project account
- Role, multiple choices, enumerated value: all roles under the project
- Query logic: Any data that matches any selected role will be queried. For example: query roles "analyst" and "developer"; under this condition, Account 1, Account 2, and Account 3 can all be queried.
| Account 1 | Analyst, Developer |
| Account 2 | Analyst, Administrator |
| Account 3 | Developer |
| Account 4 | Administrator |
- Position, multiple choices, enumerated value: all positions under the project
- Query logic is the same as "role"
- Status of enable/disable, single selection, enumeration values: enable, disable
- Expiration date, single selection, enumeration values: permanent/custom time; custom time can be selected through a time control with the range of year, month, day, hour, minute, and second
- Creation time, selectable time range, year, month, day, hour, minute, and second

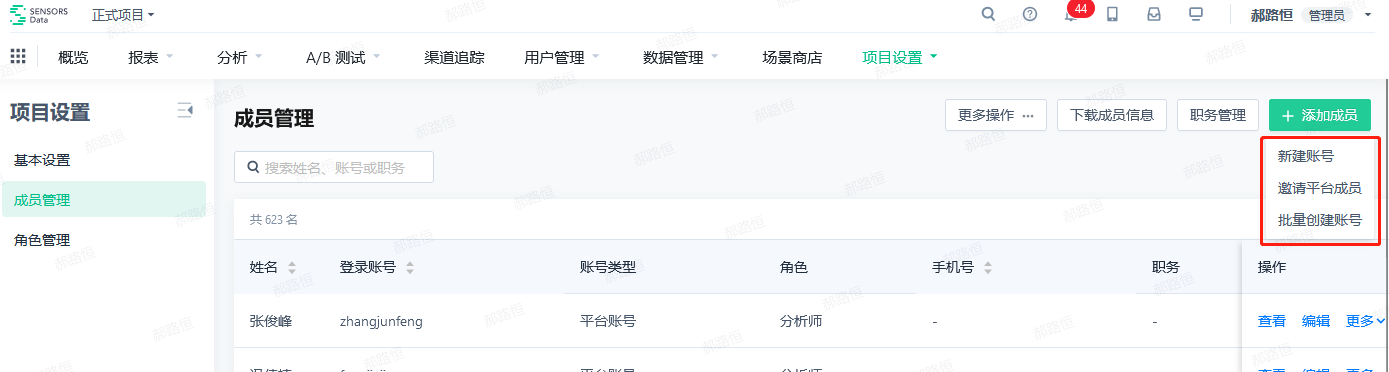
Add account
There are 3 ways to add members:
(1) Create a new account (single)
(2) Bulk create accounts
(3) Invite platform accounts
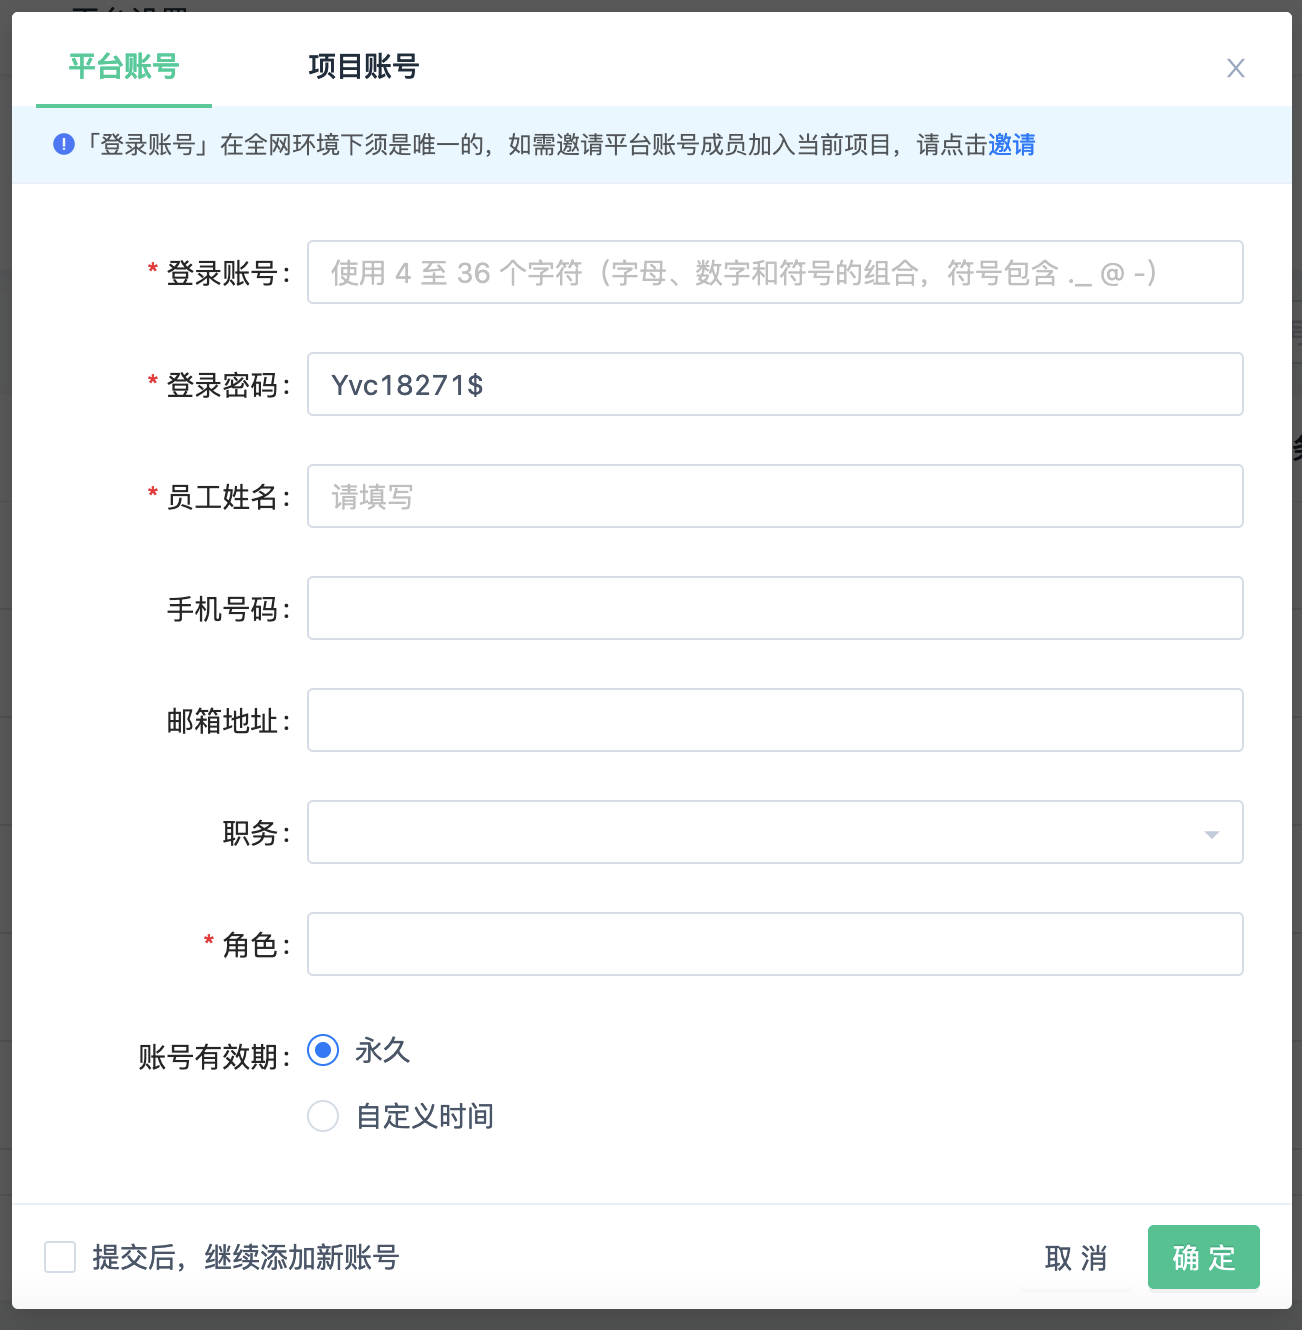
Create a new account (single)
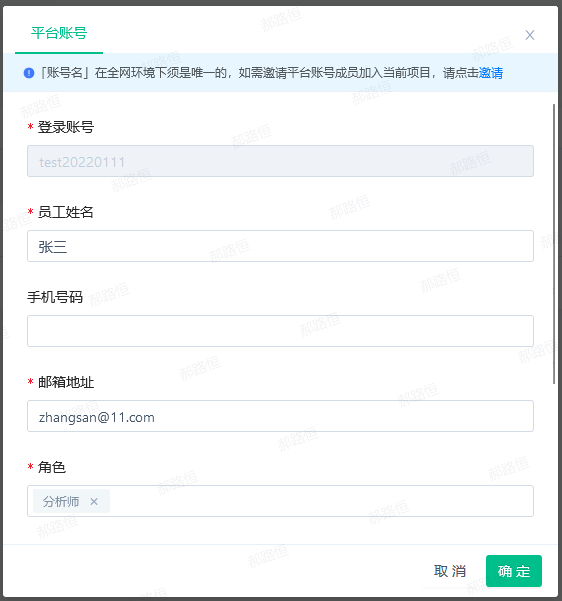
- Click to open the popup window for creating a new account, and you need to enter:
| Information to be entered | Required? | Remarks |
|---|---|---|
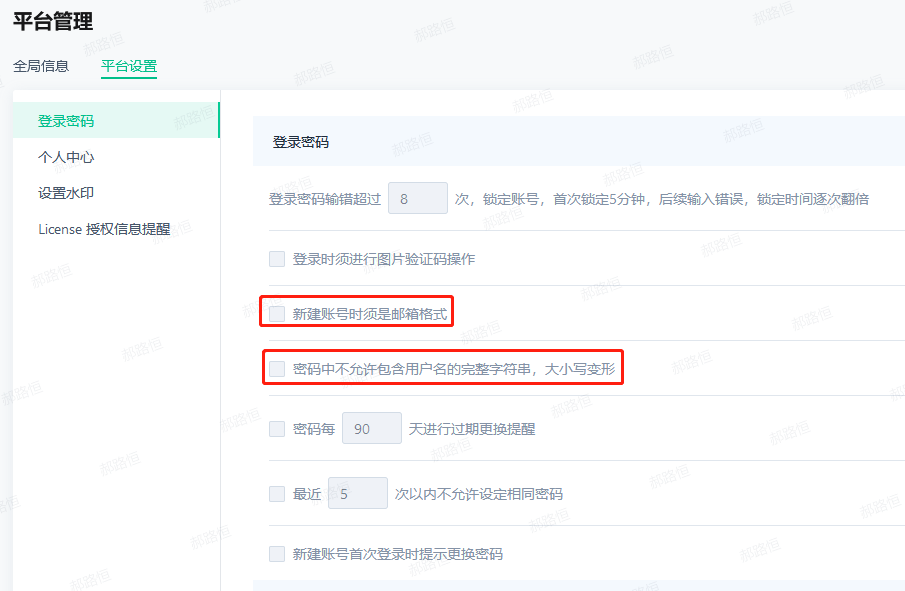
| Login account | Yes | Before version 1.4:
After version 1.4 (inclusive):
If the option "New account format must be an email format" is checked in the platform settings, the login account must be in email format |
| Login Password | Yes | Before version 1.4:
After version 1.4 (inclusive):
|
| Employee Name | Yes | |
| Mobile Phone Number | No | |
| Configurable |
| |
| Role | Yes |
|
| Position | Configurable |
|
| Other dynamic properties | No | Additional dynamic properties can be added according to customer's needs |
| Account validity period | Yes | Single selection, enumeration values: permanent (default), custom time;
|
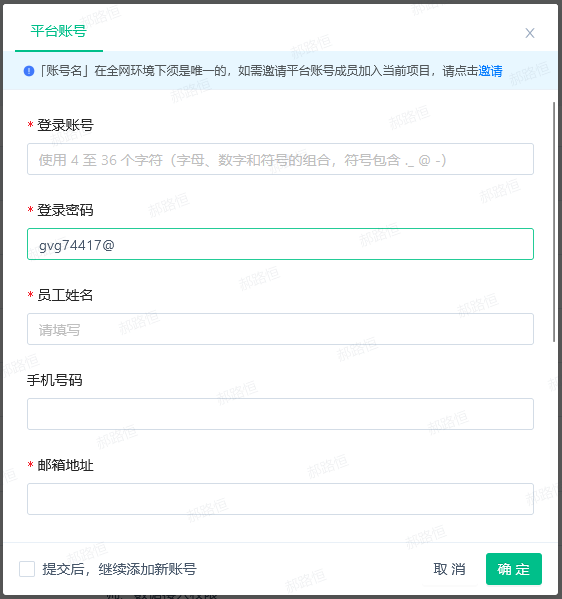
- Currently, only platform accounts are supported by default. If you need to create project accounts, you can configure to open the entry for project accounts
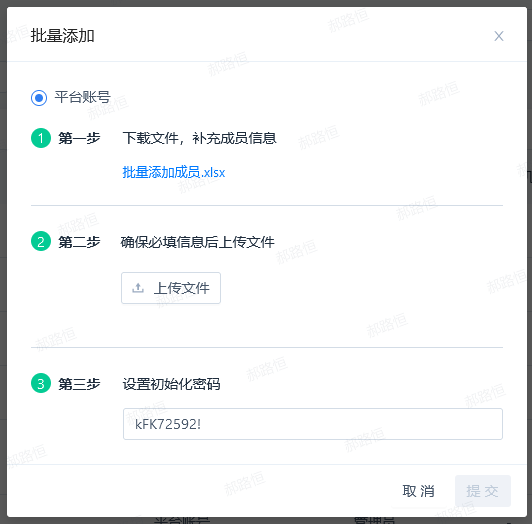
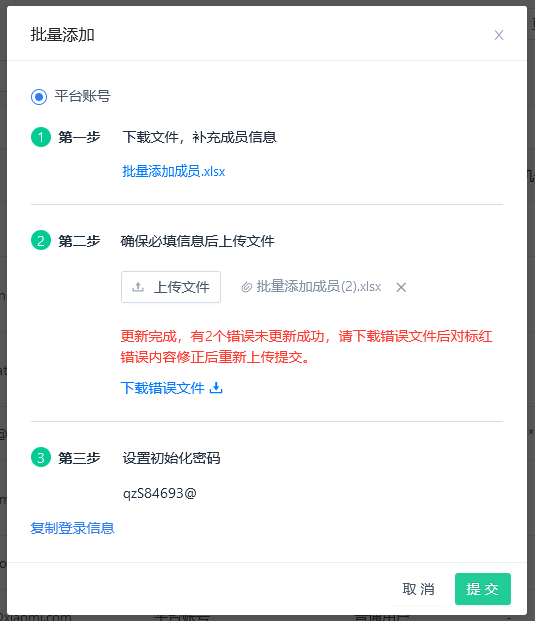
Create accounts in bulk
(1) Before version 1.4:
- Click to pop up the bulk add window;
- The first step is to download the bulk addition template in xlsx format.
- Support setting the following information for account addition: Account (required), Name, Mobile Number, Email (required), Position, Role.
- The account field is required. If the account already exists in the system, the account will fail to be created.
- If the specified position cannot be found in the system, it will be set as empty by default.
- If the specified role cannot be found in the system, it will be set as "Normal User" by default. Use commas to separate multiple roles, e.g., Analyst, Developer.
- In the second step, upload the file filled in the first step. After uploading, the "Submit" button will be clickable.
- In the third step, the system will automatically generate passwords for batch account creation. You can modify them if needed.
- Click "Submit". If there are any errors in the file, they will be displayed and you can download the error file. Successful data will create corresponding accounts.
(2) Version 1.4 and later:
- The template now supports "Active/Inactive" status and "Validity End Date".
- "Active/Inactive" status: This field is required and should be filled with "Active" or "Inactive".
- "Validity End Date": If the "Active/Inactive" status is set to "Active", this field is required and should be filled following the specified format:
- If it's permanent, write "Permanent".
- If it's a custom date, write the specific date and time in the format "YYYY-MM-DD HH:MM:SS", e.g., 2022-10-21 19:47:12.
- Added validations:
- Check if the "Active/Inactive" status is filled. If not, display a prompt saying "The 'Active/Inactive' status must be set."
- Validating if the "Active/Inactive" status is correct. If not, display a prompt saying "The 'Active/Inactive' status can only be set as 'Active' or 'Inactive'."
- If the "Active/Inactive" status is set as "Active", check if the "Validity End Date" is filled. If not, display a prompt saying "An active account must have a 'Validity End Date'."
- If the "Active/Inactive" status is set as "Inactive", check if the "Validity End Date" is filled. If yes, display a prompt saying "An inactive account cannot have a 'Validity End Date'."
- If the "expiration date" content meets the requirements, if not, prompt "the format of the expiration date is incorrect"
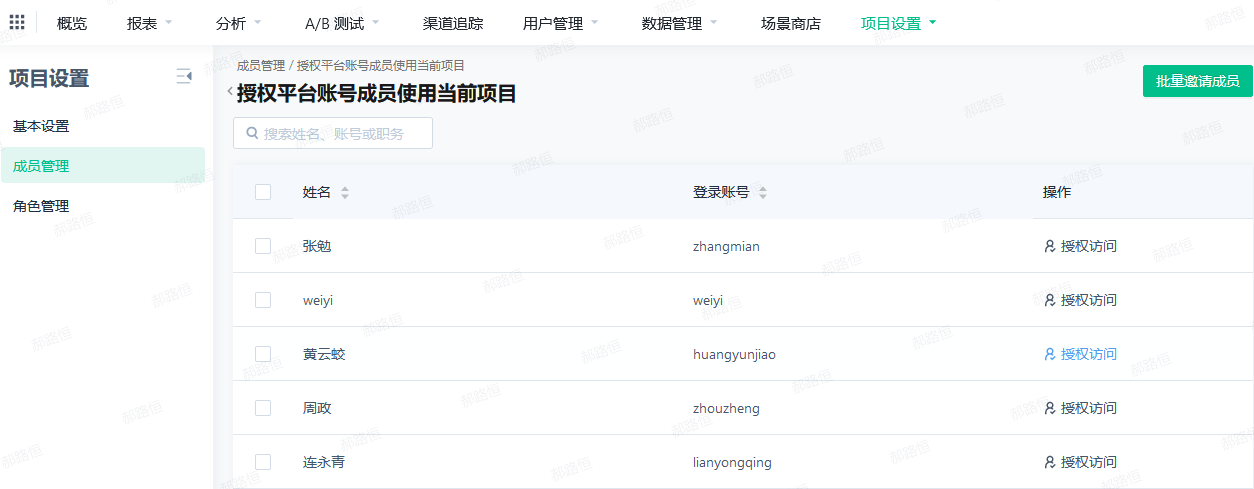
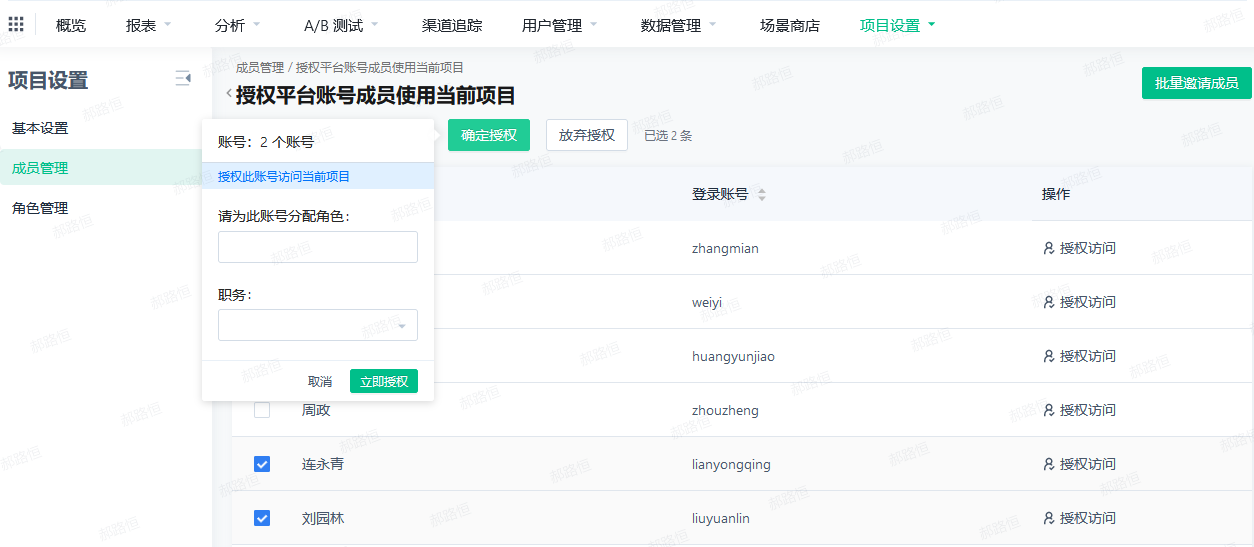
Invite Platform Account
Inviting platform accounts means inviting platform accounts from other projects to this project, rather than creating new accounts.
- Clicking will go to the invitation page
- There are two ways to invite: one is to invite through multiple selections, and the other is to invite members in bulk through file upload.
- The invitation page will display platform accounts that exist in other projects and do not exist in this project; you can select the accounts to be invited to this project by checking them;
- After checking, the "Confirm Authorization" button will appear. Click it to select the roles (required) and positions (optional) for the invited accounts. Then click "Authorize" to invite these accounts to the project.
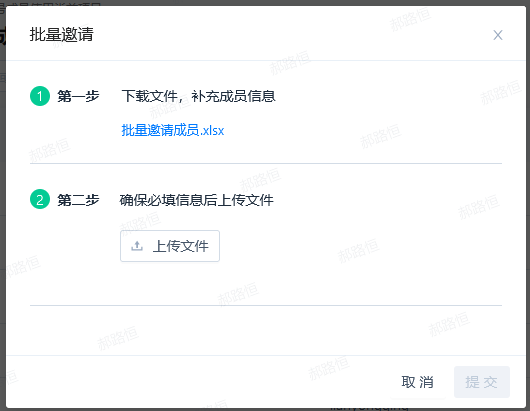
- When inviting members in bulk through file upload, you can click the "Invite Members in Bulk" button
- Clicking will bring up the corresponding bulk invitation member pop-up window, which is divided into two steps;
- The first step is to download the bulk invitation template in xlsx format:
- You can set the following for adding accounts: account (required), name, mobile number, email (required), position, and role
- Account is a required field. If this account already exists in the project, it will be overwritten and updated
- If the position entered cannot be matched in the system, it will be set to empty by default
- If the role entered cannot be matched in the system, the upload will not be successful
- If the employee account entered does not exist, the account in this entry of the file will fail to be invited
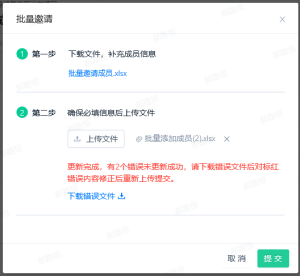
- In the second step, upload the file filled in the first step. After the upload is complete, the "Submit" button can be clicked
- Click Submit, if there are any errors in the file, they will be prompted, and you can download the error file; the successful data will be invited to the project
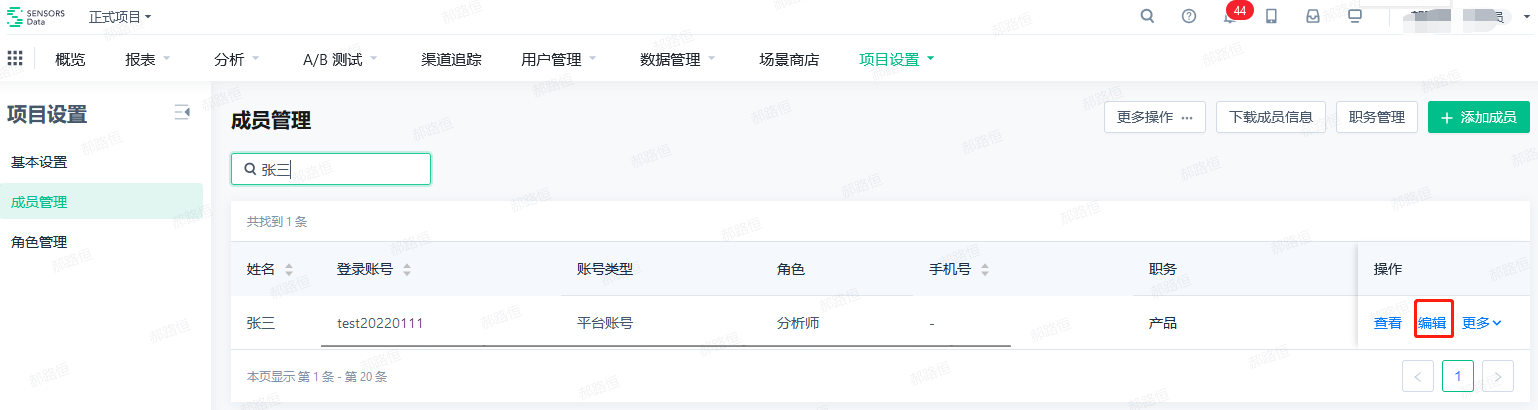
Edit Account
- There are three ways to edit an account:
- Edit a specific account in the member list;
- Click the pencil icon in the personal center;
- Select "Batch Edit" in the member list;
- After clicking, an edit dialog box will appear. The information that can be modified is generally the same as creating a new account, but the "password" is not visible and cannot be modified; the login account is read-only and cannot be modified.
Bulk Edit:
(1) Before version 1.4:
- Click to bring up the bulk edit dialog box, the logic is the same as batch creating an account.
(2) Version 1.4 and later:
- The template supports "Enable/Disable status" and "Expiration date" in batch editing, the logic is the same as batch creating an account.

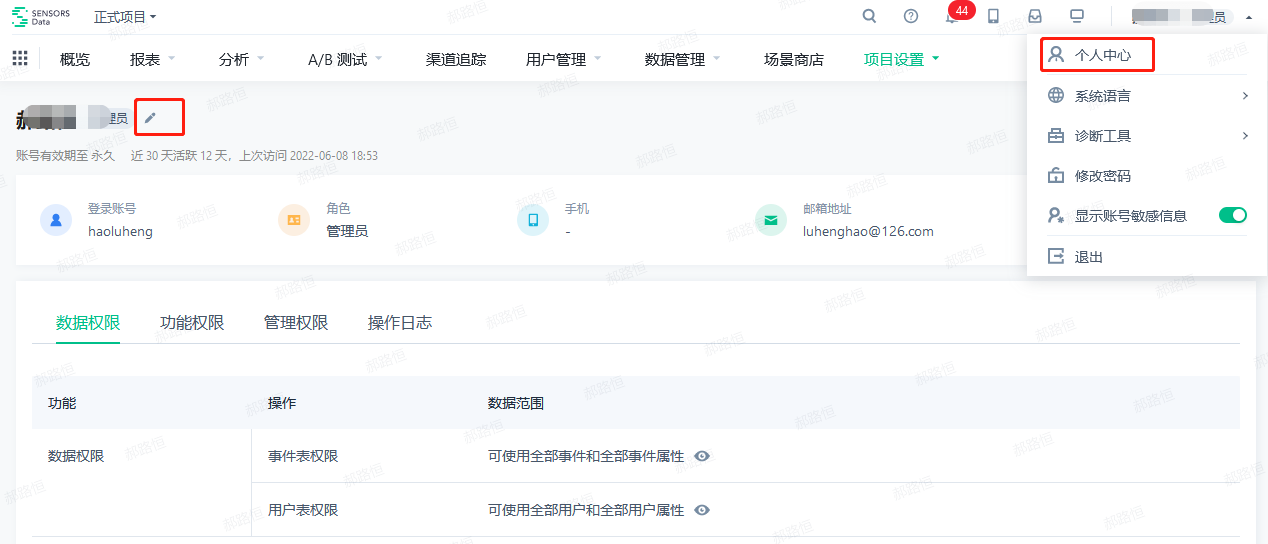
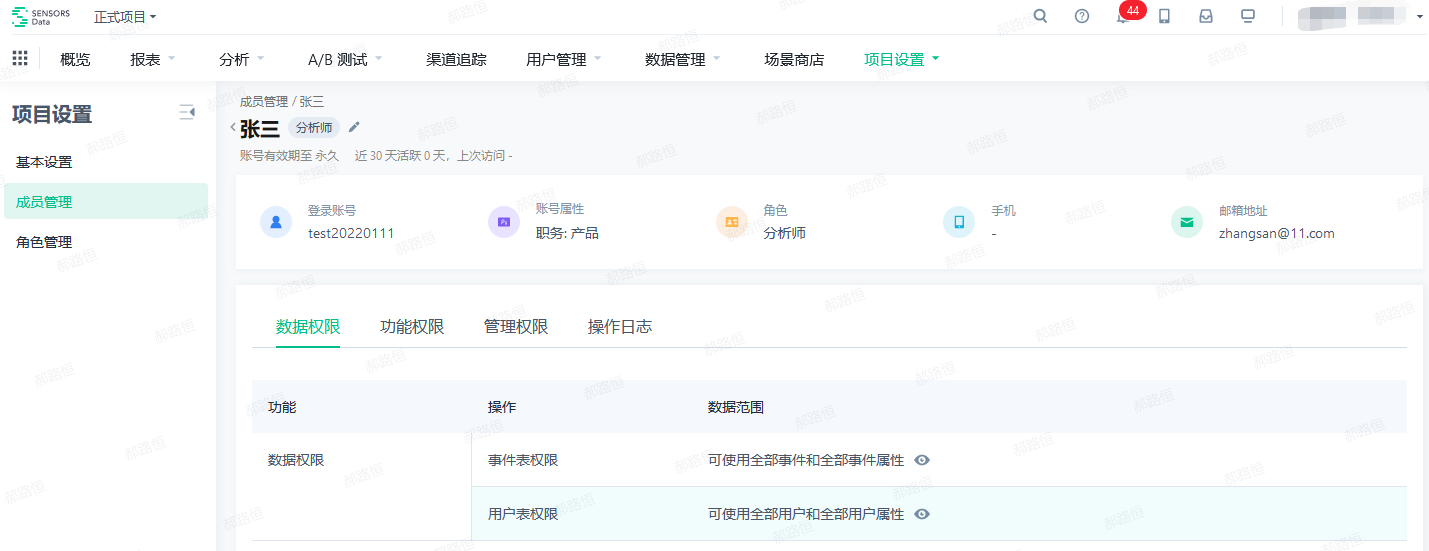
View Account
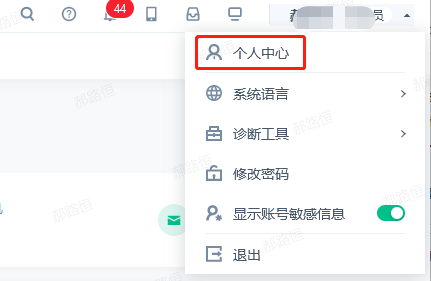
- There are three ways to view an account:
- Perform "view" operation in the member list;
- Click the user's name in the member list;
- Click "Personal Center" in the upper right corner
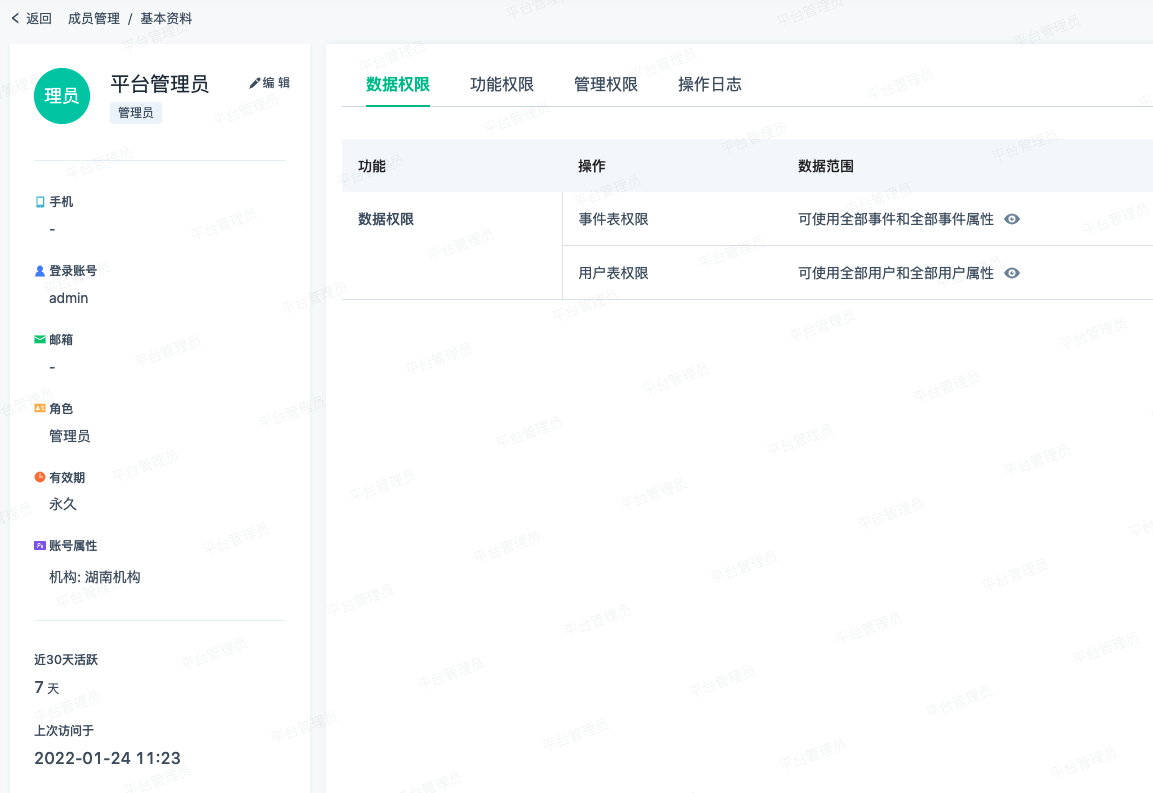
- After clicking, you can enter the details page of the account, and view the details of the account, permissions, operation logs, and other information


Transfer work
Transfer work entry
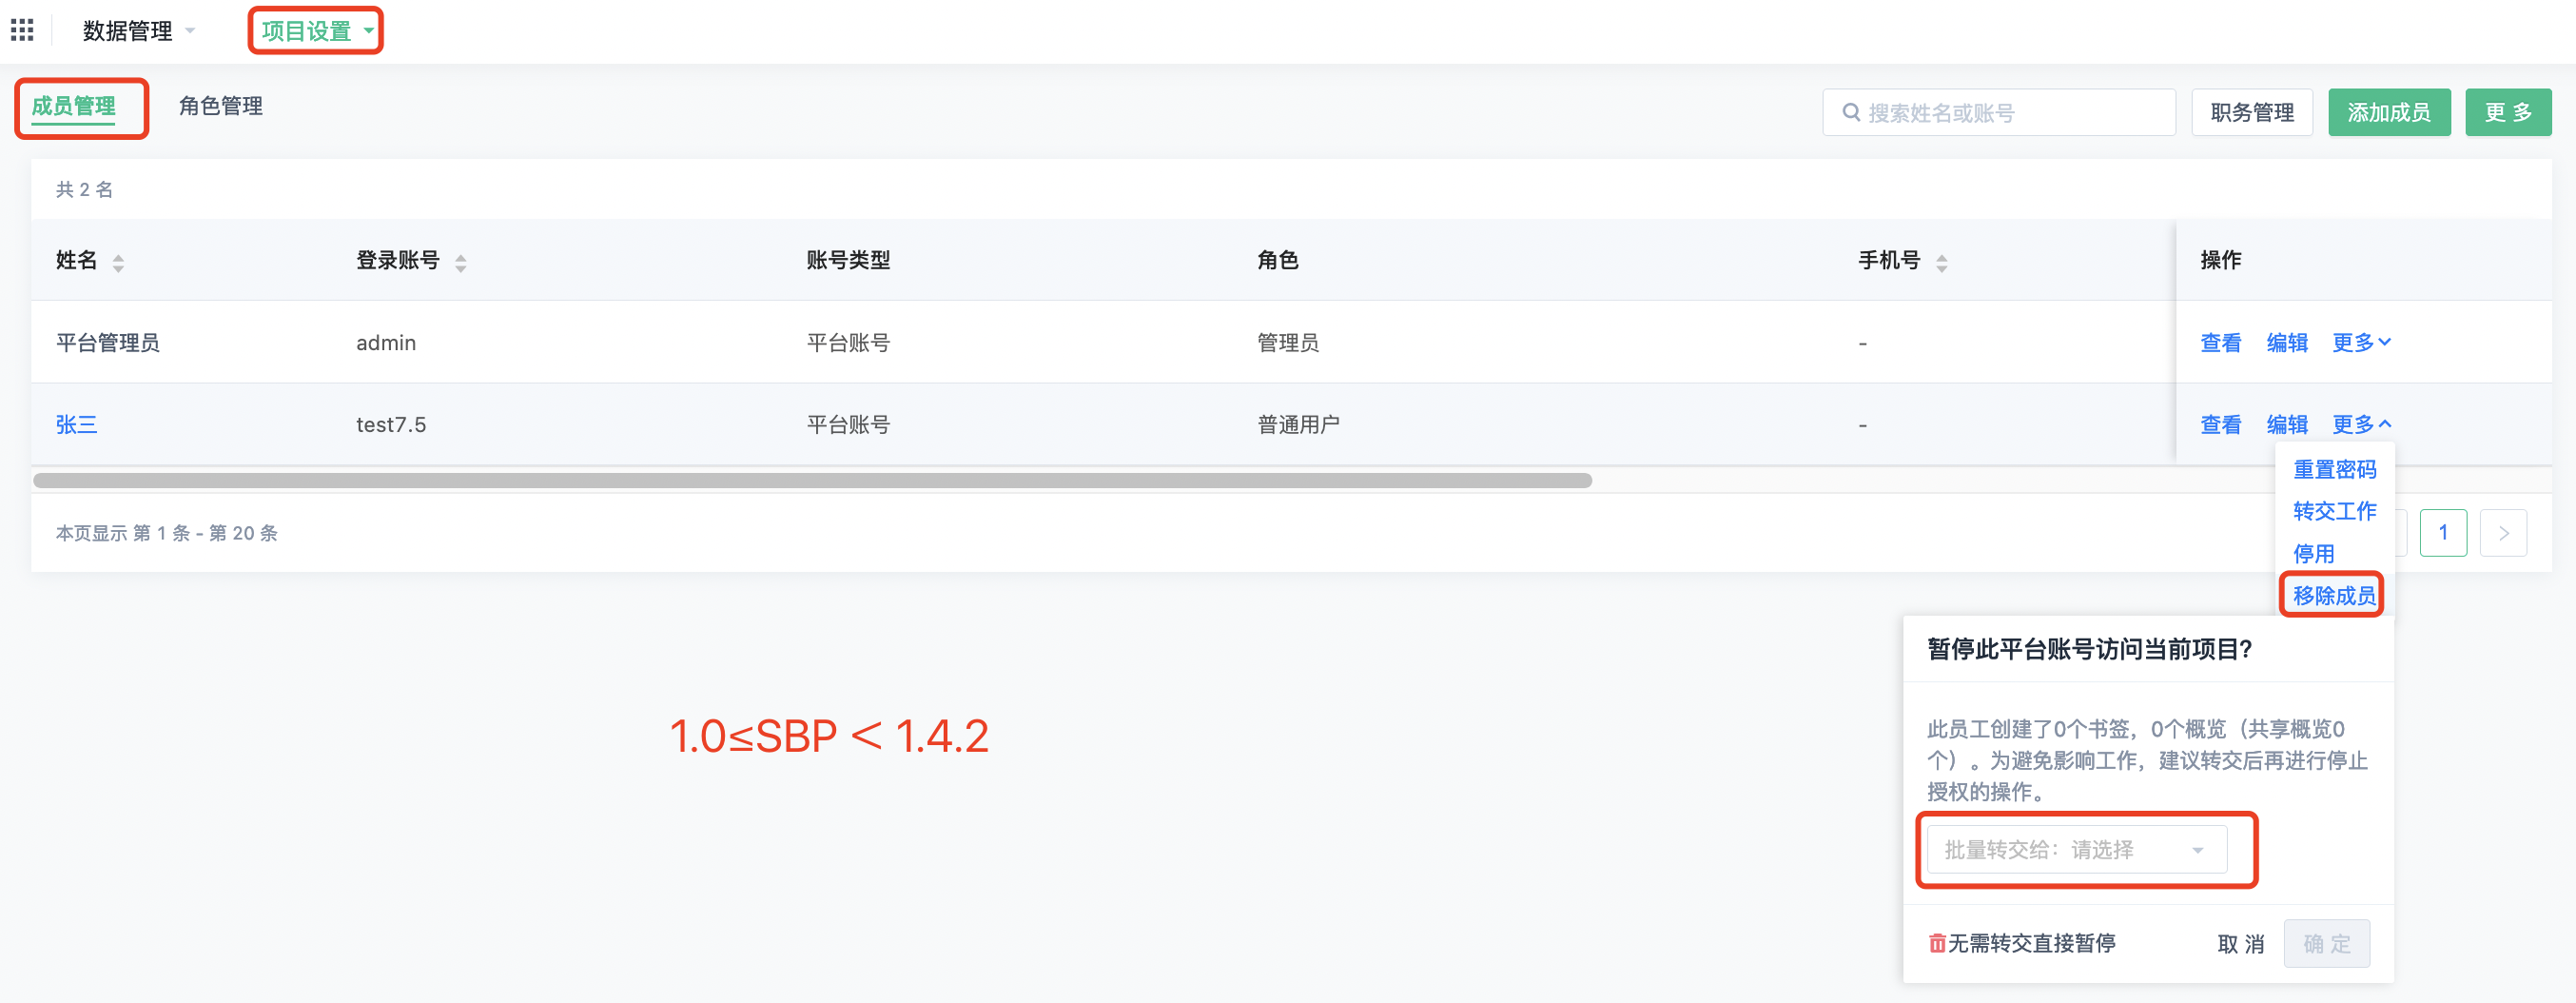
1. "Transfer work" of member list (SBP ≥1.0)
Operation path: "Project Setup - Member management - transfer work"

2. "Transfer of work" when the member list is "removed" (SBP ≥1.0)
Operation path: "Project Setup - Member management - Remove member - transfer work"
3, personal center "transfer work" (SBP≥1.4.2)

Function details
1、Delegate Work(1.0≤SBP<1.4.2)
- Click "Delegate Work" to bring up the Delegate Work popup
- Select the account to delegate to, and click "Confirm Delegation" to complete the delegation
- Only supports delegating overviews, bookmarks, intelligent alerts, and funnels created by the account, and cannot select other types of resources
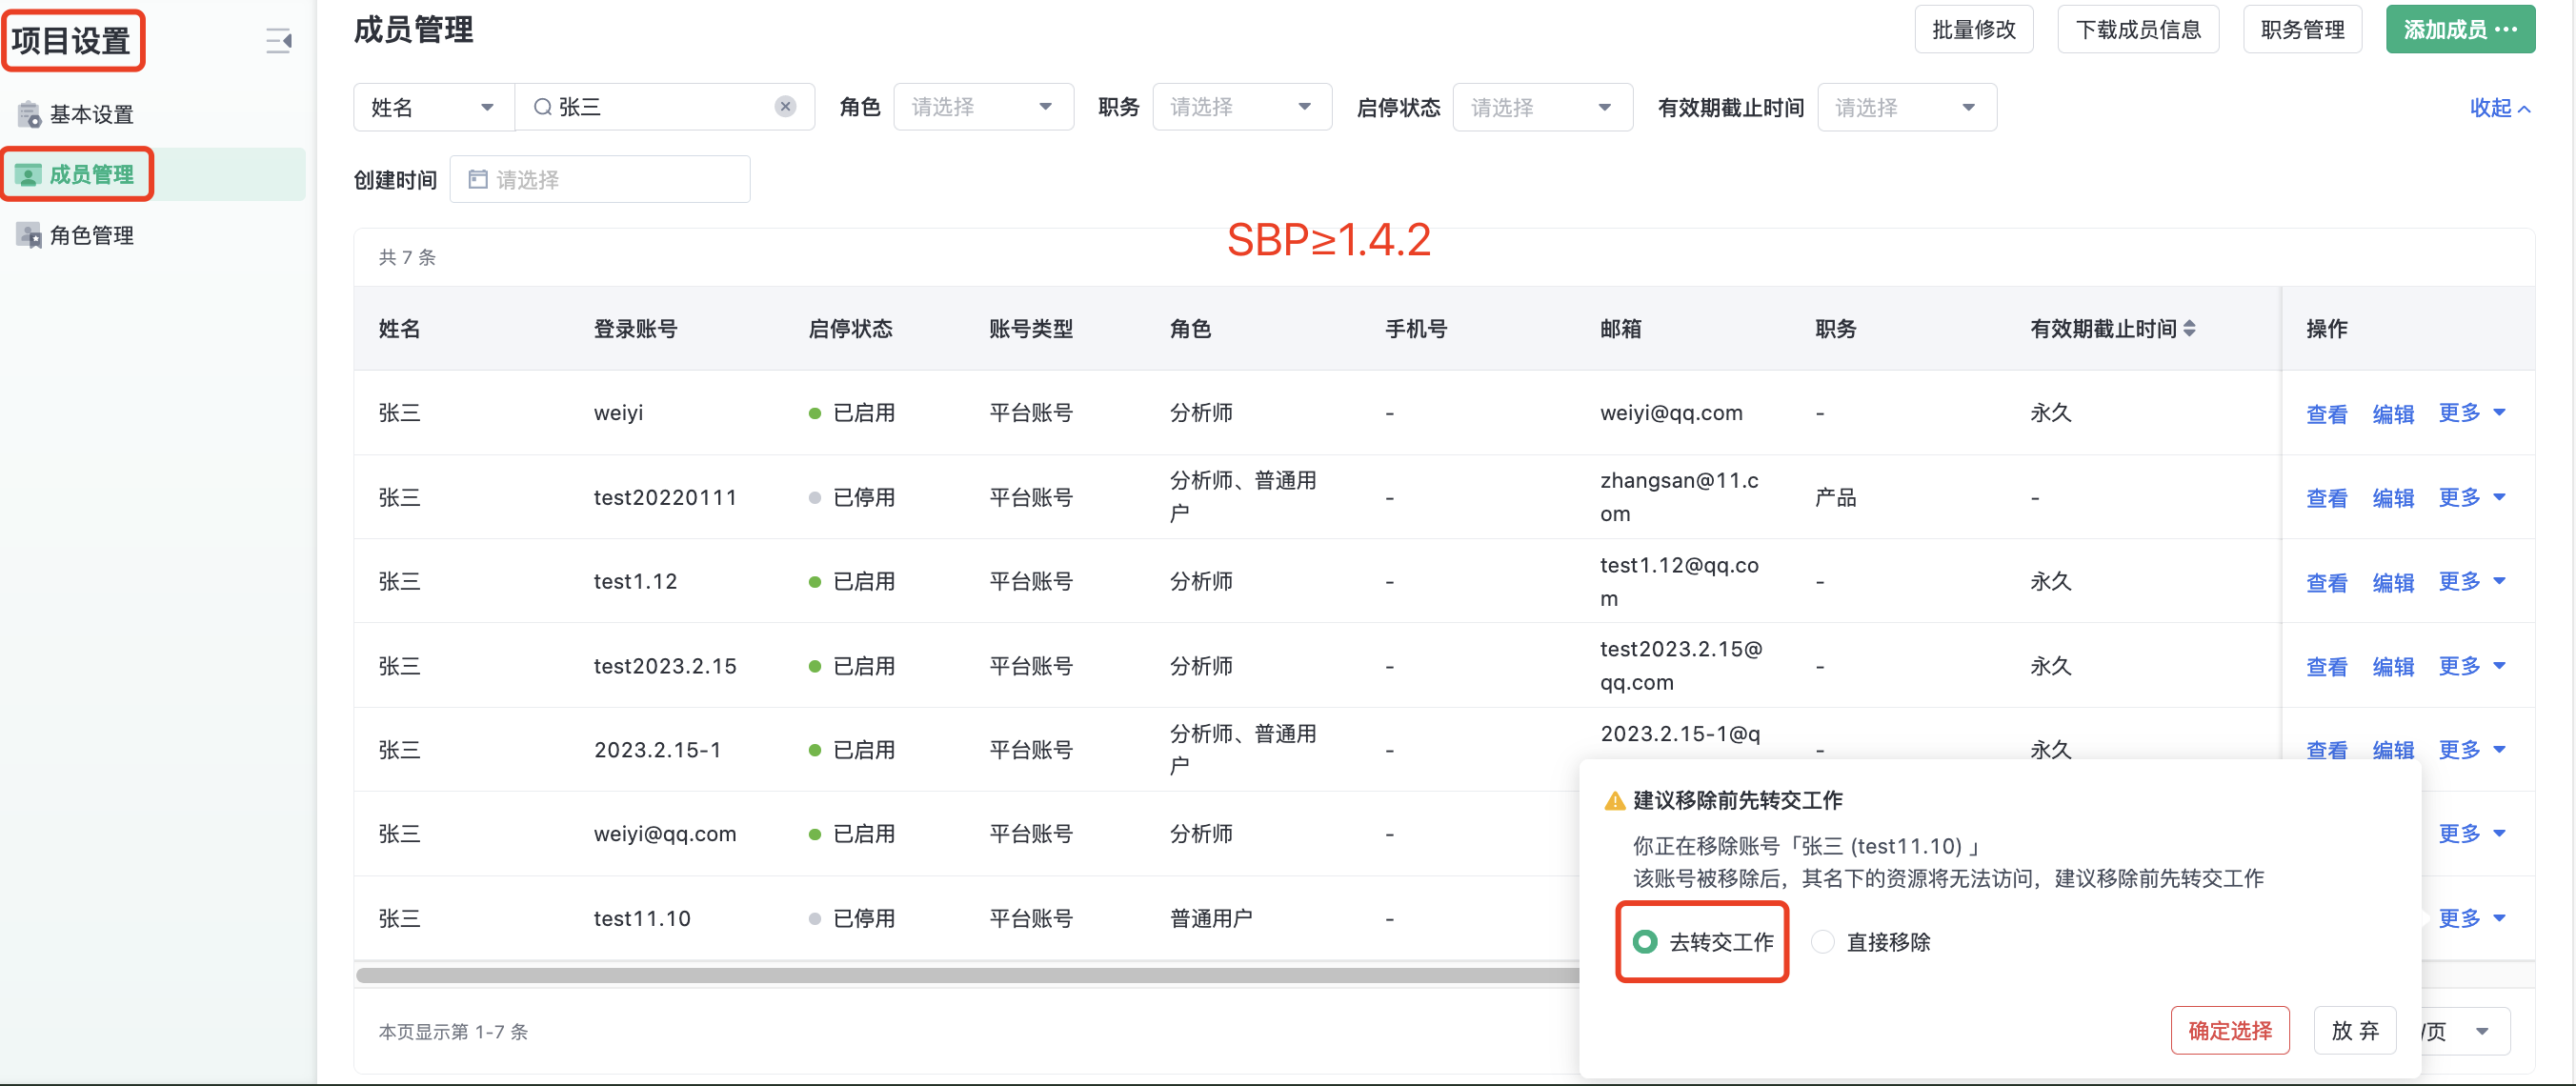
2. Delegate Work (SBP > 1.4.2)
(1) After selecting Delegate Work, the corresponding Delegate Work popup will appear:
- Account to be delegated: the account from which resources will be delegated;
- Categories of resources to be delegated: the types of resources to be delegated from the account; supports multiple selection
- Account to delegate to: the account to which these resources will be delegated;
- First accurately input the account to be delegated. If the system can match it, the corresponding account will appear in the dropdown list. Then select the account to successfully specify the delegate to account
- The account to delegate to is limited to platform accounts in the current project and does not include the account to be delegated itself
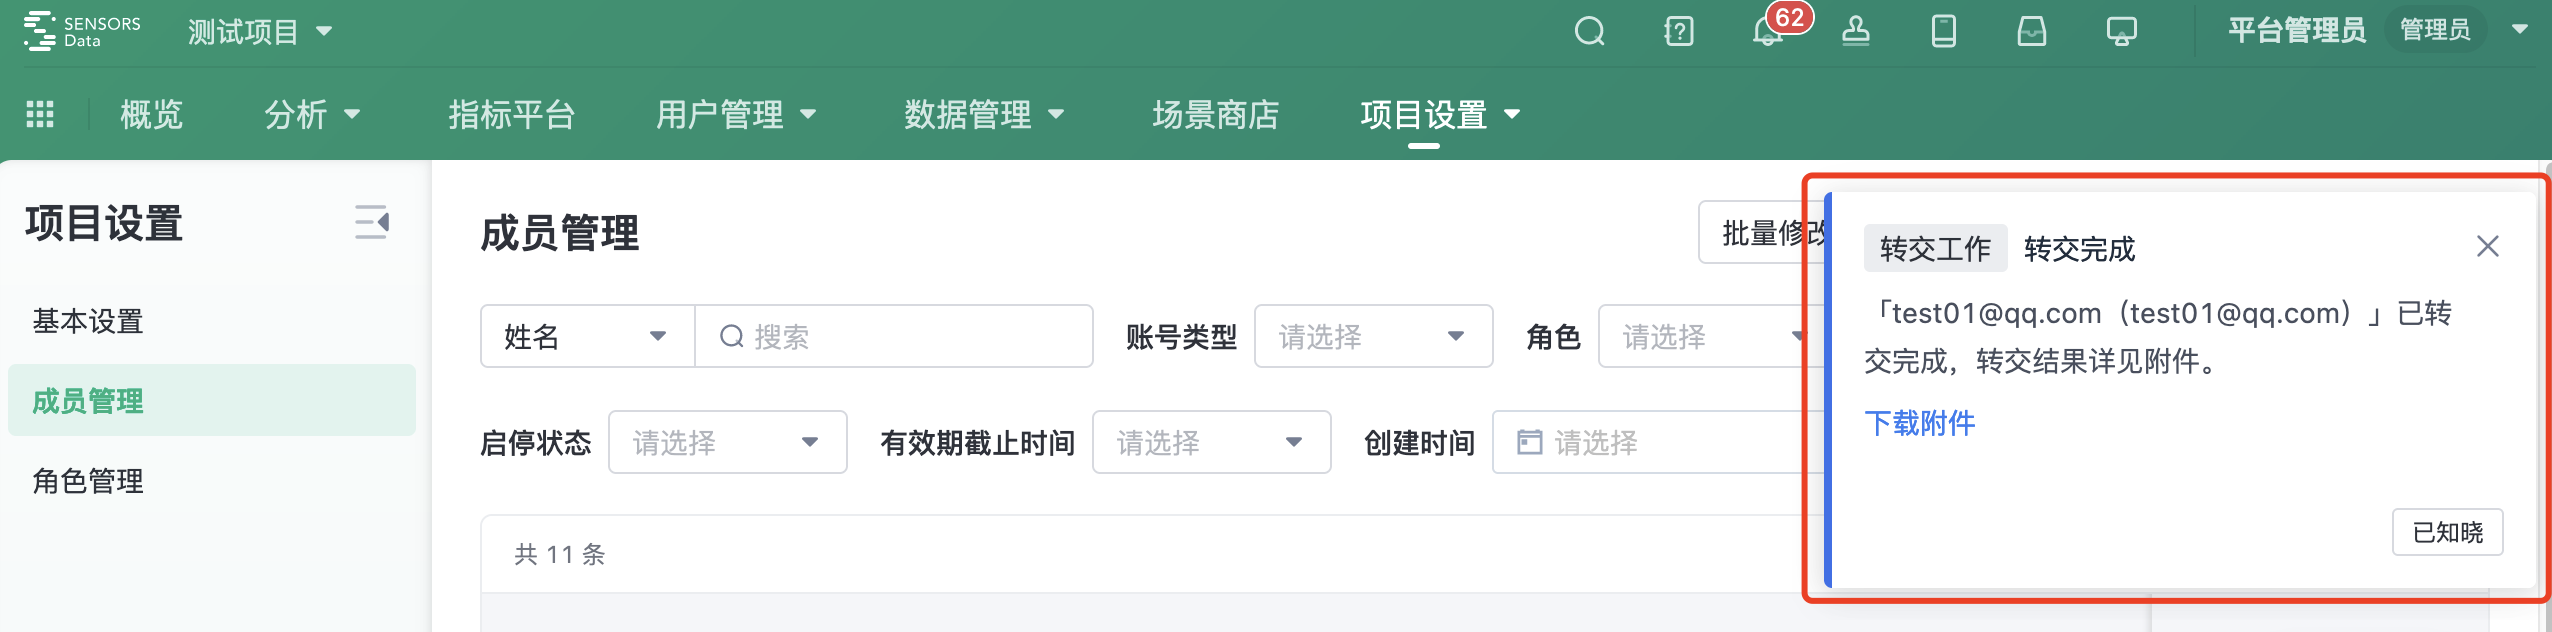
- Click "Confirm Delegation" to start the delegation, and will prompt "Delegate Work in progress, completion will be notified in the message center, no impact after closing"
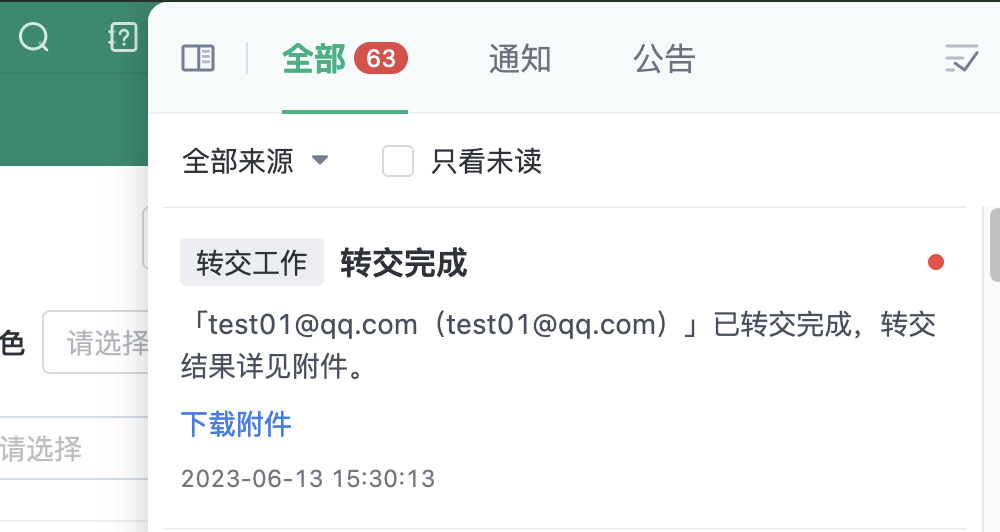
(2) Notification of delegation results:
- After the delegation is completed, the operator will receive a notification informing them of the completion of the delegation
- If you want to view the specific delegation results, you can download the attachment in the notification
(3) In order to ensure the smooth transfer of the account, during the transfer of the account, the operation of "transfer work", "deactivate" and "remove members" cannot be carried out on the account
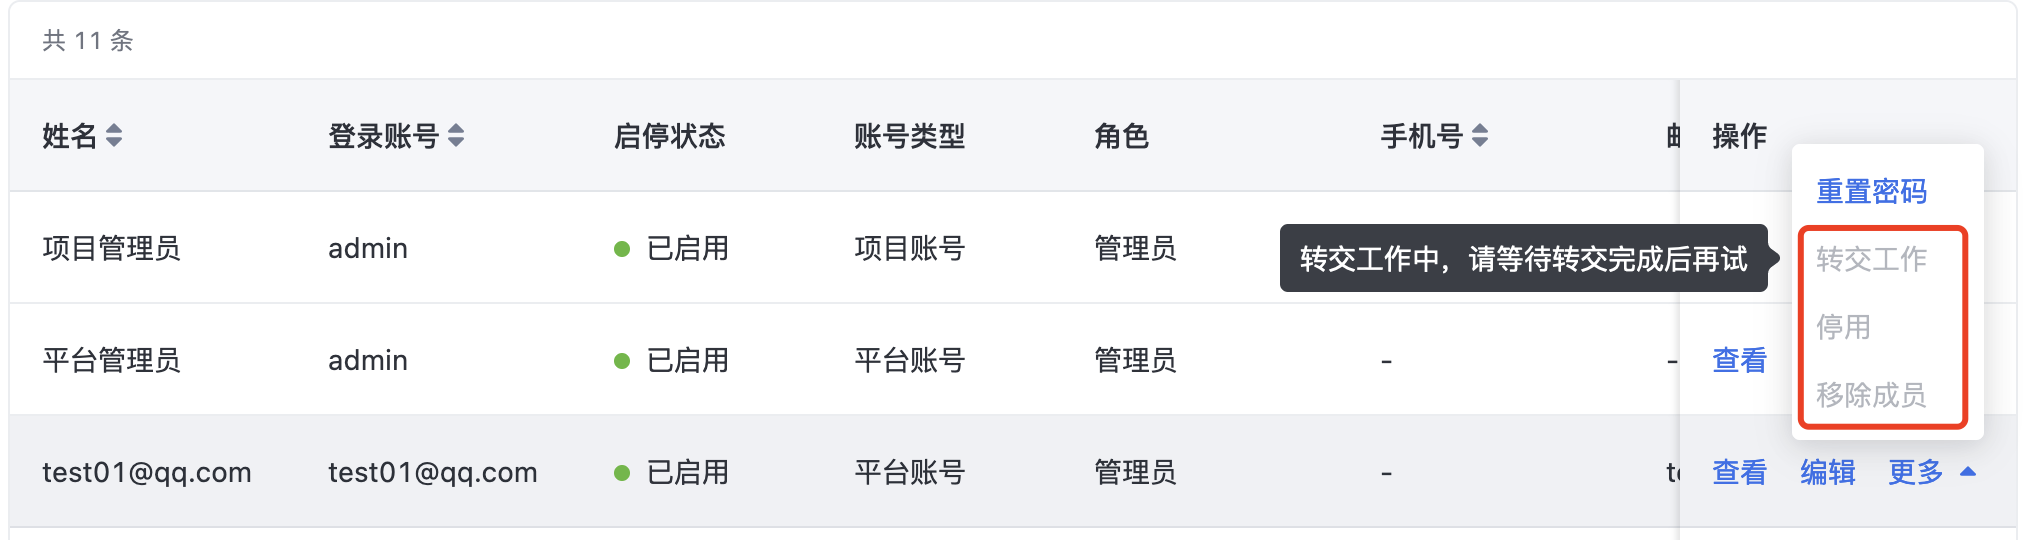
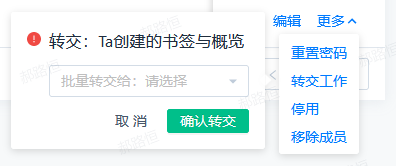
Remove member
- Click "Remove Member" and the corresponding pop-up window will appear
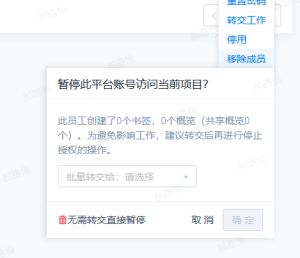
- As a first step, you can choose whether you want to hand over the bookmarks and overviews created by the account:
- If you need to transfer, select the account you want to transfer to and click "OK";
- If you do not need to transfer, then you can click "no transfer directly pause";
- Note: If the account is deleted without transferring the resources under its name, the account will be deleted.In addition, the resources under this item are deleted synchronously
- After clicking "OK" or "Pause directly without transfer", a secondary confirmation window will appear to remove the member; Depending on whether the current account only belongs to the current project, there are different prompt documents (the picture on the left shows that the current account only belongs to the current project; The picture on the right shows the current account belongs to multiple accounts)
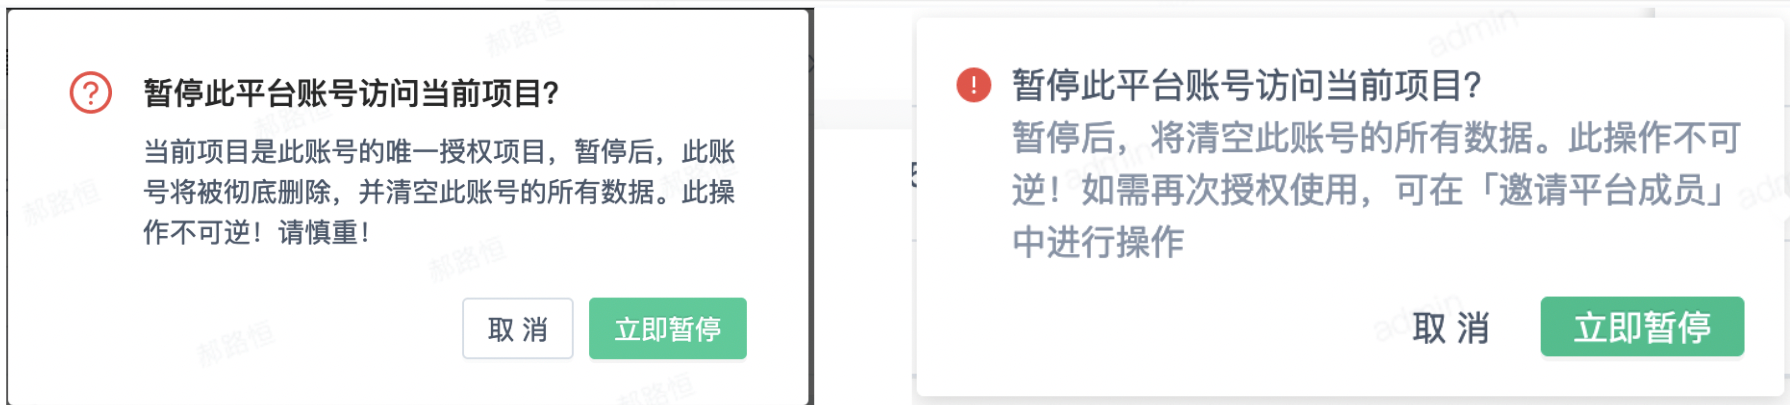
- Click "Pause Now" and the account will be removed from the project
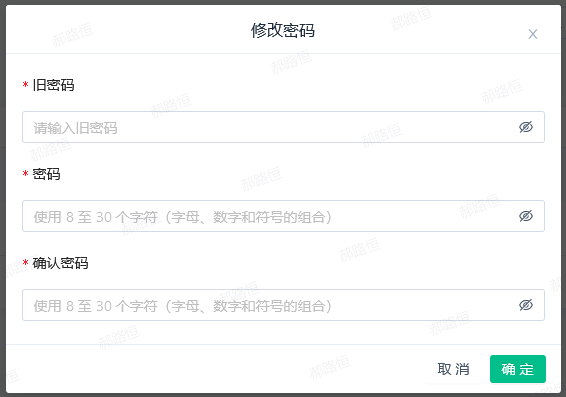
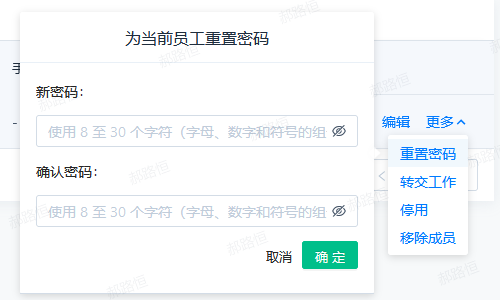
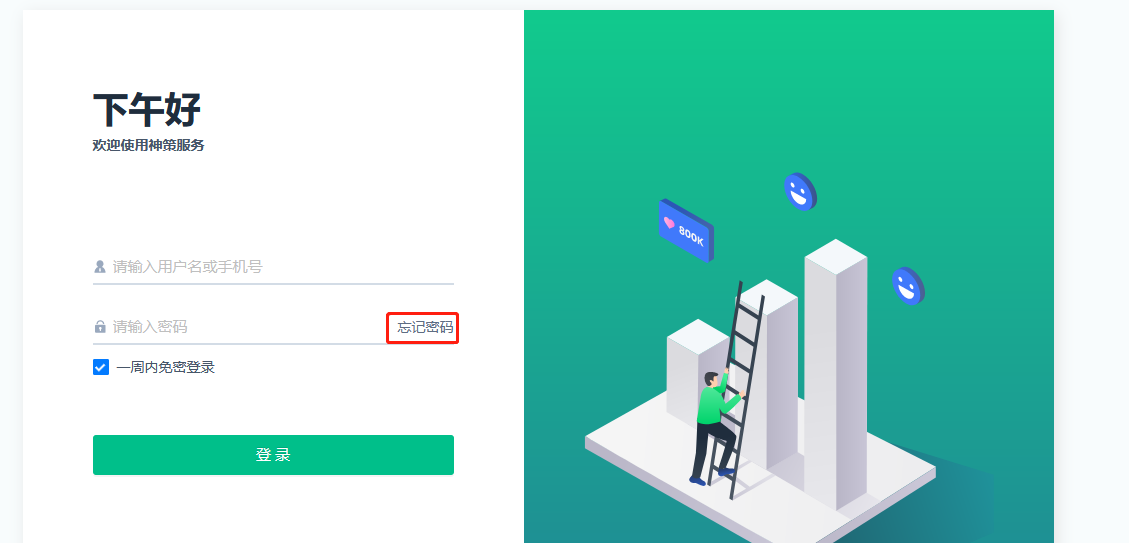
reset password
There are three ways to reset your password:
- Personal Center reset password:
- You need to enter the old password and the new password twice
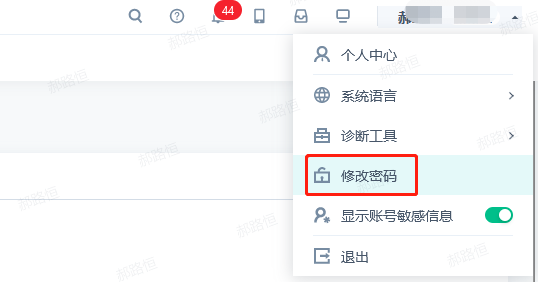
- Member list Reset password:
- You need to enter a new password twice

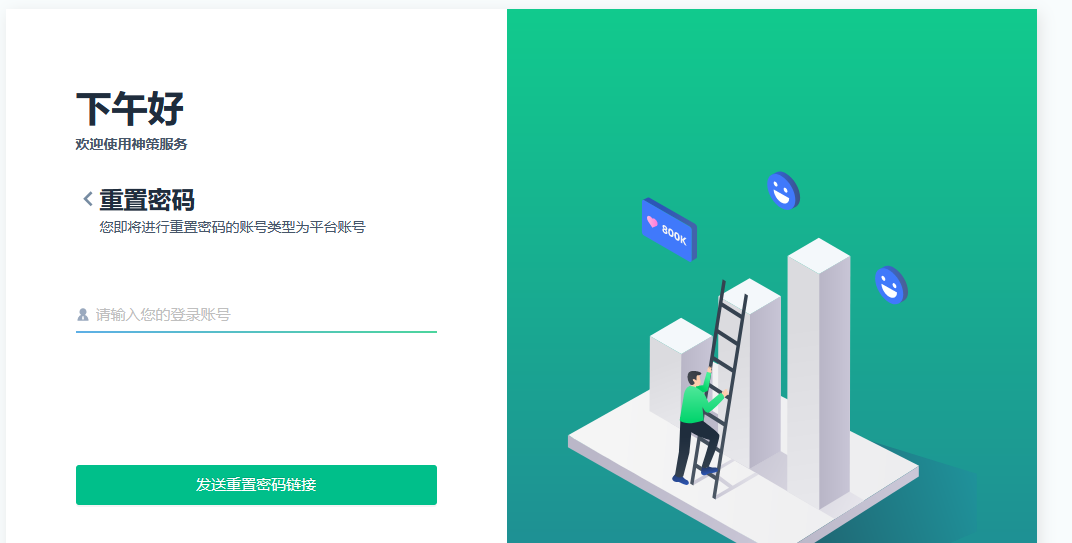
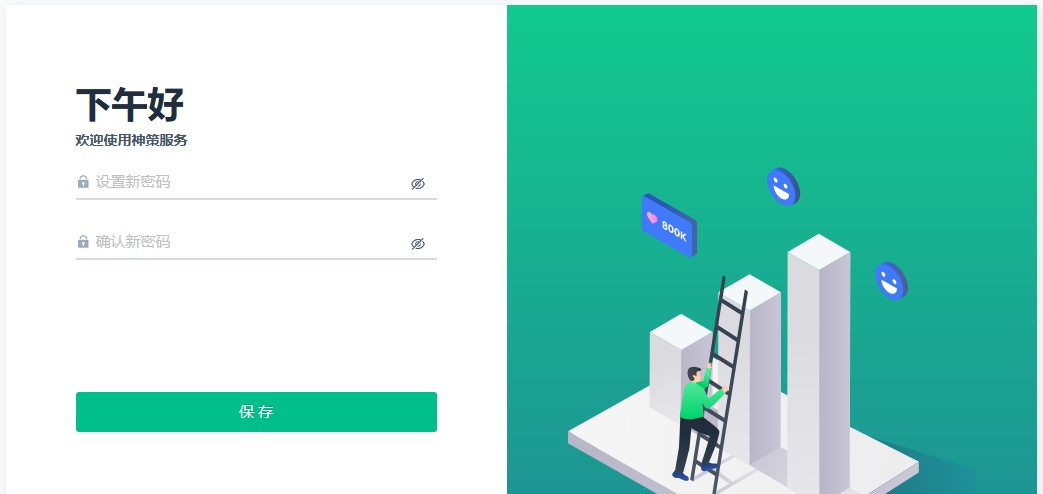
- Reset password link:
- Click "Forgot Password", enter the account you want to reset, then click "Send reset password link"
- The email address bound to the account you want to reset will receive a password reset link
- Click the link to go to the Reset password page
Download Member Information
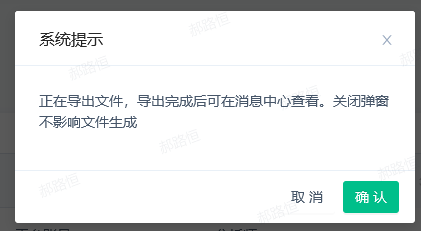
- Click "Download Member Information", all member information will be downloaded as an attachment
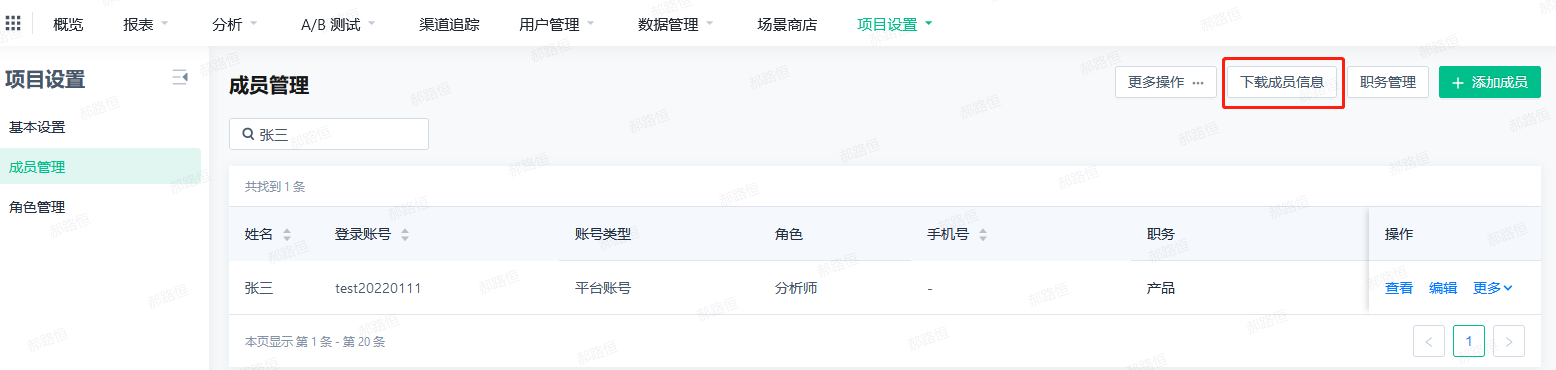
- The downloaded attachment contains roughly the same information as the member list, with the only difference being two extra fields:
- Last access time, that is, the time of the latest data in the last 30 days recorded in the operation log
- Last 30 Days Active Days Indicates the total number of days that have operation log data in the last 30 days

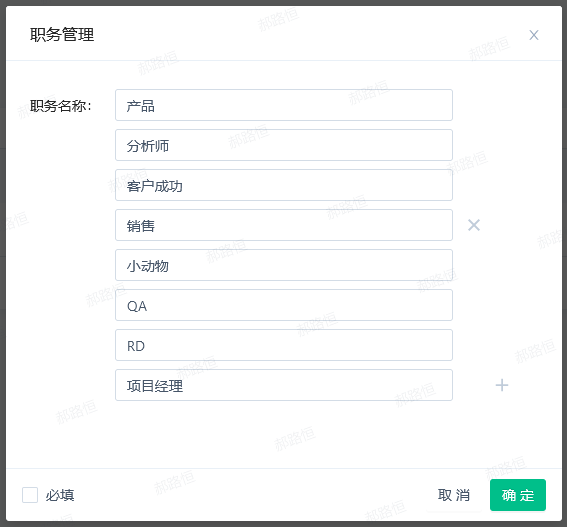
Job Management
- Click Job Management to enter the job management pop-up window
- Positions can be added, deleted or changed
- You can set whether the job is a required attribute of the account
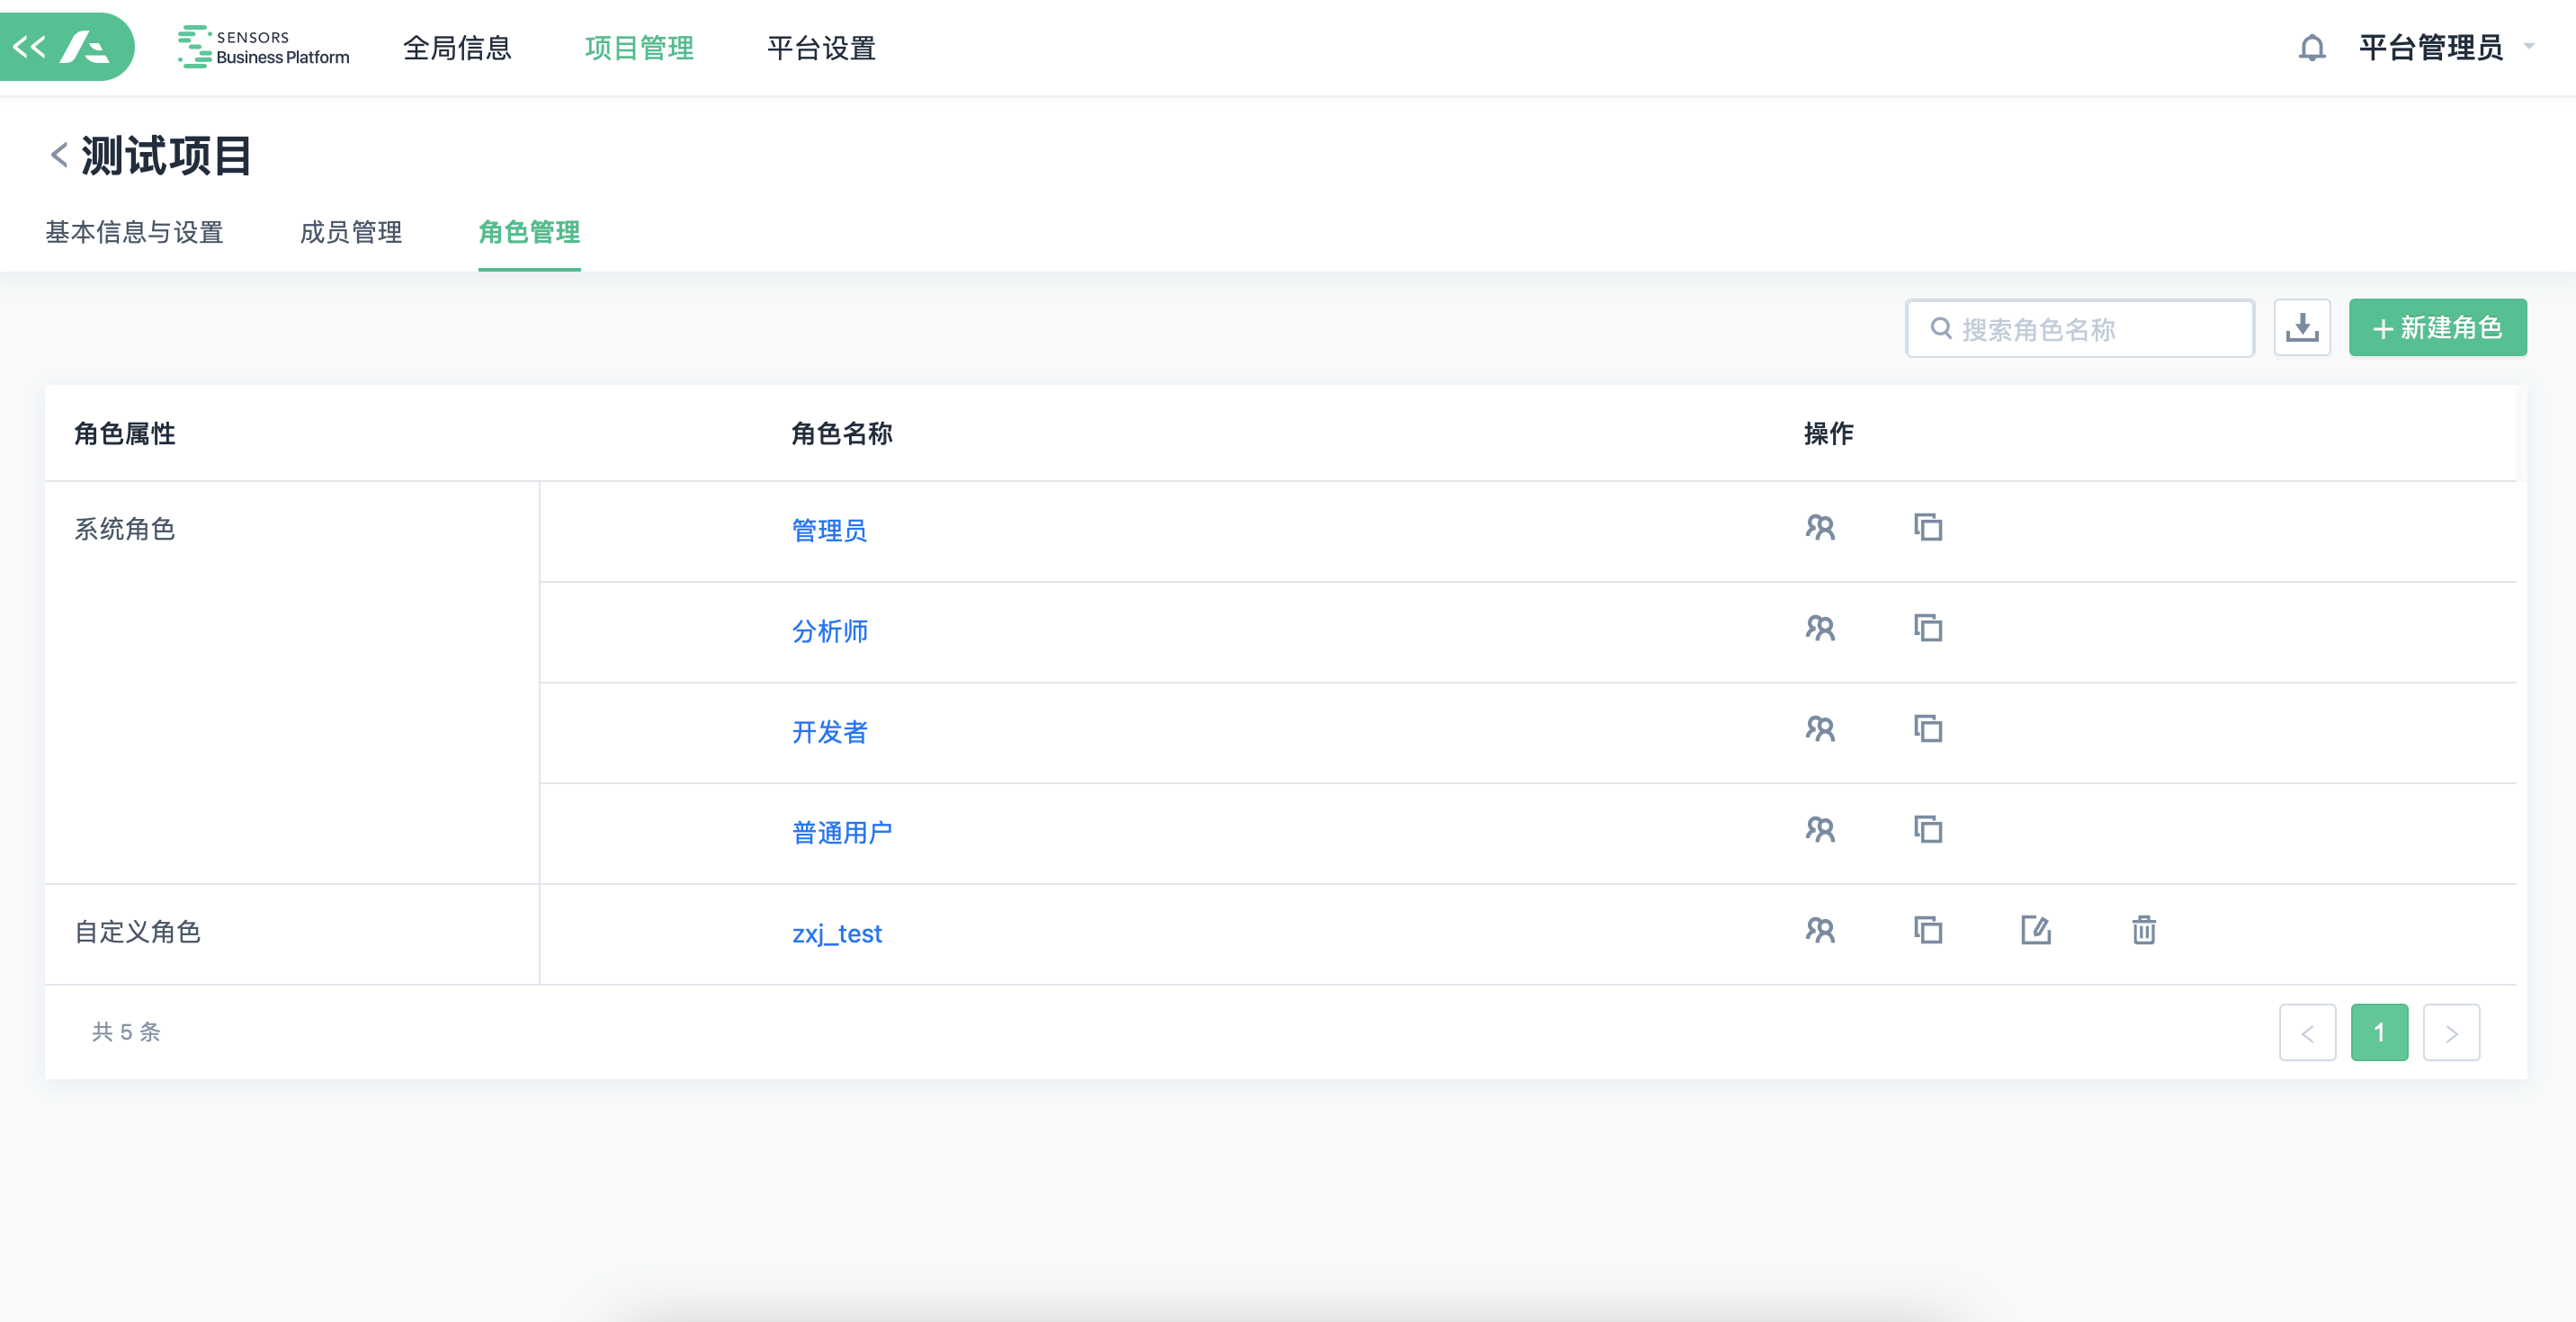
Role management
A role is equivalent to a permission package. When an administrator creates an account for each member, they need to choose the member's role. We support customizing roles based on requirements and assigning different permissions to them. For example, the administrator role can set up the system's basic information, while the analyst role can only use and view the system.
Roles are divided into "system roles" and "custom roles":
- System roles: pre-configured roles provided by the system, including: administrators, analysts, developers, and ordinary users. The permission points of system roles are pre-configured by the system. System roles cannot be deleted or modified with the bound permission points. "Administrators" have all permissions, and "ordinary users" have fewer permissions.
- Custom roles: roles created by users themselves, which can modify the bound permission points and be deleted.
Multi-role authorization model
Segmentation products support the "multi-role authorization" model, which combines and distributes different roles as needed to quickly meet different authorization requirements. When a member is granted multiple roles, the member's permissions are the maximum collection of permissions authorized by multiple roles. For example:
Xiao Zhou is assigned with roles A and B. After Xiao Zhou logs into the segmentation platform, he can see the data range of all users and can use the functions of viewing and managing overviews. Even if role B only authorizes the use of data of some users, this limitation is invalid due to the maximum set of permissions authorized by multi-roles for Xiao Zhou.
| Roles | Authorization Module | Permission Configuration |
|---|---|---|
| A | Data Range | Able to view all data of all users |
| Functional Scope | View Overview | |
| B | Data Range | Able to view data of some users; the condition for some users is "residence area" equals "Beijing" |
| Functional Scope | View and manage the overview |
In order to allow the rights assigner to manage the rights of each member more effectively, and quickly verify whether each member is correct after authorization, we provide a "profile page" to summarize this information, and support members with "member management rights" can directly view the role assignment of each member, as well as the final authorization result and the authorization source of each module.
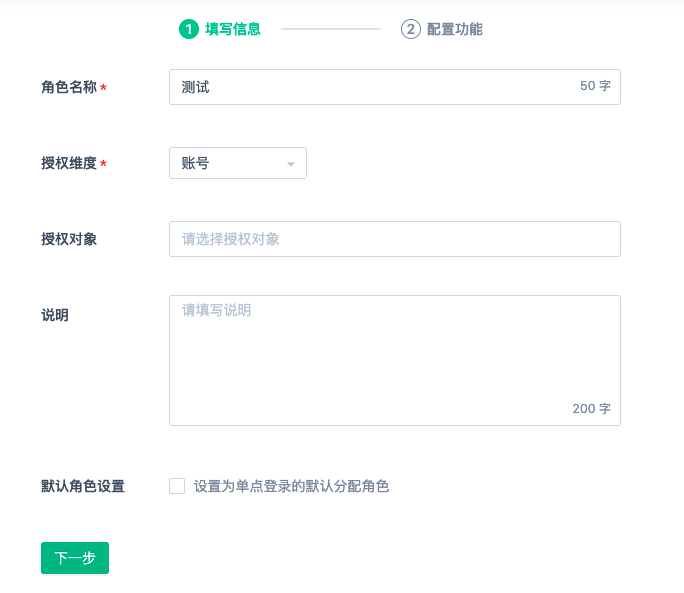
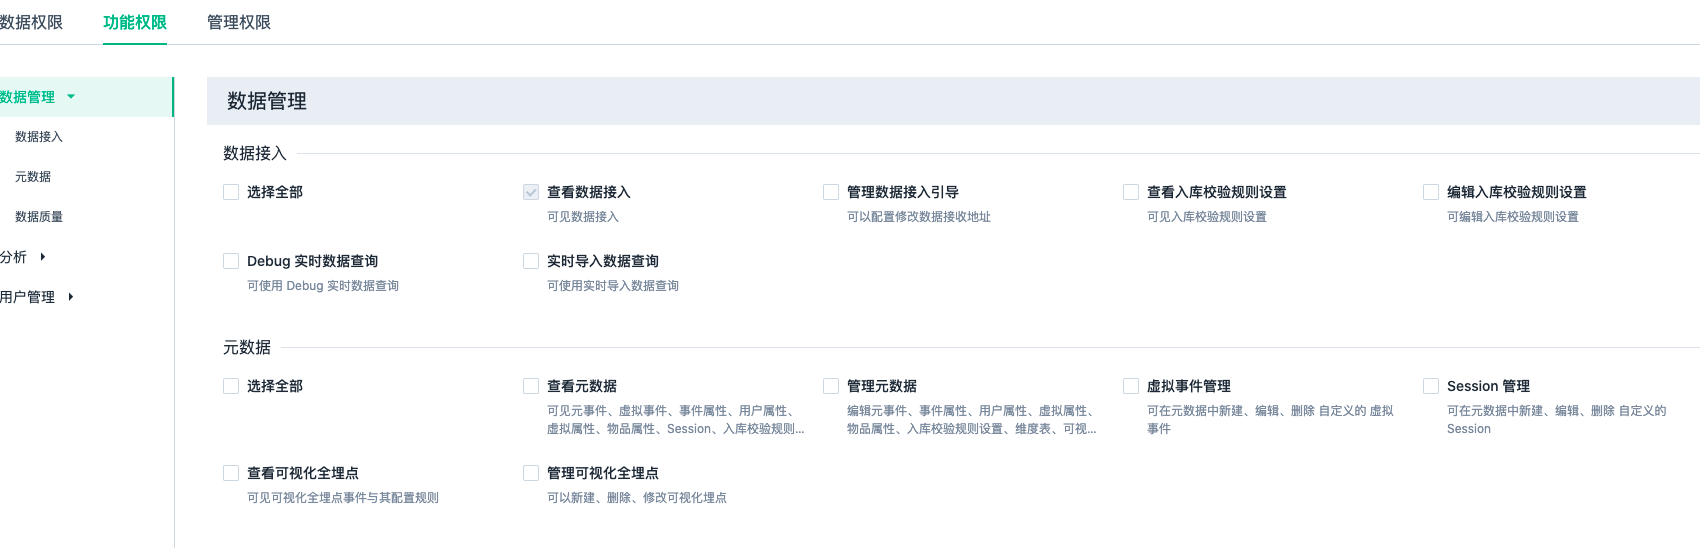
Creating a role
Sensors supports custom roles based on business requirements. Click Create Role, enter the role name, authorization dimension, authorization object, and select the required rights.
Authorization dimension Indicates the role assignment mode. You can select only by account or by job.
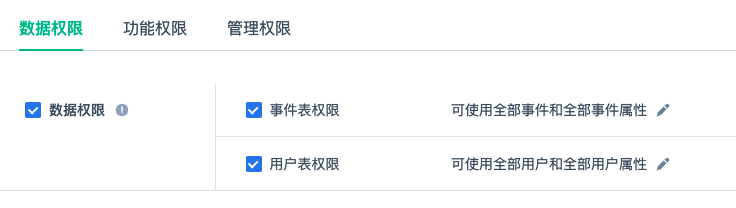
E-U Data permission
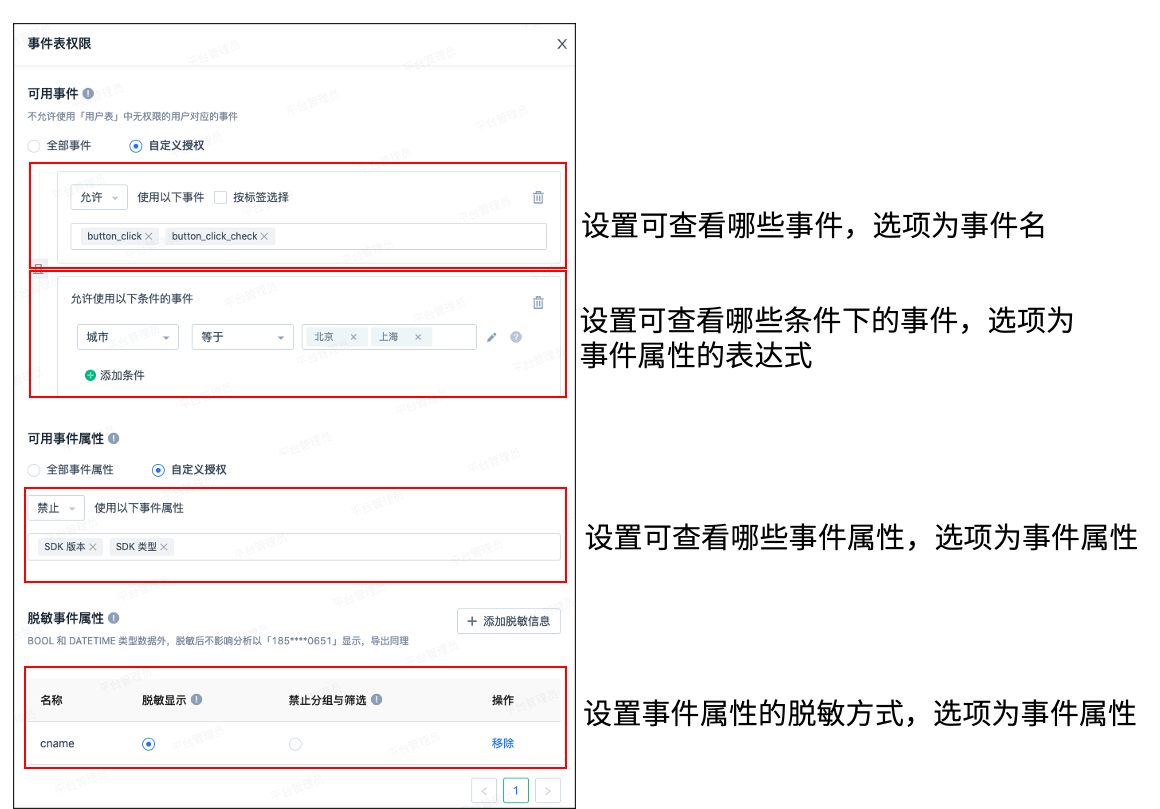
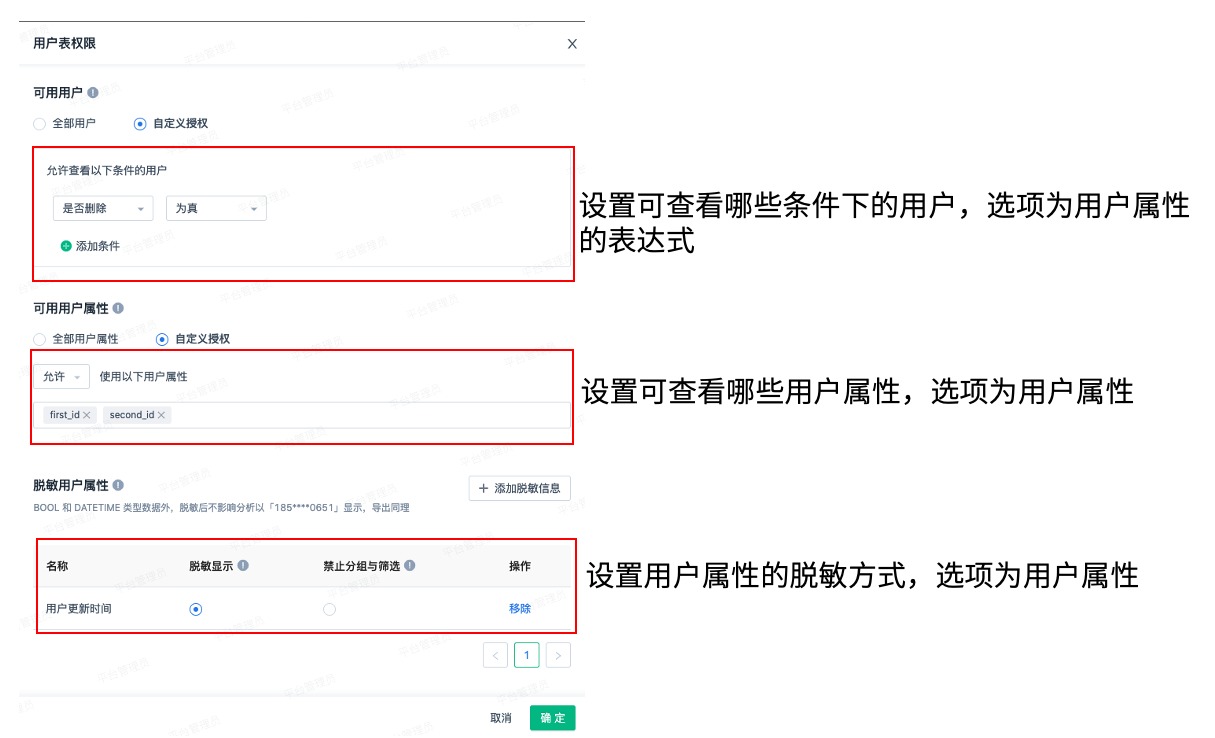
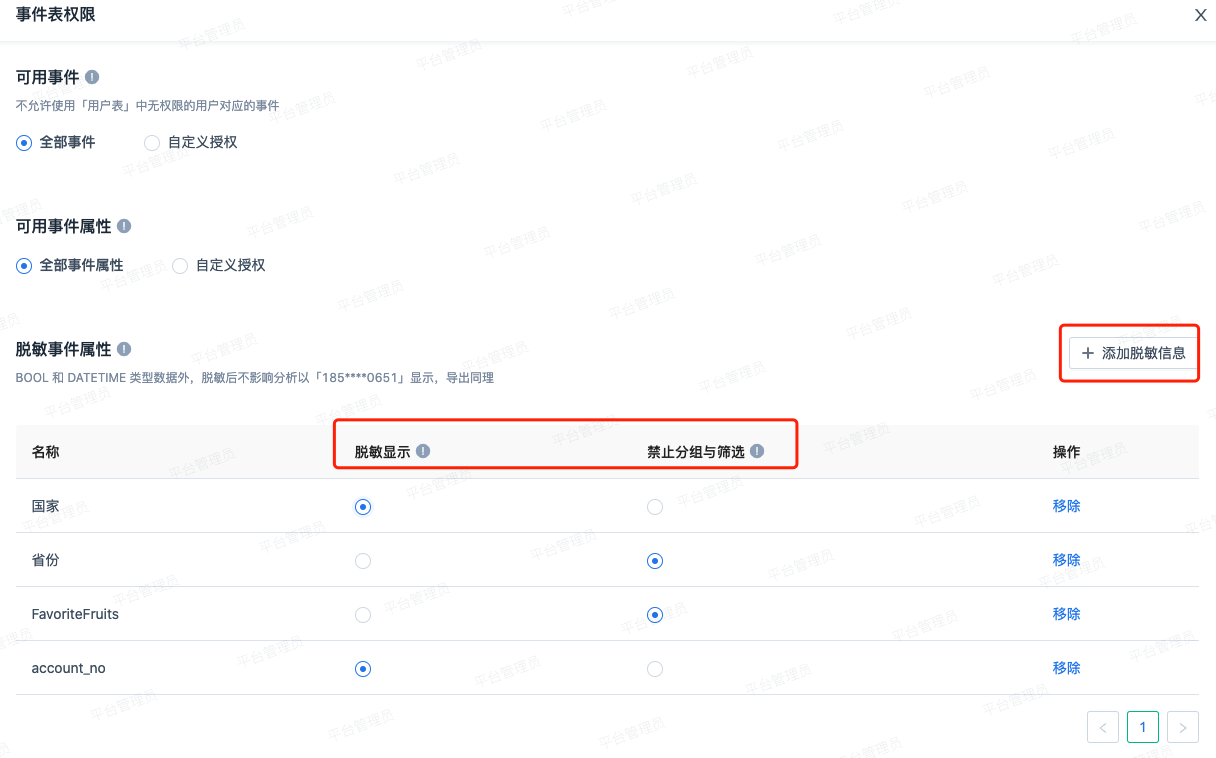
You can customize which data in the event table and user table can be analyzed by the current role. The flexible combination can fully meet the various scenarios of enterprises. We can use event attributes or virtual event attributes to restrict this. After virtual event attributes are created, roles are created.(Click to see how to use virtual properties)
Solution | Instructions |
|---|---|
| All events and all event properties are available | All data in the event table can be analyzed and queried |
| Partial events and partial event properties are available | You can view only the events under specified conditions, and only some event attributes |
| Cannot use event table data | Unable to access event table |
| Can use all users and all user attributes | All data in the user table can be used for analysis and querying |
| Can use some users and some user attributes | Can only view specified users under certain conditions and can only see some user attributes |
| Cannot use user table data | Unable to access user table |
# Application scenario introduction #
1. Authorized access to data from the past 30 days
Limit users to only view data from all users that occurred in the past 30 days. We can then set "Can use some events and some event attributes" and select virtual event attributes such as "Event Occurrence Time" and "Relative to the Current Occurrence Time" within "30" days "ago".
2. Division between departments based on regions, and authorized access to data for all users in "Beijing"
You can set "Can use some events and some event attributes" and "Can use some users and some user attributes" data, then select user attribute "City" equals "Beijing"; select event attribute "City" equals "Beijing".
Specify desensitized information
Role management allows configuring corresponding desensitized user attributes and encrypted event attributes for each role. Important information can be effectively desensitized without affecting analysis.
Take encrypted settings for user attribute as an example. Encryption can only be applied to non-BOOL and DATATIME type attributes. Encryption can be done in two ways:
- Desensitized display: The attribute value will be desensitized in the user list, behavioral sequence, and analysis model and overview. The desensitized content can be successfully analyzed, used as a grouping condition, but cannot be used as a filtering condition. If a role includes users who have previously created bookmarks or overviews using this attribute as a filter condition, the bookmarks will not be able to query normally.
The desensitized content will be displayed with masked characters in the middle. The specific display may vary based on the length of information. At most, the first and last 2 characters of the information will be shown. If the desensitized value is duplicated, "_number" will be appended at the end. For example, the phone numbers 18999999988 and 18999998888 will be displayed as 18****88_1 and 18****88_2; if the length is 1, it will be displayed as *_number." - Prohibited grouping and filtering: This information cannot be used for data grouping in the analysis model, nor can it be used as a query condition in the filtering condition. This applies to all analysis models and custom queries.
Either of these encryption methods can be selected. If you do not want users to view the specific information of this attribute and do not want others to use it in the analysis model, you can go to the configuration of "Can Use Event Attributes" and "Can Use User Attributes" to completely disable it.
If a member belongs to both a role with encrypted display and a role without encrypted display, the result in the system will be displayed as encrypted.
Entity Data Permissions (in beta)
For customers who have installed the "Sensors Data Platform" product, "Entity Data Permissions" is used instead of "E-U Data Permissions" for permission control.
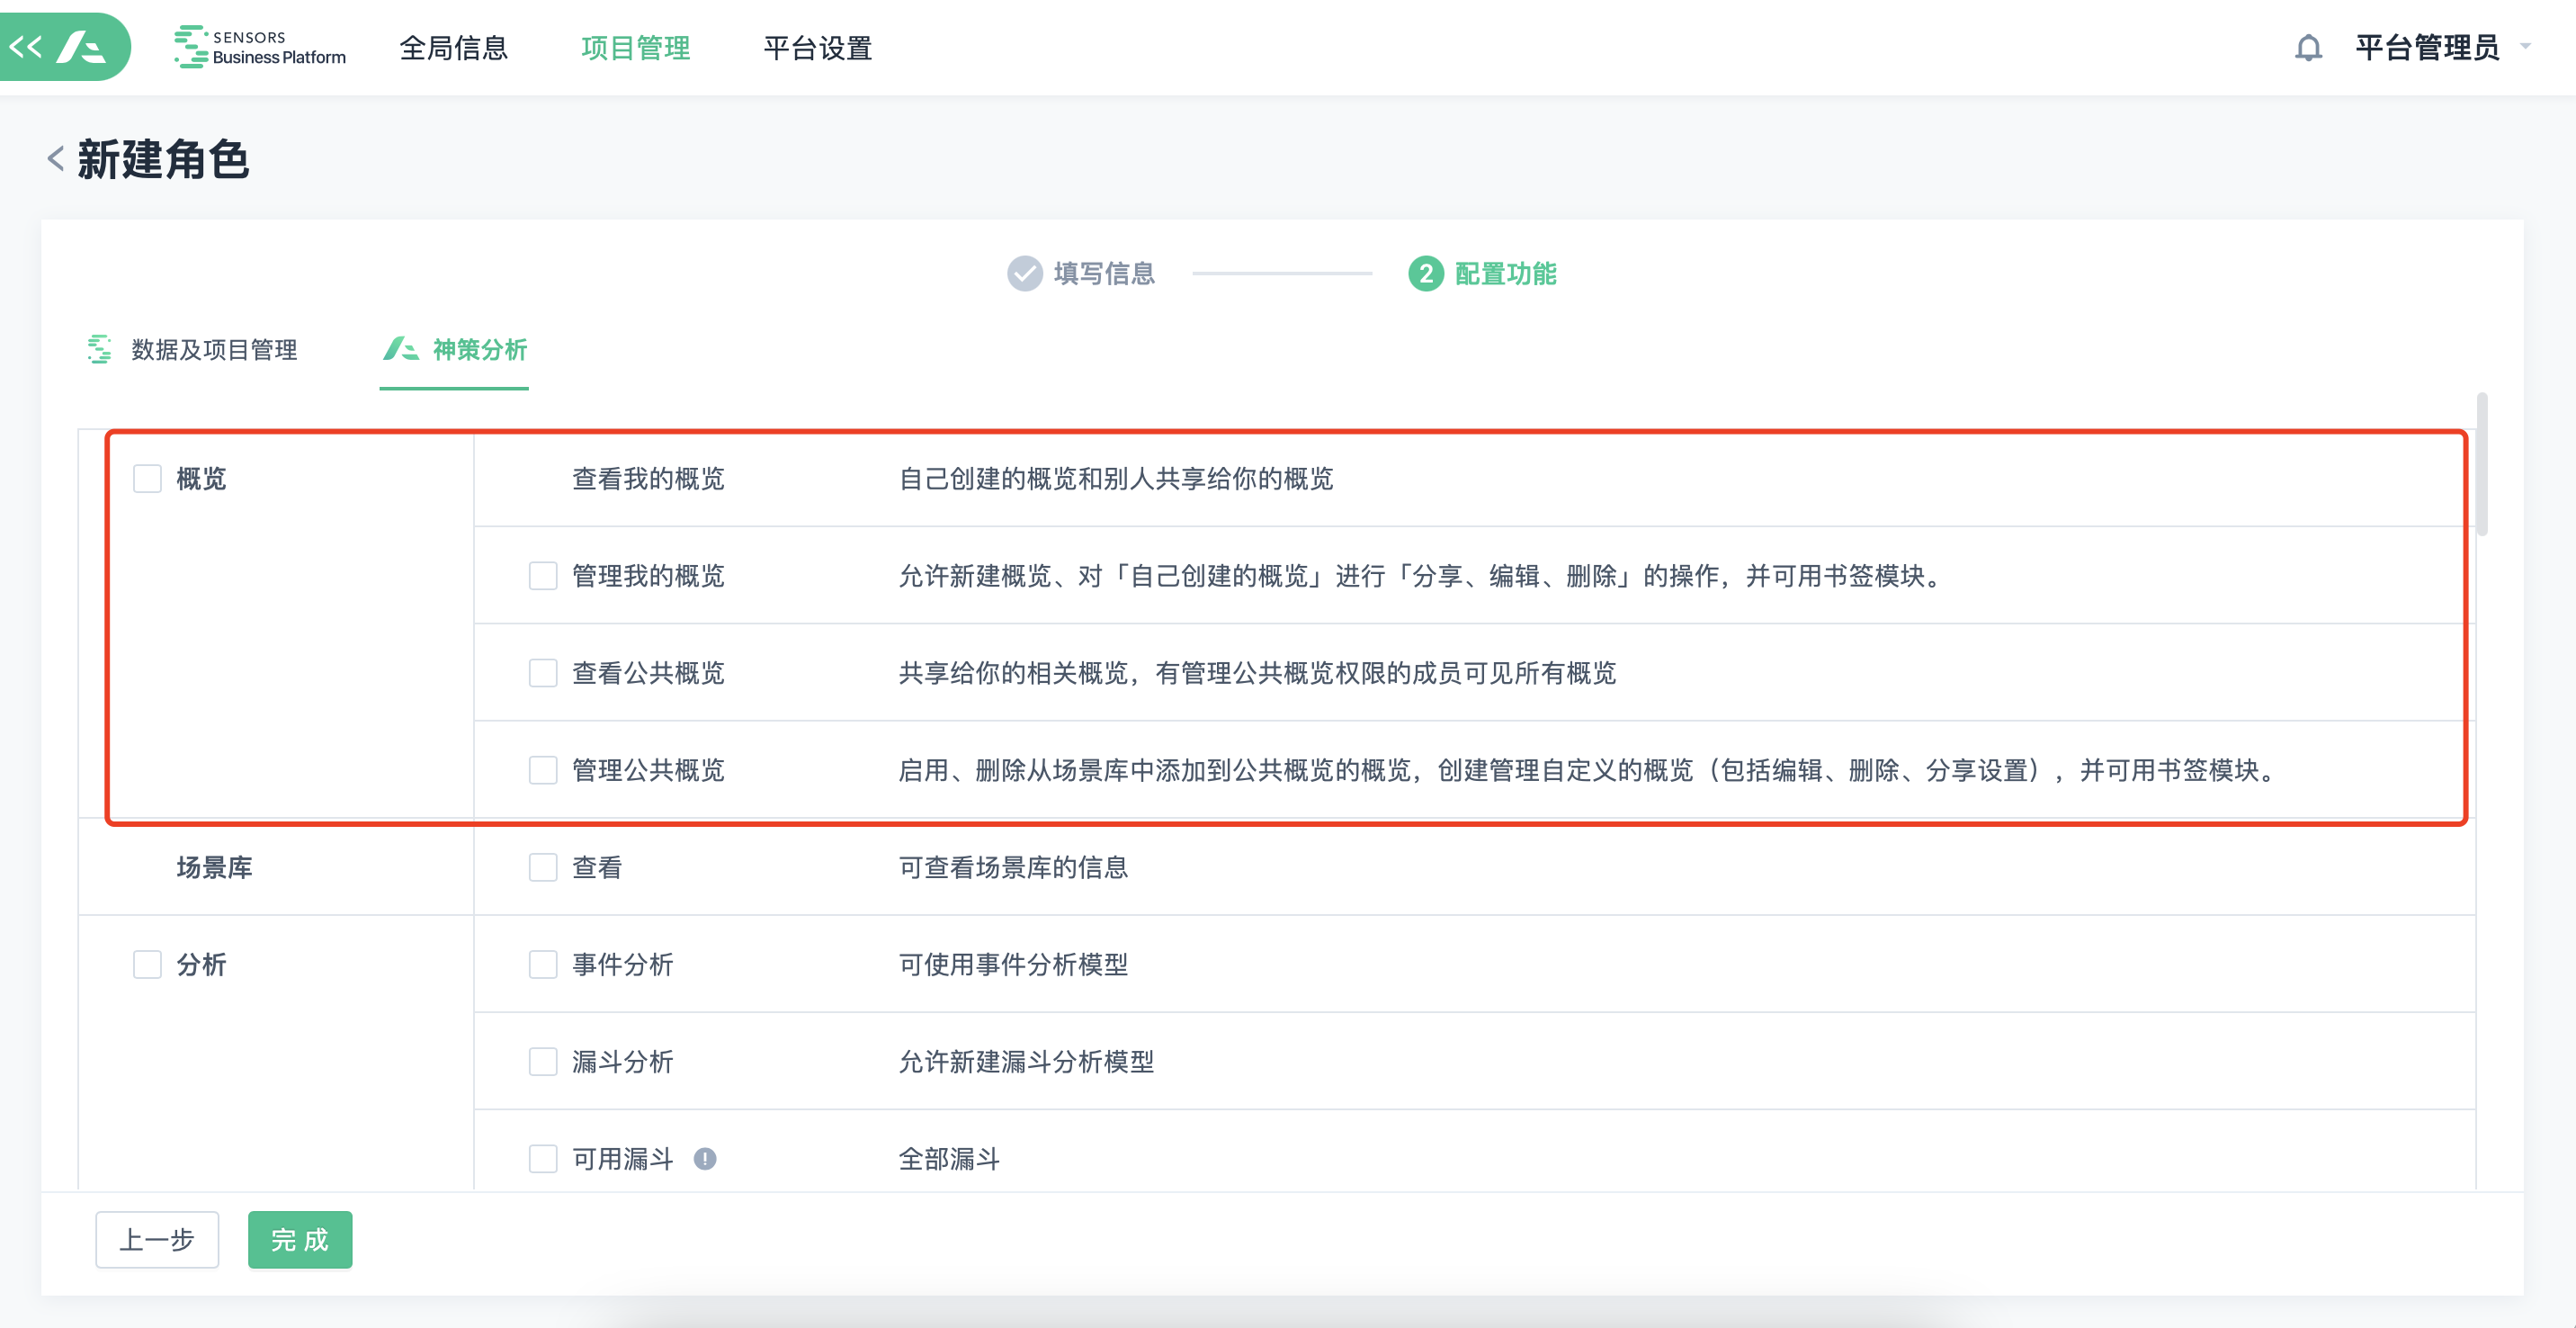
The "Overview" is divided into four parts: "View My Overview", "Manage My Overview", "View Public Overview", and "Manage Public Overview".
- With the addition of "Manage Public Overview," users can create public overviews from the scene library or create their own public overviews.
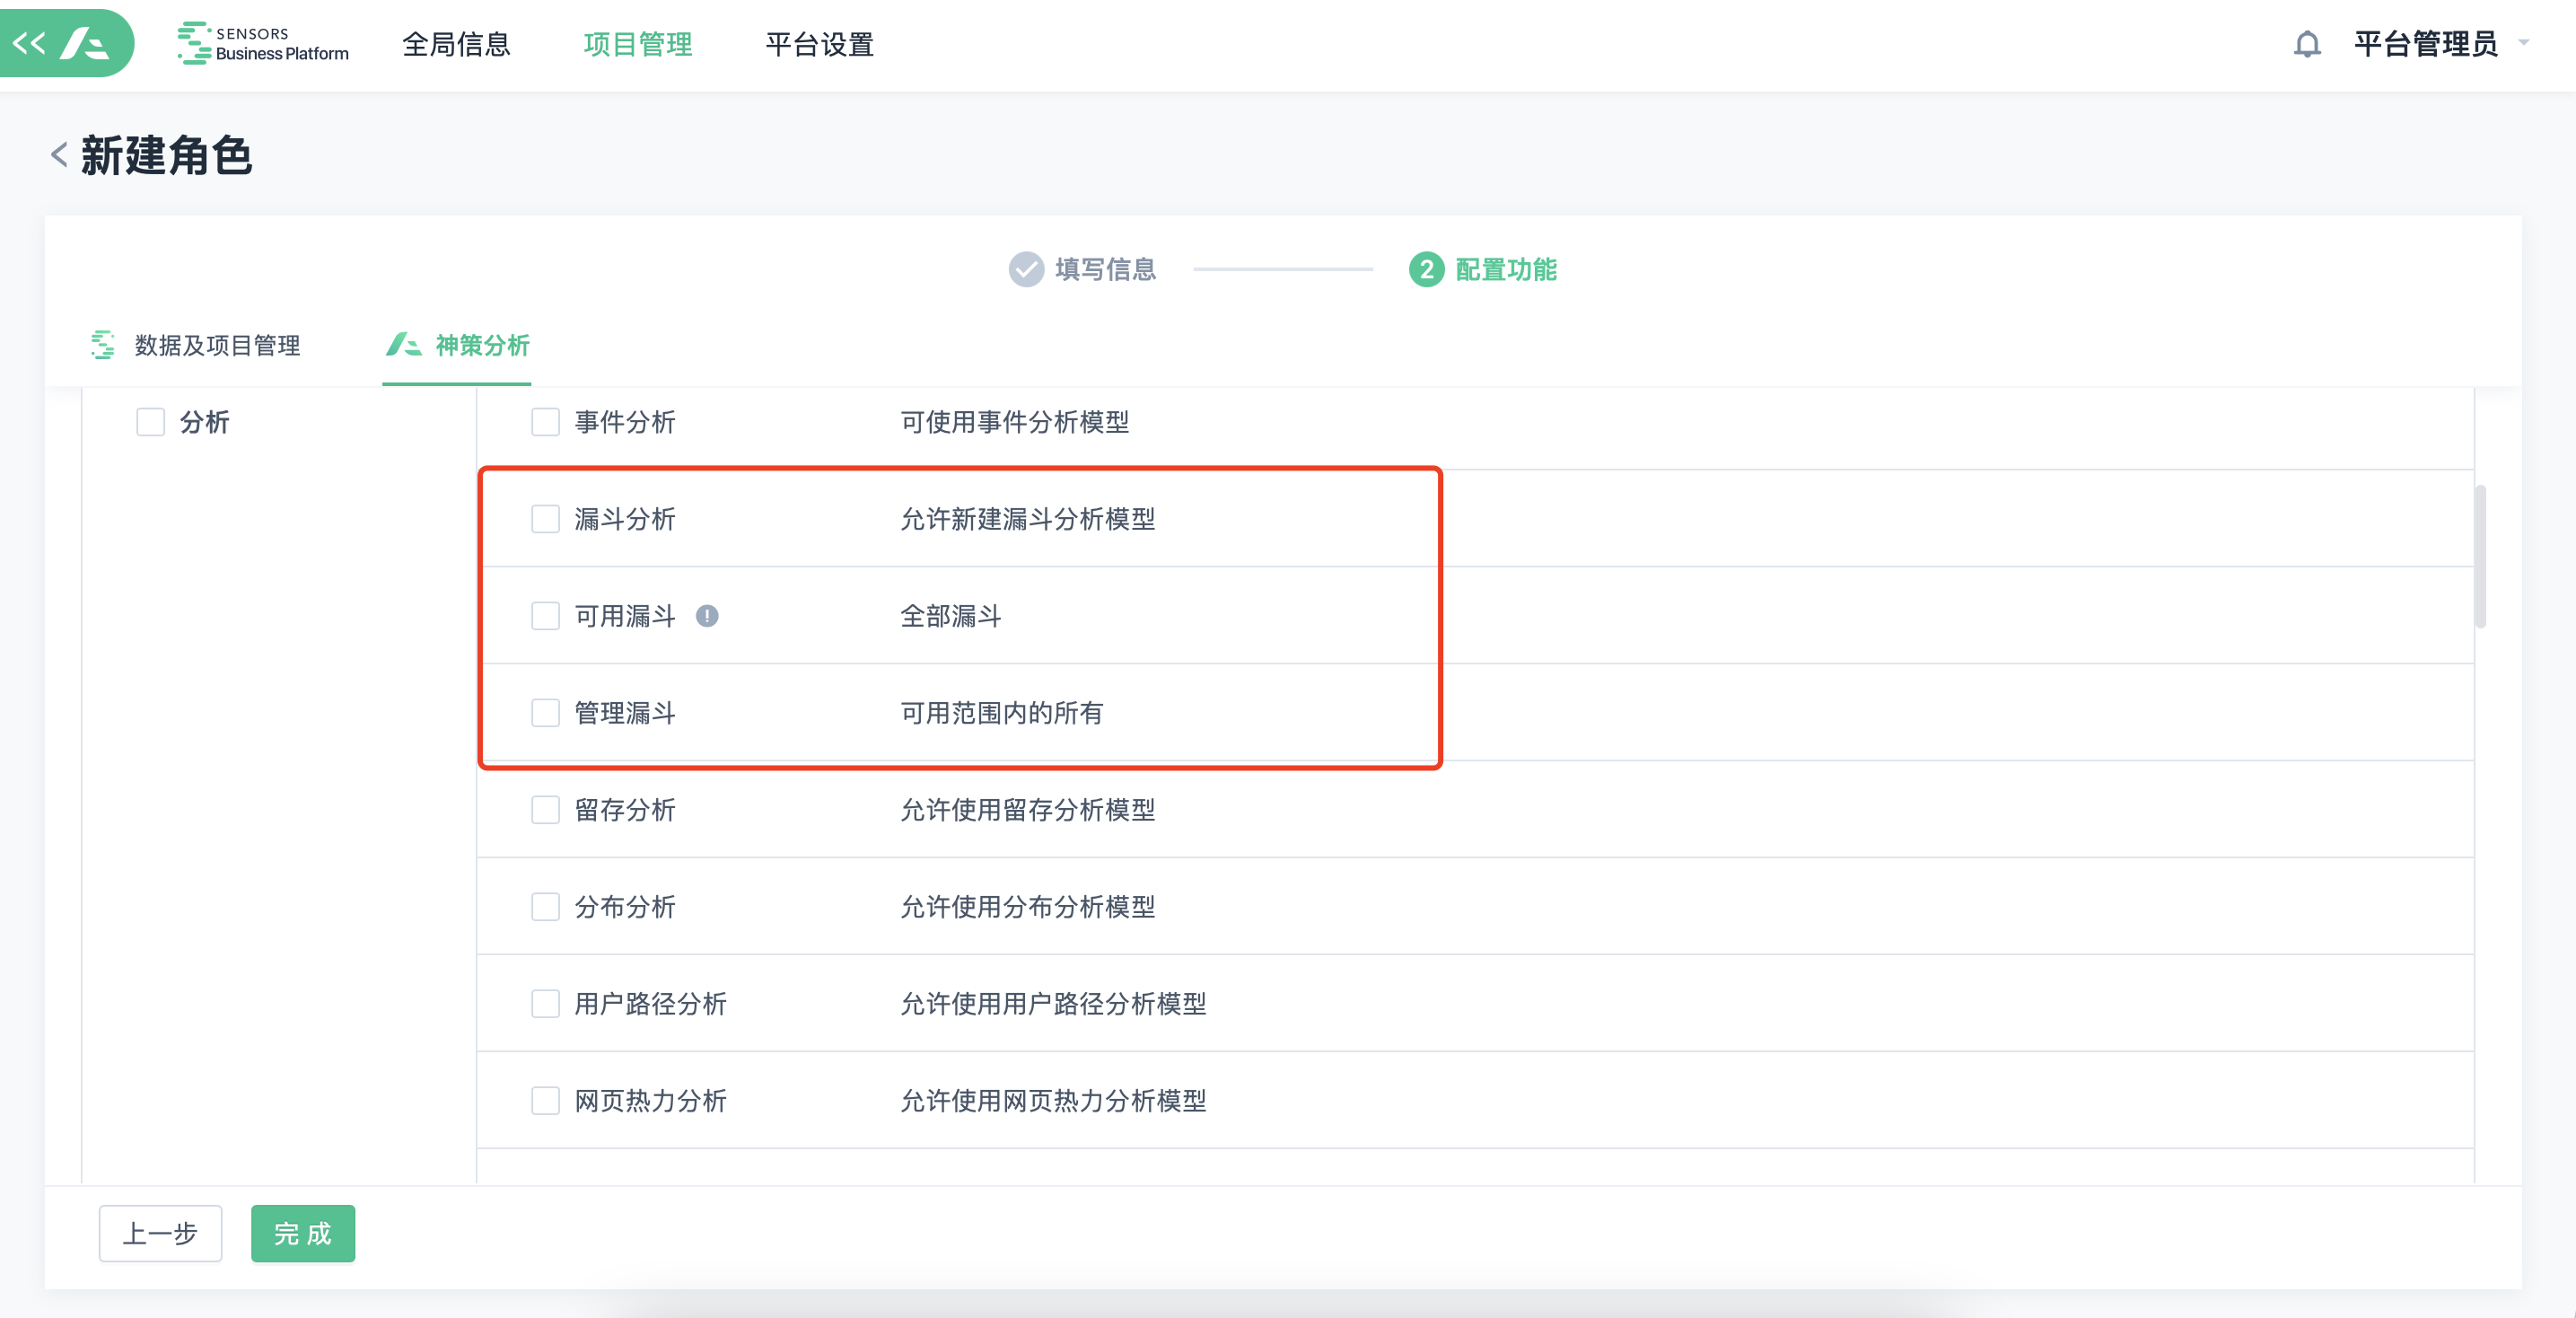
The funnel permissions are divided into: Available Funnels and Manage Funnels based on user usage.
- Available Funnels: Users can choose which funnels to use for analysis based on "All Available", "Created by Admin", or "Specified Member".
- Manage Funnels: Users can edit and delete funnels that they have access to in funnel analysis.
- Any user with the funnel analysis permission can create and manage their own funnels.
Member Management - Implementation of hierarchical permission delegation
In member management and role management, we provide the following four permission configurations. Suitable for enterprises with many members and departments, who wish to authorize department administrators to maintain member information within their own departments. And to avoid loose control over other functions and data permissions caused by the delegation of member management permissions.
| Permission Name | Scope | Tip |
|---|---|---|
| Create User | Allow creating an account or inviting new platform accounts to the current project | After authorization, the role user can perform three operations: create, batch create members, and invite platform members. |
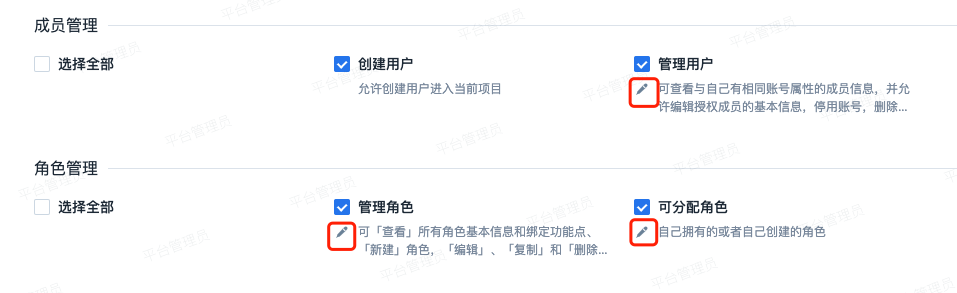
| Manage users | Can view "All Members" information and edit the basic information, deactivate, delete the account of authorized members | - |
Can view members with specified "positions" and edit the basic information, deactivate, delete the account of authorized members | If you also have the "Create Account" permission, you will be required to select only the specified "position" when creating members or inviting platform members Similarly, in the member list, this role can only view the information of members with specified "positions" | |
| Can view members with the same account properties and edit the basic information, deactivate, delete the account of authorized members | If you also have the "Create Account" permission, you will be required to select only your own account properties (position or custom account properties) when creating members or inviting platform members Similarly, in the member list, this role can only view the members with the same account properties as themselves In this case, it is usually recommended for customers to import custom account properties such as organization structure/department/position, so that each department administrator can only manage accounts under their own department. | |
| Manage roles | Can "view" all role basic information and bound function points, "create" roles, "edit", "copy", and "delete" all role basic information and bound function points | - |
| Can "view" all role basic information and bound function points, "create" roles, "edit", "copy", and "delete" their own or created by themselves role basic information and bound function points | When "creating", "editing", and "copying" roles, can only select the permissions points they own; and can only delete the roles they own or created by themselves. | |
| Can assign roles | All roles | - |
| User Role | You can only authorize the current role and in the member management, only use the specific role items specified. In this case, it is usually recommended that the top administrator of the company configures all the required roles in advance, so that the department management can directly use the created roles. | |
| Roles owned or created by oneself | You can only authorize the roles owned or created by yourself and in the member management, you can only choose the roles owned or created by yourself. |
Click the edit button in the red box to set the scope:
Add the "Developer" system role by default
When the development team accesses data or deploys points, they need to use functions such as point management and metadata to view the completion of the deployment points, but do not need to use other business functions. In this case, you can assign them the "Developer" role. If this system role does not meet the requirements, you can also create a "Custom Role" for flexible authorization.
If the company purchases the "User Tag Product" and "Intelligent Recommendation Product", corresponding permissions can be configured.
User Tag Module Permissions
Added User Tag Module Permissions: If you have purchased the User Portrait System, you can set the permissions for viewing, creating, managing, reviewing, and managing the tag structure of "User Tags".
- View permission: Click "Edit" to set the range of tags that can be viewed, which supports selecting all tags, tags created by me, and custom authorized tags. Among them, the custom authorization supports setting visibility of specific user groups and dynamic authorization of whether "tags created by specific roles" can be viewed.
- Create permission: It means that you can create, edit, and delete data created by yourself.
- Management permission: Manage all user tags within the viewing range, including "Edit", "Delete", "Recalculate", "Enable/Disable" operations. When the role is authorized with "Create" permission, the management permission can choose between "all tags within the viewing range" and "tags created by me" depending on the business needs.
- Review permission: After a tag is created, it can be reviewed to determine whether it can be used.
- Tag structure management permission: Grouping, sorting, and managing all "tag tree structures" and "tag categories".
Personalized Recommendation Module Permissions
For example, if you purchase a personalized recommendation and do not yet support the custom permission configuration module, add the viewing and management rights of "Personalized recommendation". Solution 1: Support to view all recommendation-related data; Management of personalized recommendation "content library" "Content rules" "recommendation Rules" Solution 2 and 3: Support to view all recommendation-related data;
Note: The content of this document is a technical document that provides details on how to use the Sensors product and does not include sales terms; the specific content of enterprise procurement products and technical services shall be subject to the commercial procurement contract.
 Popular Searches