Adjust Data Integration Instructions
|
Collect
1. Introduction to Function Integration
This document will provide a detailed introduction on how to integrate Adjust data into the Sensors Analytics system in real-time. Specifically, it includes:
1. Storing the original data from Adjust's real-time feedback into the Sensors Analytics' Event-User table, allowing you to view and analyze the received raw events and users. (Note: When storing the third-party feedback data into the database by event, this part of data will be included in the consumed event count of the cluster.)
2. Storing the attribution results of each new user from Adjust's real-time feedback into the Sensors Analytics' overseas attribution record table, allowing you to view and analyze the overseas channel sources corresponding to user behaviors reported by Sensors Analytics.
3. In addition to the default attribution information, you can add other placeholders allowed by Adjust for feedback to the event attributes and overseas attribution record table, allowing you to flexibly analyze other overseas channel attributes.
2. Integration Process
If you are using the real-time callback interface and the original data access function for the first time, you need to complete the following configurations step by step during the docking phase:
1. Integration and configuration of Adjust and Sensors Analytics SDKs
Integrate the Adjust client SDK and the Sensors Analytics client SDK, and through the Sensors Analytics SDK, obtain the Sensors Analytics user identifier in the client, and pass this identifier into the Adjust client SDK through the specified interface, so that when Adjust reports user behavior events, it carries the Sensors Analytics user identifier.
2. Configure the real-time callback interface on Adjust Dashboard
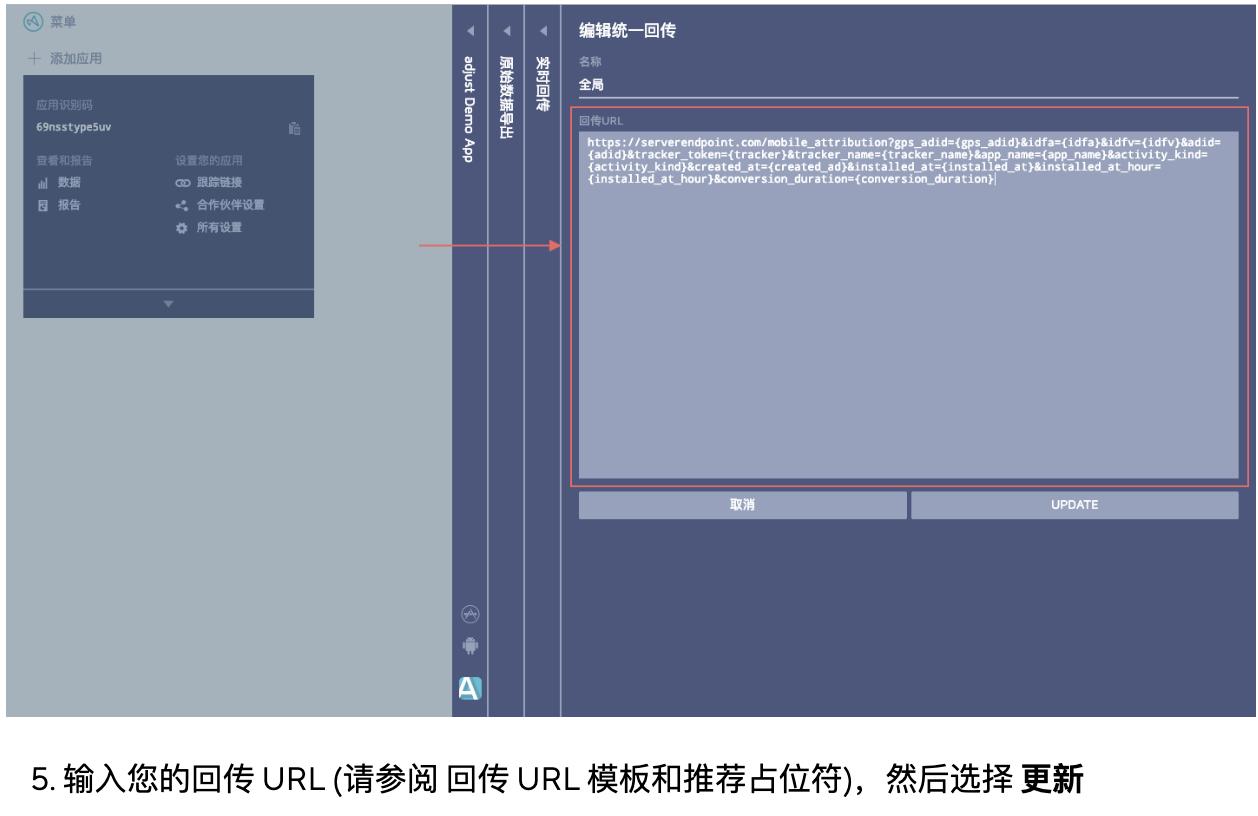
Copy the data receiving URL in Sensors Analytics' "Third-party Data Integration" - "Adjust Data Access" and fill it in the "Receiving URL" in Adjust's "real-time callback-universal callback".
3. Enable data receiving and event writing in Sensors Analytics, and add other custom message fields as needed
When the Sensors Analytics system receives real-time callback data, it will automatically integrate the data according to the write rules configured by you. At this time, you can query the Sensors Analytics and Adjust user behavior events and their corresponding channel sources in the Sensors Analytics model.
2.1. Client SDK Settings
If you want to link the real-time callback user behavior with the user behavior reported in the Sensors Analytics system at the user level, you need to report the Sensors Analytics user identifier in the Adjust client SDK to associate it with the reported users in Sensors Analytics.
The Sensors Analytics user identifier used in this function is the anonymous ID (distinct_id) and whether the user is logged in (is_login). After initializing the Sensors Analytics and Adjust SDKs according to the specified process, you need to call the interface to enable the reporting of this identifier.
For detailed configuration steps, please refer to: https://manual.sensorsdata.cn/sa/latest/page-118425429.html
2.2. Configure Adjust Data Receiving in Sensors Analytics
Before setting platform functions, ensure that 2.1 is complete; otherwise, the following Settings will not take effect.
2.2.1. Turn on the data receiving switch
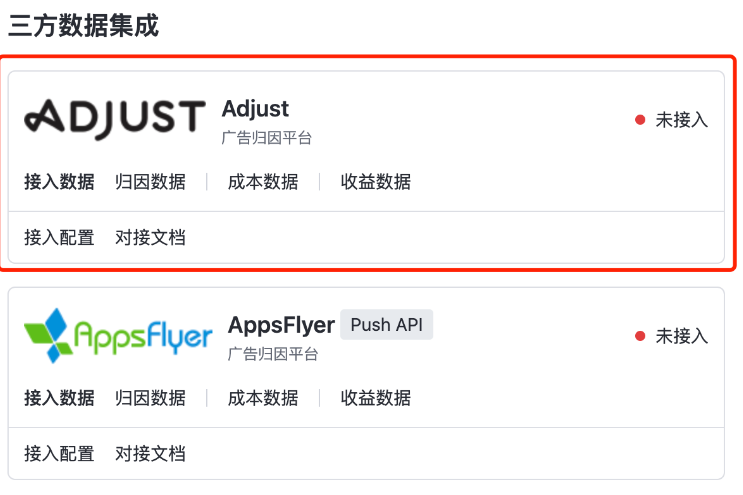
In "Three-Party Data Integration", find the "Adjust Data Access" function and click the "Access Configuration" button to enter the configuration page
Click the "Data Receiving Configuration" edit button, and select "Enable data receiving" to save. When Validity Status is Enabled, the data receiving switch is enabled.
Note: The data receiving switch takes effect in real time, and the change status will be confirmed twice. Do not change the status at will. Otherwise, the real-time data sending result may be affected.

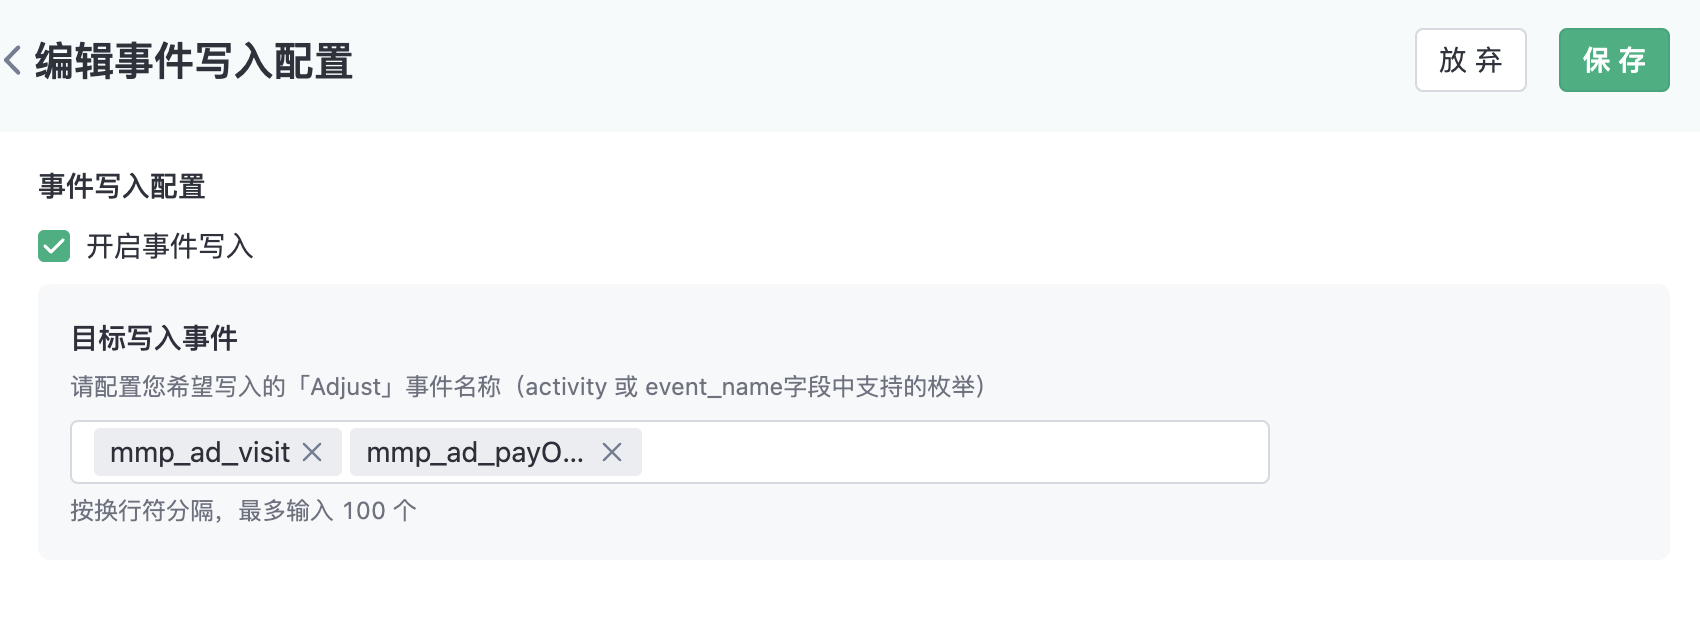
2.2.2. Turn on the event write switch
Click the "Event Write Configuration" edit button and check "Enable Event write". At this time, you can return the supported placeholders (enumerated values of activity or event_name) in real time according to Adjust, please refer to the details Adjust Unified return documents ), configure the user behavior events that you want to receive. The system writes the original data into the event table in the format of mmp_ad_ Target Event Name and records the corresponding user table.
For example, if you want to record payOrder events sent back by Adjust in the Sensors Analysis system, you need to ensure that Adjust has reported the behavior event, then enable the event write function in Shenze Event Write Configuration, and add the mmp_ad_payOrder event. This way, when Adjust returns a payOrder event via event_name, the analytics system automatically writes to the event table.
Note
1、Writing Adjust postback events will consume the amount of events in your analytics package; In particular, when the data receiving function is enabled, regardless of whether you enable event writing, the activation event (install) will be written to the event table to consume the set event amount, so as to achieve the function of connecting the gods and Adjust attribution.
2、Be sure to fill in the exact event name based on the activity or event_name enumeration value that Adjust actually reported (you can confirm the return event name with your Adjust account manager or SDK developer). The event name is case sensitive. Incorrect entries will not be written into the event table.
3、If you enter visit and press enter, the event is automatically named mmp_ad_visit. You do not need to enter mmp_ad_ repeatedly.
4、The change event configuration takes effect in real time and is confirmed twice. Do not change the status at will. Otherwise, data can be written in real time.

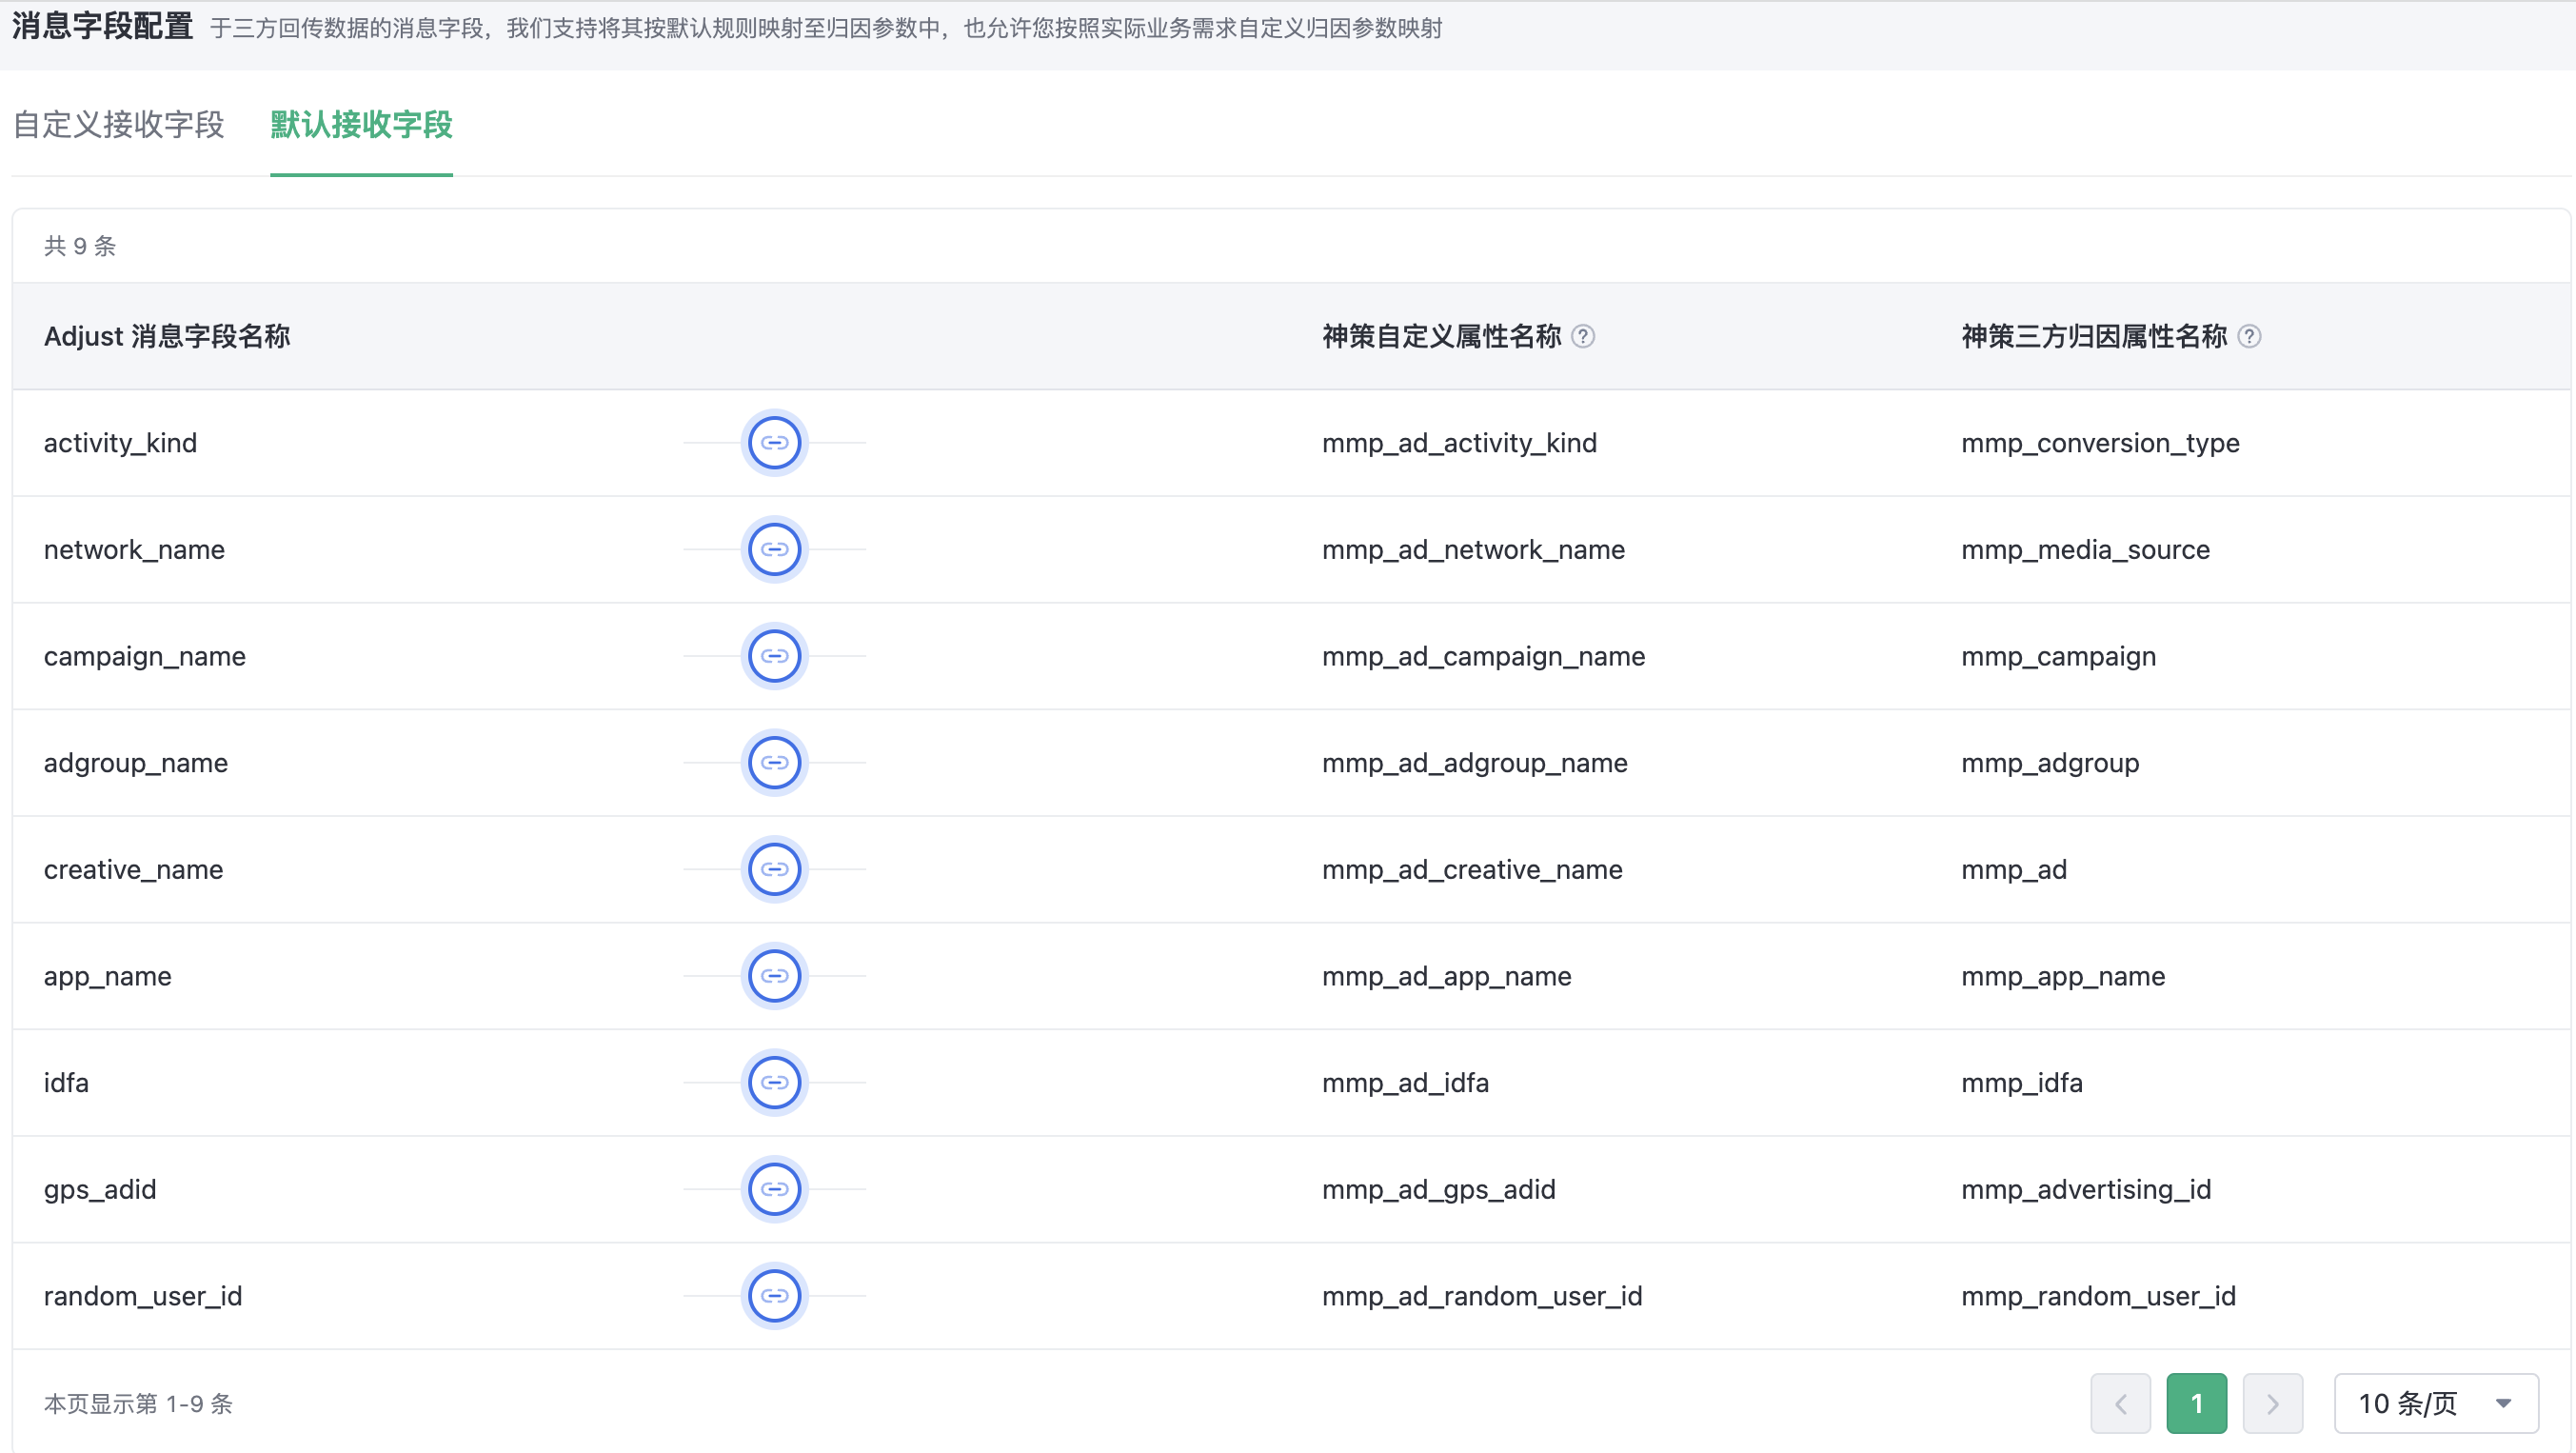
2.2.3. Configuring message fields
2.2.3.1. Default receiving fields
Sensors default supports writing the following Adjust message fields as custom properties into the event table and synchronously recording them in the Sensors third-party attribution property table. Default receiving fields are for viewing only and do not support deletion or modification.
The definitions of terms are as follows:
- Adjust message field name: The parameter field name provided by Adjust, which is case sensitive. If you add it yourself, please ensure that it is consistent with the Adjust Placeholder List field.
- Sensors custom property name: Used in the event table to receive custom properties corresponding to Adjust events; only applicable to Adjust event viewing.
- Sensors third-party attribution property name: Used in the third-party attribution table to uniformly receive channel property fields for activation events of multiple MMPs such as AppsFlyer and Adjust; it is actually a virtual property. Suitable for viewing MMP channel attribution results reported on Sensors.
- Sensors third-party first channel property: When a user is first attributed to a media channel, use this preset user property to record the channel attribution result of the MMP. Use profile setonce() for first-time updates.
| Adjust Placeholder | Corresponding Sensors custom property name | Corresponding Sensors third-party attribution property name | Corresponding Sensors third-party first channel property | Remarks |
|---|---|---|---|---|
| {activity_kind} | mmp_ad_conversion_type | mmp_conversion_type | / | Conversion category, for example: Session |
| {network_name} | mmp_ad_media_source | mmp_media_source | mmp_first_media_source | Media Channel |
| {campaign_name} | mmp_ad_campaign | mmp_campaign | mmp_first_campaign | Ad Campaign Name |
| {adgroup_name} | mmp_ad_adgroup | mmp_adgroup | mmp_first_adgroup | Ad Group |
| {creative_name} | mmp_ad_ad | mmp_ad | mmp_first_ad | Ad Name |
| {app_name} | mmp_ad_app_name | mmp_app_name | / | Application Name |
| {idfa} | mmp_ad_idfa | mmp_idfa | / | Resettable advertising ID on iOS devices |
| {gps_adid} | mmp_ad_advertising_id | mmp_advertising_id | / | Resettable advertising ID on Android devices, usually GAID |
| {random_user_id} | mmp_ad_random_user_id | mmp_random_user_id | / | Unique user identifier from Adjust |
| {event_name} | / | / | / | The URL used for backend, not visible to users on the configuration page, and not searchable in the analysis module. The receiving URL for data defaults to include |
| {created_at_mili} | / | / | / | The URL used for backend, not visible to users on the configuration page, and not searchable in the analysis module. The receiving URL for data defaults to include |
| {timezone} | / | / | / | The URL used for backend, not visible to users on the configuration page, and not searchable in the analysis module. The receiving URL for data defaults to include |
| {partner_parameters} | / | / | / | The URL used for backend, not visible to users on the configuration page, and not searchable in the analysis module. The receiving URL for data defaults to include |
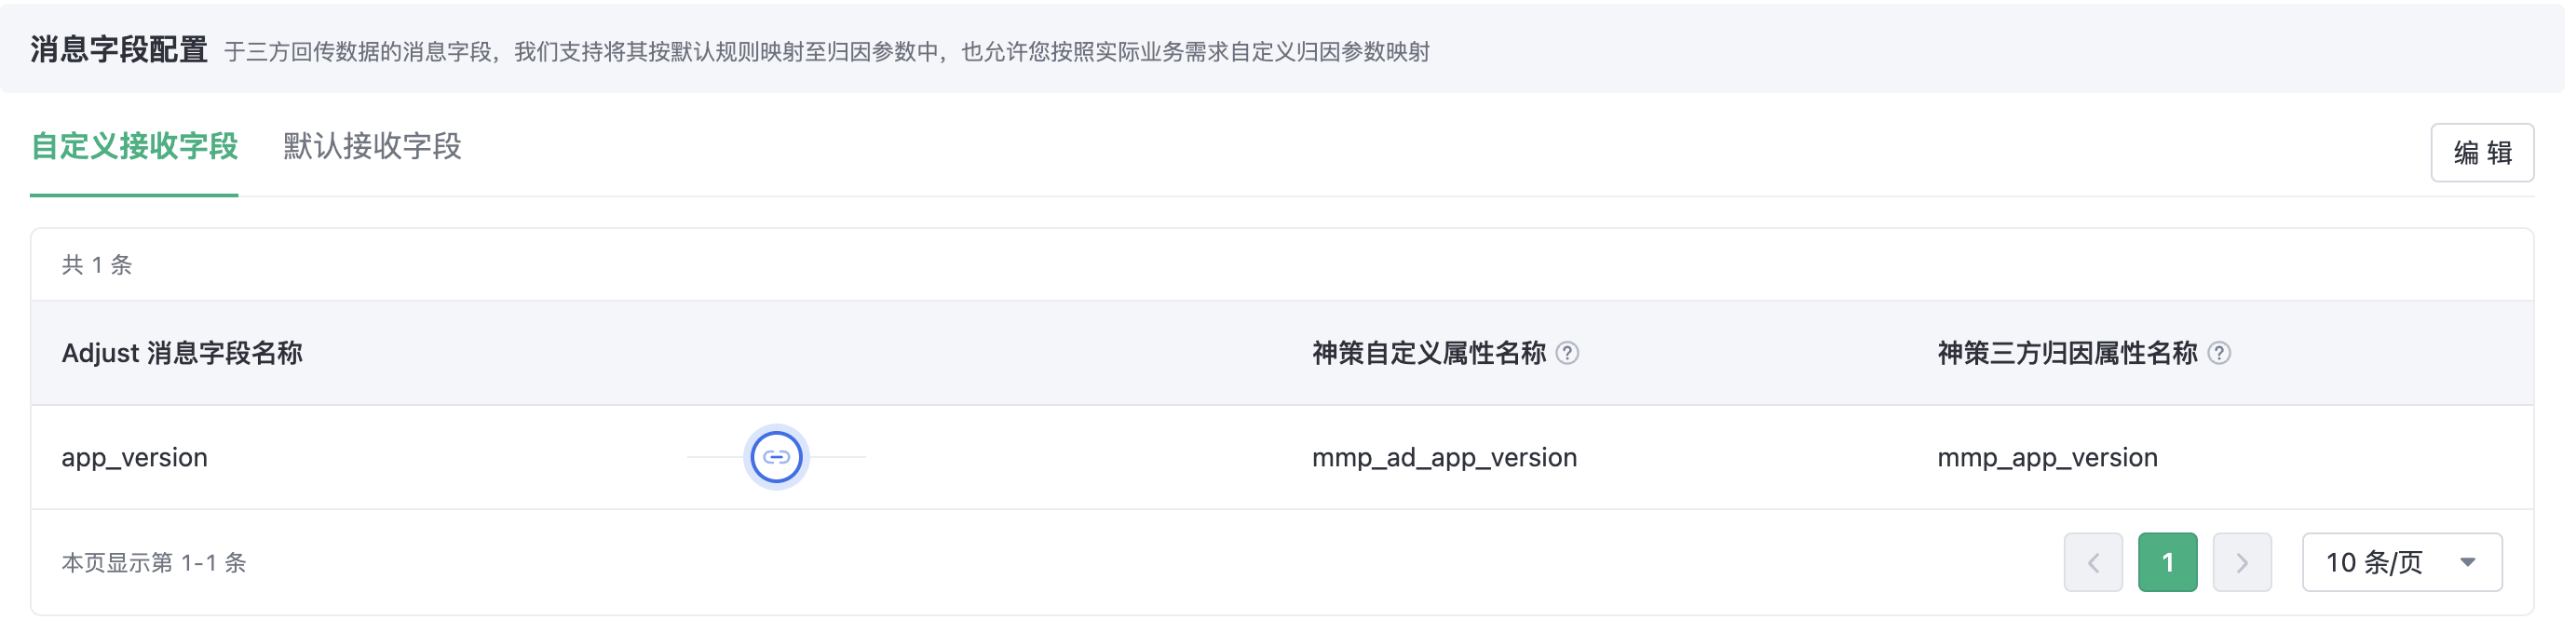
2.2.3.2. Custom receive fields
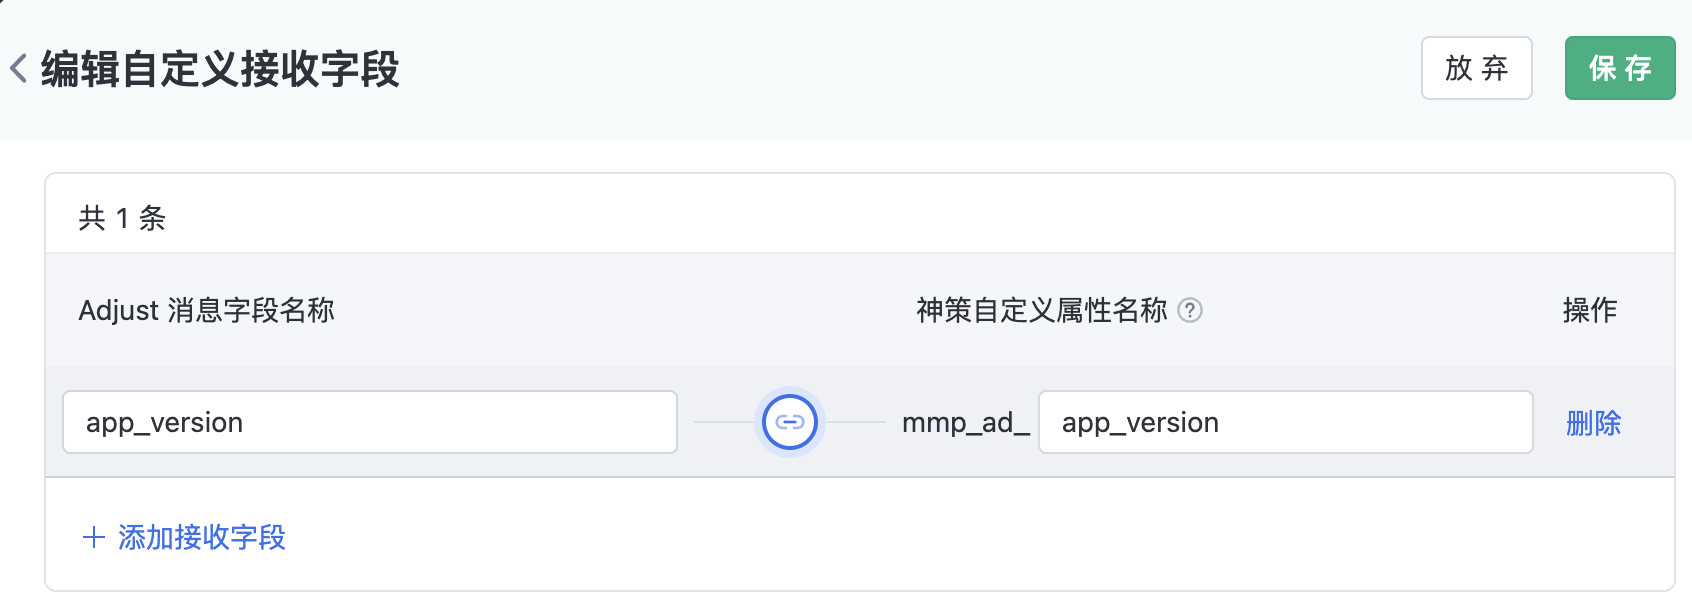
If the default receiving fields do not meet your requirements, we support you to add custom receiving fields as needed. Please strictly followAdjust List of placeholders parameter name, fill in the Adjust placeholder field name, and fill in the name of the custom attribute for the Oracle to receive.
The mmp_ad_ prefix is automatically added based on the custom attribute name you entered to distinguish the attribute as dedicated to the Adjust event, and the mmp_ prefix is automatically used to create the mmp_ attribute name for receiving the third-party attribution results in a unified manner.
For example, if you want to Adjust the app_version field, enter app_version in Adjust Message Field Name, enter app_version in Custom Attribute Name, and click Save to complete the new custom receiving field configuration.
Meaning: When the analysis system receives the app_version placeholder sent back by Adjust, the custom attribute mmp_ad_app_version is automatically created and written to the event. If the received event is Install, the mmp_app_version virtual property is automatically created and written into the property. If the same user reports the behavior event through the Sensors SDK, the mmp_app_version value can be associated query.
Note
1. The mapping rule takes effect in real time after the customized message field is edited and saved, the same as the data receiving configuration and event writing configuration. Do not change the data arbitrarily. Otherwise, data writing may be affected.
2, the custom attribute received by the analysis has a length limit, the default is the maximum length of 1024 bytes after UTF-8 encoding. Detailed reference Data format
2.3. Set the Adjust real-time sending interface
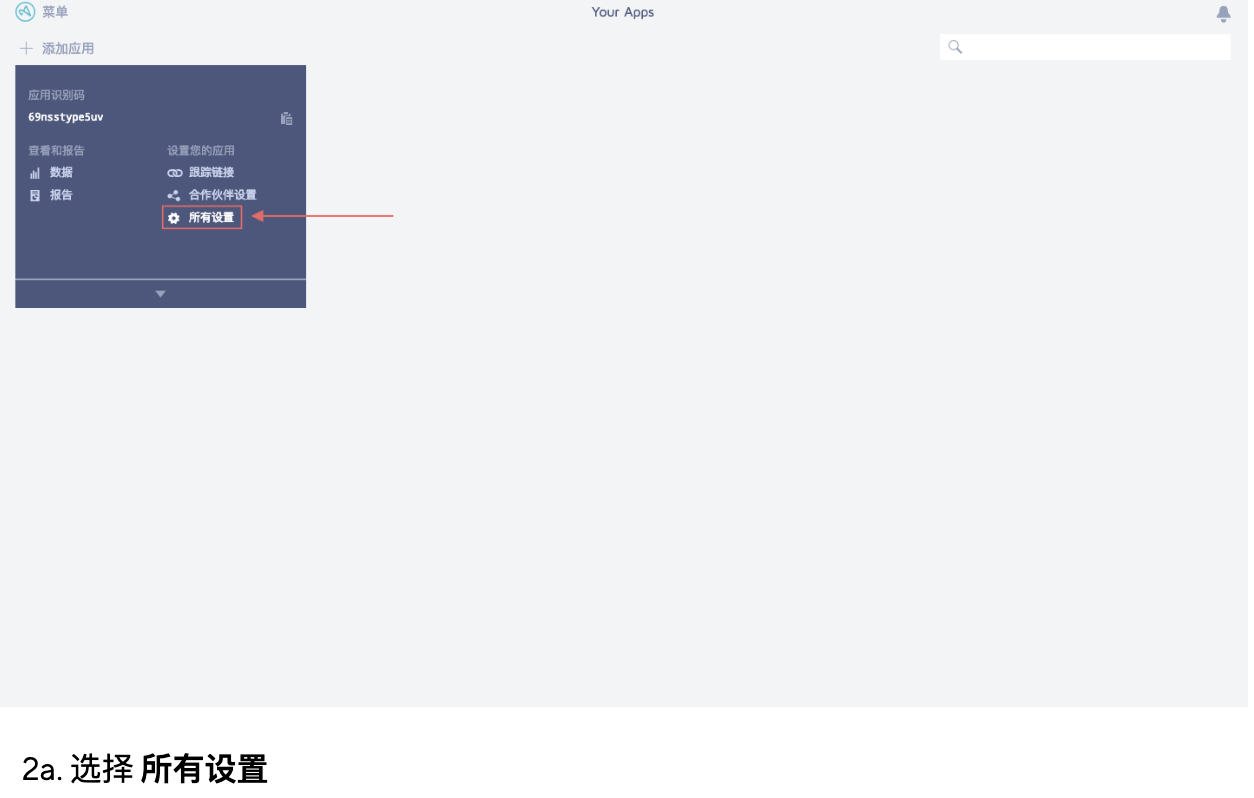
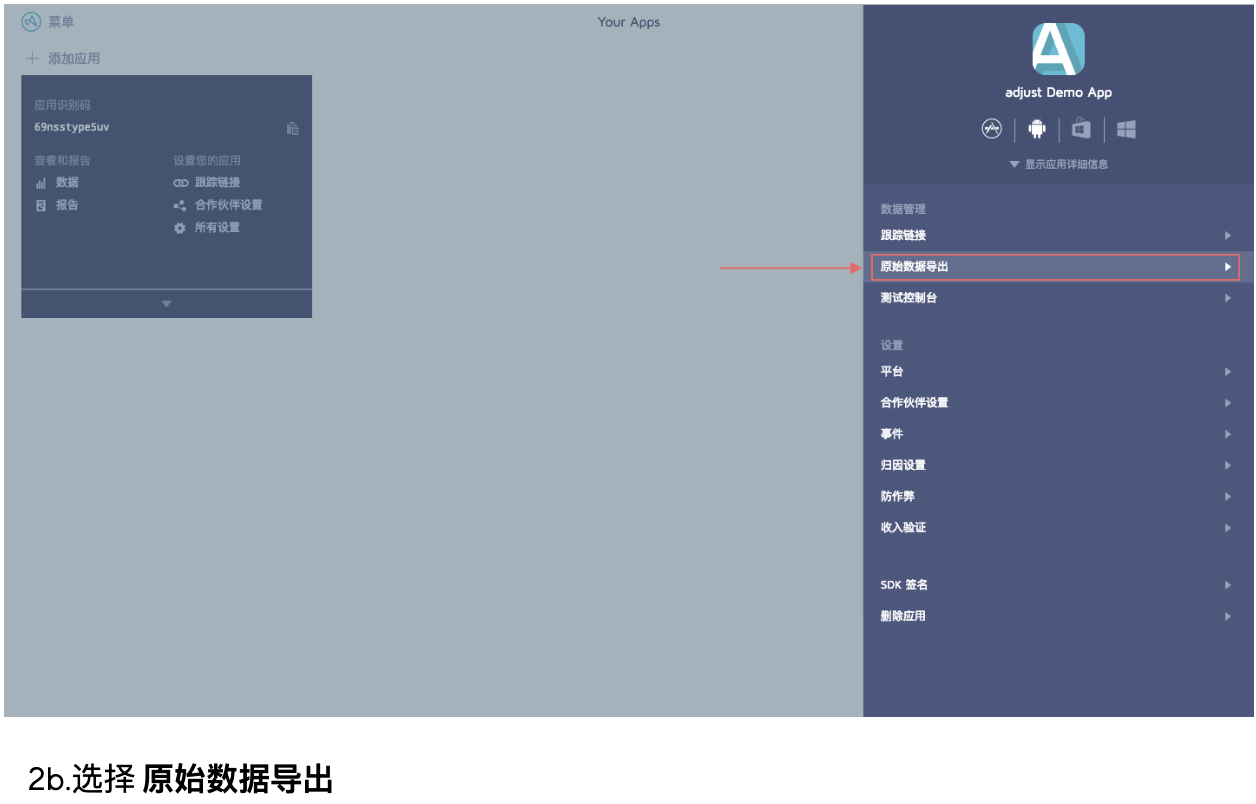
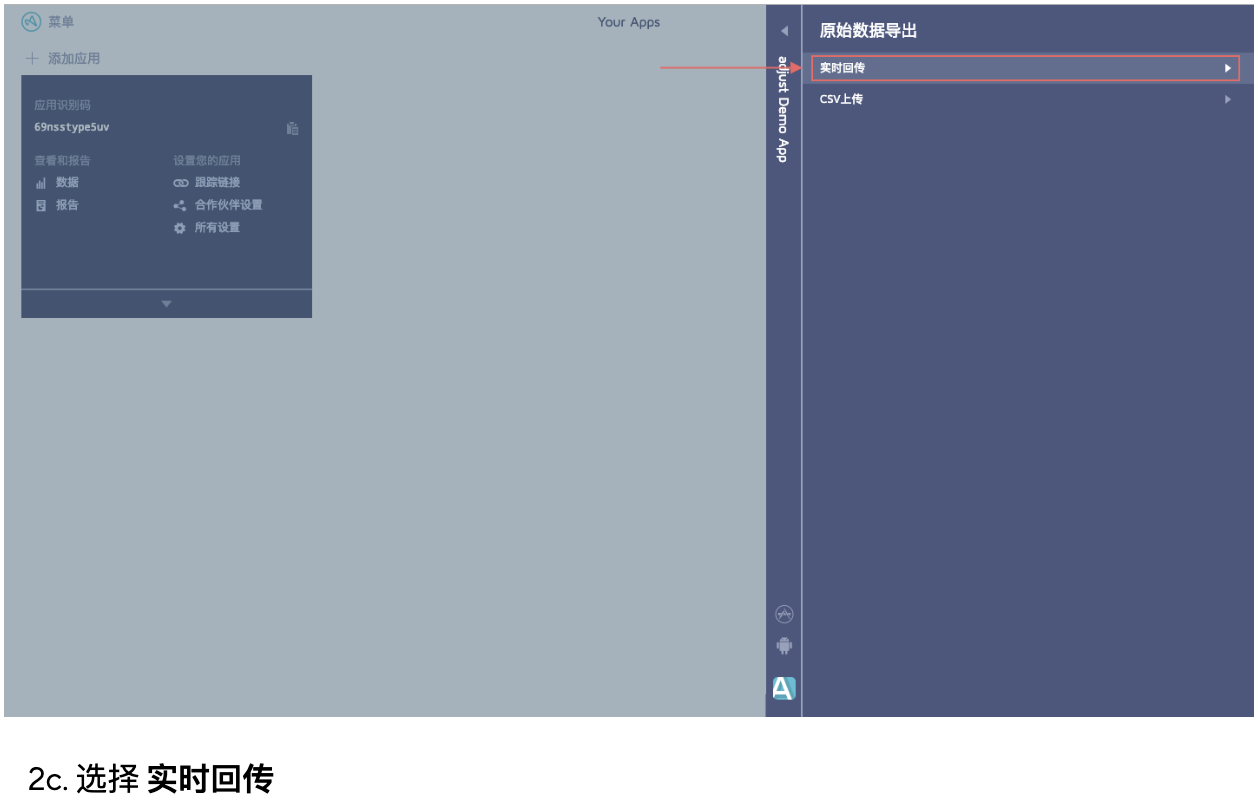
You need to log in to Adjust background as an administrator and configure raw data uploading in All Settings, Raw Data Export, and Real-time Uploading.
Please follow the following method to set the real-time uploading of original data, that is, the data receiving address generated by the Sensors platform is filled in the "real-time uploading" - "Add unified uploading" position, and the update submission takes effect.


With this, you have successfully configured the function of passing the original data from Adjust to the Sensors Analytics Platform in real-time. Next, you can launch the application, observe the data reception situation, and analyze the data in Sensors Analytics.
1. If you have changed the event writing configuration or message field configuration of Adjust on the Sensors Analytics Platform, please be sure to update the latest data receiving URL to the backend of Adjust, otherwise the changed configuration will not take effect.
2. To avoid data confusion, we recommend that you do not frequently change the event writing configuration or message field configuration.
3. Data Storage Rules
3.1.1. User Identification Rules
According to the user identification field set in the client SDK of Sensors Analytics, Sensors Analytics will default to finding the user identification based on the following fields in the returned install data:
- Check whether the partner_parameters field contains sensors_distinct_id/sensors_is_login, which are the user identification fields from Sensors Analytics passed to Adjust.
- Check whether the returned fields include random_user_id, which is the user identification field from Adjust.
If a valid user identification can be obtained in step 1, stop the check in step 2 and record the user based on the Sensors Analytics user identification.
If a valid Sensors Analytics user identification cannot be obtained in step 1, use the random_user_id from step 2 to record the user as a Sensors Analytics anonymous ID. Note that at this time, the user cannot be associated with the reported user in Sensors Analytics.
If no valid user identification can be obtained in steps 1 and 2, a randomly generated anonymous ID will be used to record the user. Note that at this time, the user cannot be associated with other users.
Note
If you have used a special user identification field in the Sensors Analytics system (the distinct_id and is_login mentioned above cannot accurately identify your users), please contact your account manager. We will make adjustments during the delivery phase to adapt to your business situation.
3.1.2. Event Storage Rules
As long as the data receiving switch is turned on, regardless of whether event writing is enabled or not, the Sensors Analytics system will default to writing the received activation event (install) to the event table. If you have configured other event writing in the event writing configuration, the Sensors Analytics system will also write them together.
Here are the rules for event data storage:
- Based on the Sensors Analytics user identification rules, the written event data is attributed to the corresponding Sensors Analytics user.
- Use the created_at_mili field in the returned data as the event reporting time (time).
- The event name written will be prefixed with "mmp_ad_" to differentiate it from other events you report. In particular, the install event will be written as "mmp_ad_install" by default without configuration.
- The written events will carry a custom attribute "mmp_name= Adjust".
- The attribute name written for an event will be prefixed with "mmp_ad_" to differentiate it from other event attributes you report. For example, in the case of the default receiving field (also applicable to custom receiving fields), the {network_name} placeholder in the Adjust placeholder will be written as "mmp_ad_media_source".
3.1.3. User attribute storage rules
When any returned event is received and the user table is updated, if the user does not have "third-party channel user attributes" at this time, the first third-party channel user attributes will be updated using profile_set_once().
Sensors first third-party channel attributes (Pre-set user attributes) | Adjust placeholder field name | Notes |
|---|---|---|
| mmp_first_media_source | {network_name} | Media Channel |
| mmp_first_campaign | {campaign_name} | Ad Campaign Name |
| mmp_first_adgroup | {adgroup_name} | Ad Group |
| mmp_first_ad | {creative_name} | Ad Name |
3.1.4. Third-party Attribution Table Update Rules
The Sensing Analytics system supports receiving and storing the attribution results from various third-party attribution platforms for each attribution and associates them with the user behavior reported by the Sensing system using the integrated Sensing user identifier. The update rules for the third-party attribution table are as follows:
- Only when an install event (adjust) is received and this install event carries a valid Sensing user identifier, the third-party attribution table will be updated (Re-attribution results for re-marketing are not supported to be updated at the moment)
- When updating, a new attribution record will be added with the Sensing user identifier as the main key. The record will include the start and end time of the attribution and the channel information
- Start and End Time: When adding a new attribution record, the system will ensure that all attribution records for the same user are continuous and non-repetitive
- Channel Information: Refers to the third-party attribution attributes written (virtual attributes). The format is to add the prefix "mmp_" in front of the custom attribute name you configured
3.2. Data Query Method
After completing the above integration configuration, you can query the Adjust events that have been integrated with the user and query the third-party attribution channel results associated with the user behavior reported by Sensing in the event analysis. The method is as follows:
3.2.1. Query the integrated Adjust events
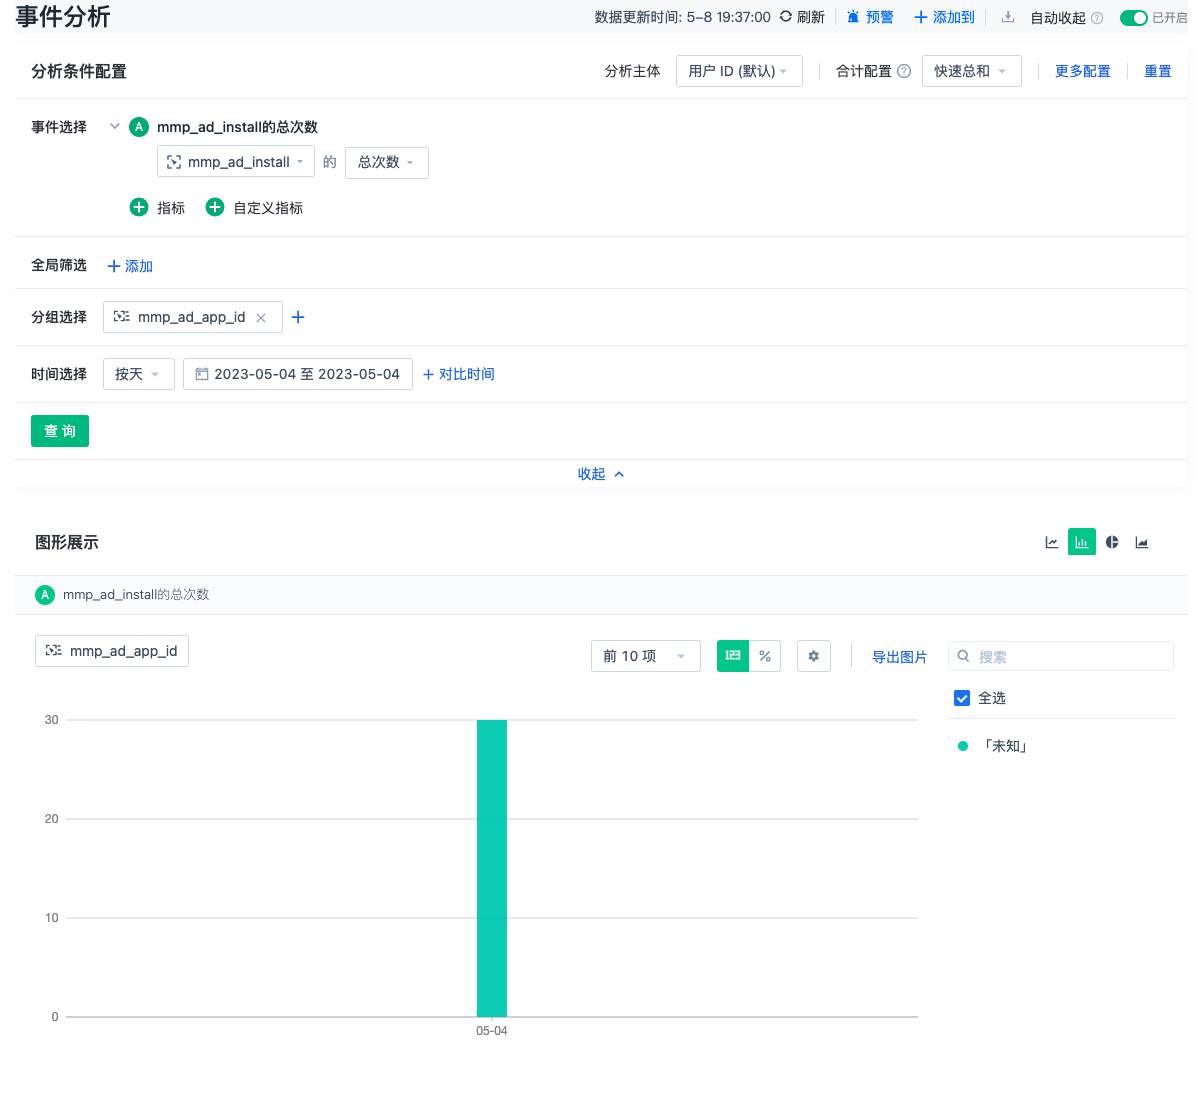
Take the default integrated install event as an example. In the event analysis, filter the event "mmp_ad_install" and select the custom attribute "mmp_ad_app_id" in the grouping selection. See the query results example below.
You can filter other configured integrated events and custom attributes according to your actual needs (make sure they are consistent with the format of the event write-in configuration and message field configuration names, otherwise the results will not be found. Adjust's custom attributes all begin with "mmp_ad_")
3.2.2. Query the integrated Adjust users
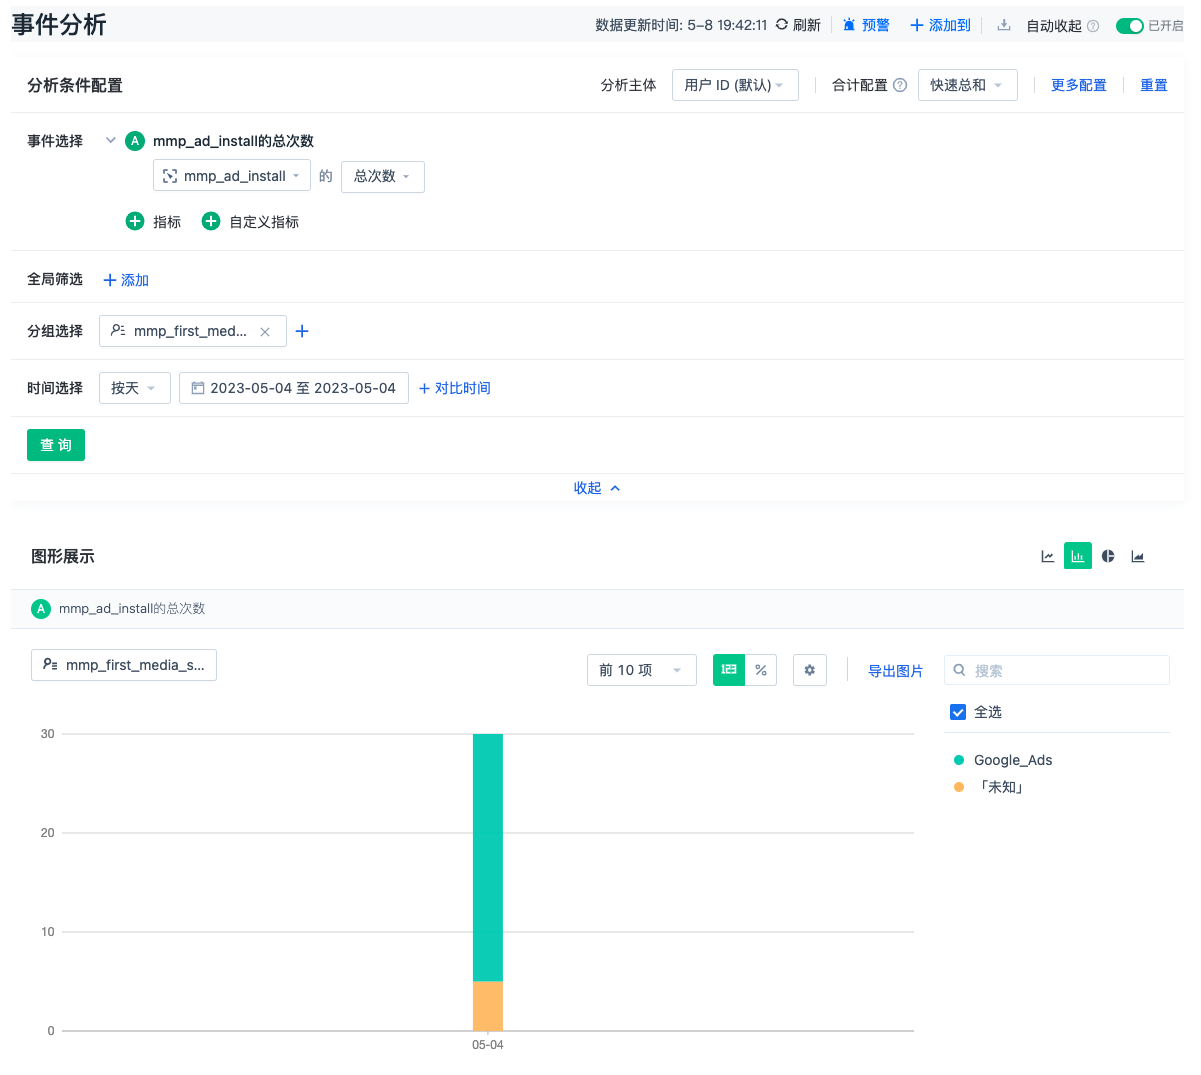
Take the default integrated Install event as an example. In the event analysis, filter the event "mmp_ad_install" and select the third-party user channel attribute "mmp_first_media_source" in the grouping selection. See the query results example below.
You can filter other configured integrated events and third-party user channel attributes according to your actual needs (only the first five third-party user channel attributes are written when first updated, all starting with "mmp_first_")
3.2.3. Query third-party attribution channel results associated with events reported by Sensors
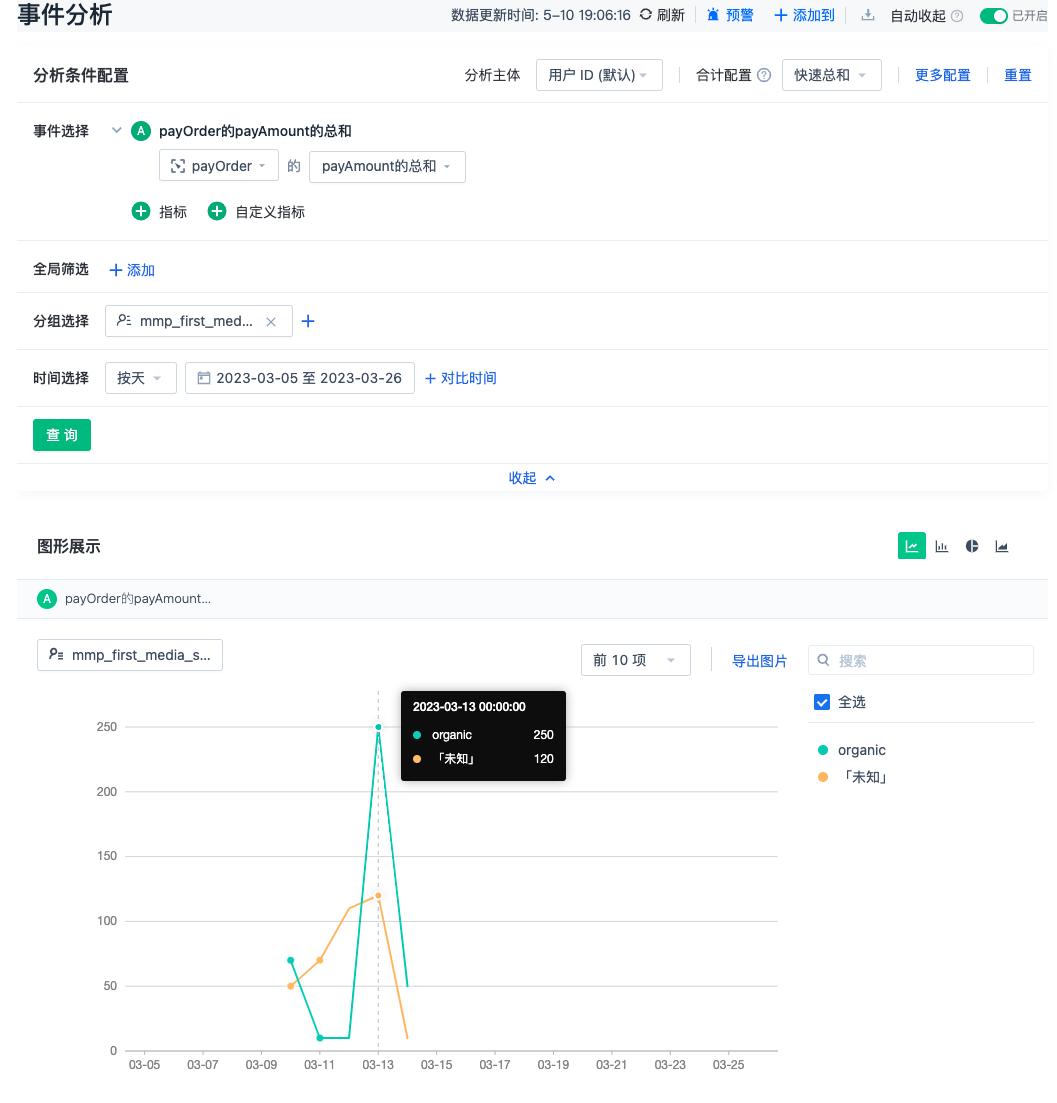
Using the user behavior payOrder within the app as an example, select the event "payOrder" in event analysis, and check the third-party channel attribute "mmp_media_source" in group selection. See the query result example below.
You can select other collection events and third-party channel attributes according to your actual needs (be sure to match the format of the field name in the message configuration, otherwise the results will not be queried. Third-party channel attributes all start with mmp_)
Note: The content of this document is a technical document that provides details on how to use the Sensors product and does not include sales terms; the specific content of enterprise procurement products and technical services shall be subject to the commercial procurement contract.
 Popular Searches