App Visual Labeling
|
Collect
1. Video Explanation
App Visualization Full Buried Point Explanation Video
Embedded H5 App Visualization Full Buried Point Explanation Video
App Visualization Full Buried Point Supports Custom Attribute Explanation Video
2. Function Introduction
The App Visualization Full Buried Point function provides the ability to synchronize the screen between the computer and the mobile phone to define events. The specific function list is as follows:
- Define various types of controls, supporting filtering based on their position and content in the Listview;
- Convenient operation on the computer, with the right-side interface dynamically displaying the accurate definition of the currently defined elements;
- Support multiple devices: mobile phones, tablets, and corresponding landscape and portrait screens.
- Support custom attributes: visually select page element content to define as attributes.
3. Preparation Work
3.1. Correctly integrate the corresponding SDK
Version requirements for using the App Visualization Custom Attribute feature:
- SDH: v1.2.1 and above
- Android SDK: v5.4.5 and above
- iOS SDK: v3.1.8 and above
- Web JS SDK: v1.18.19 and above
- SDH :v1.2.1 and above
- Android SDK:v5.2.0 and above
- iOS SDK:2.6.0 and above
- React Native 0.46 ~ 0.60
- React Native SDK v2.0.1 and above version
- Android SDK v5.2.5 and above version
- Android Plugin v3.2.5 and above version
- iOS SDK v2.6.7
Integrated Sensors React Native SDK App, you only need to turn on the visual buried point function on the Native side to automatically support React Native pages and controls.
Integrated approach, see:
3.2. How to access the buried page
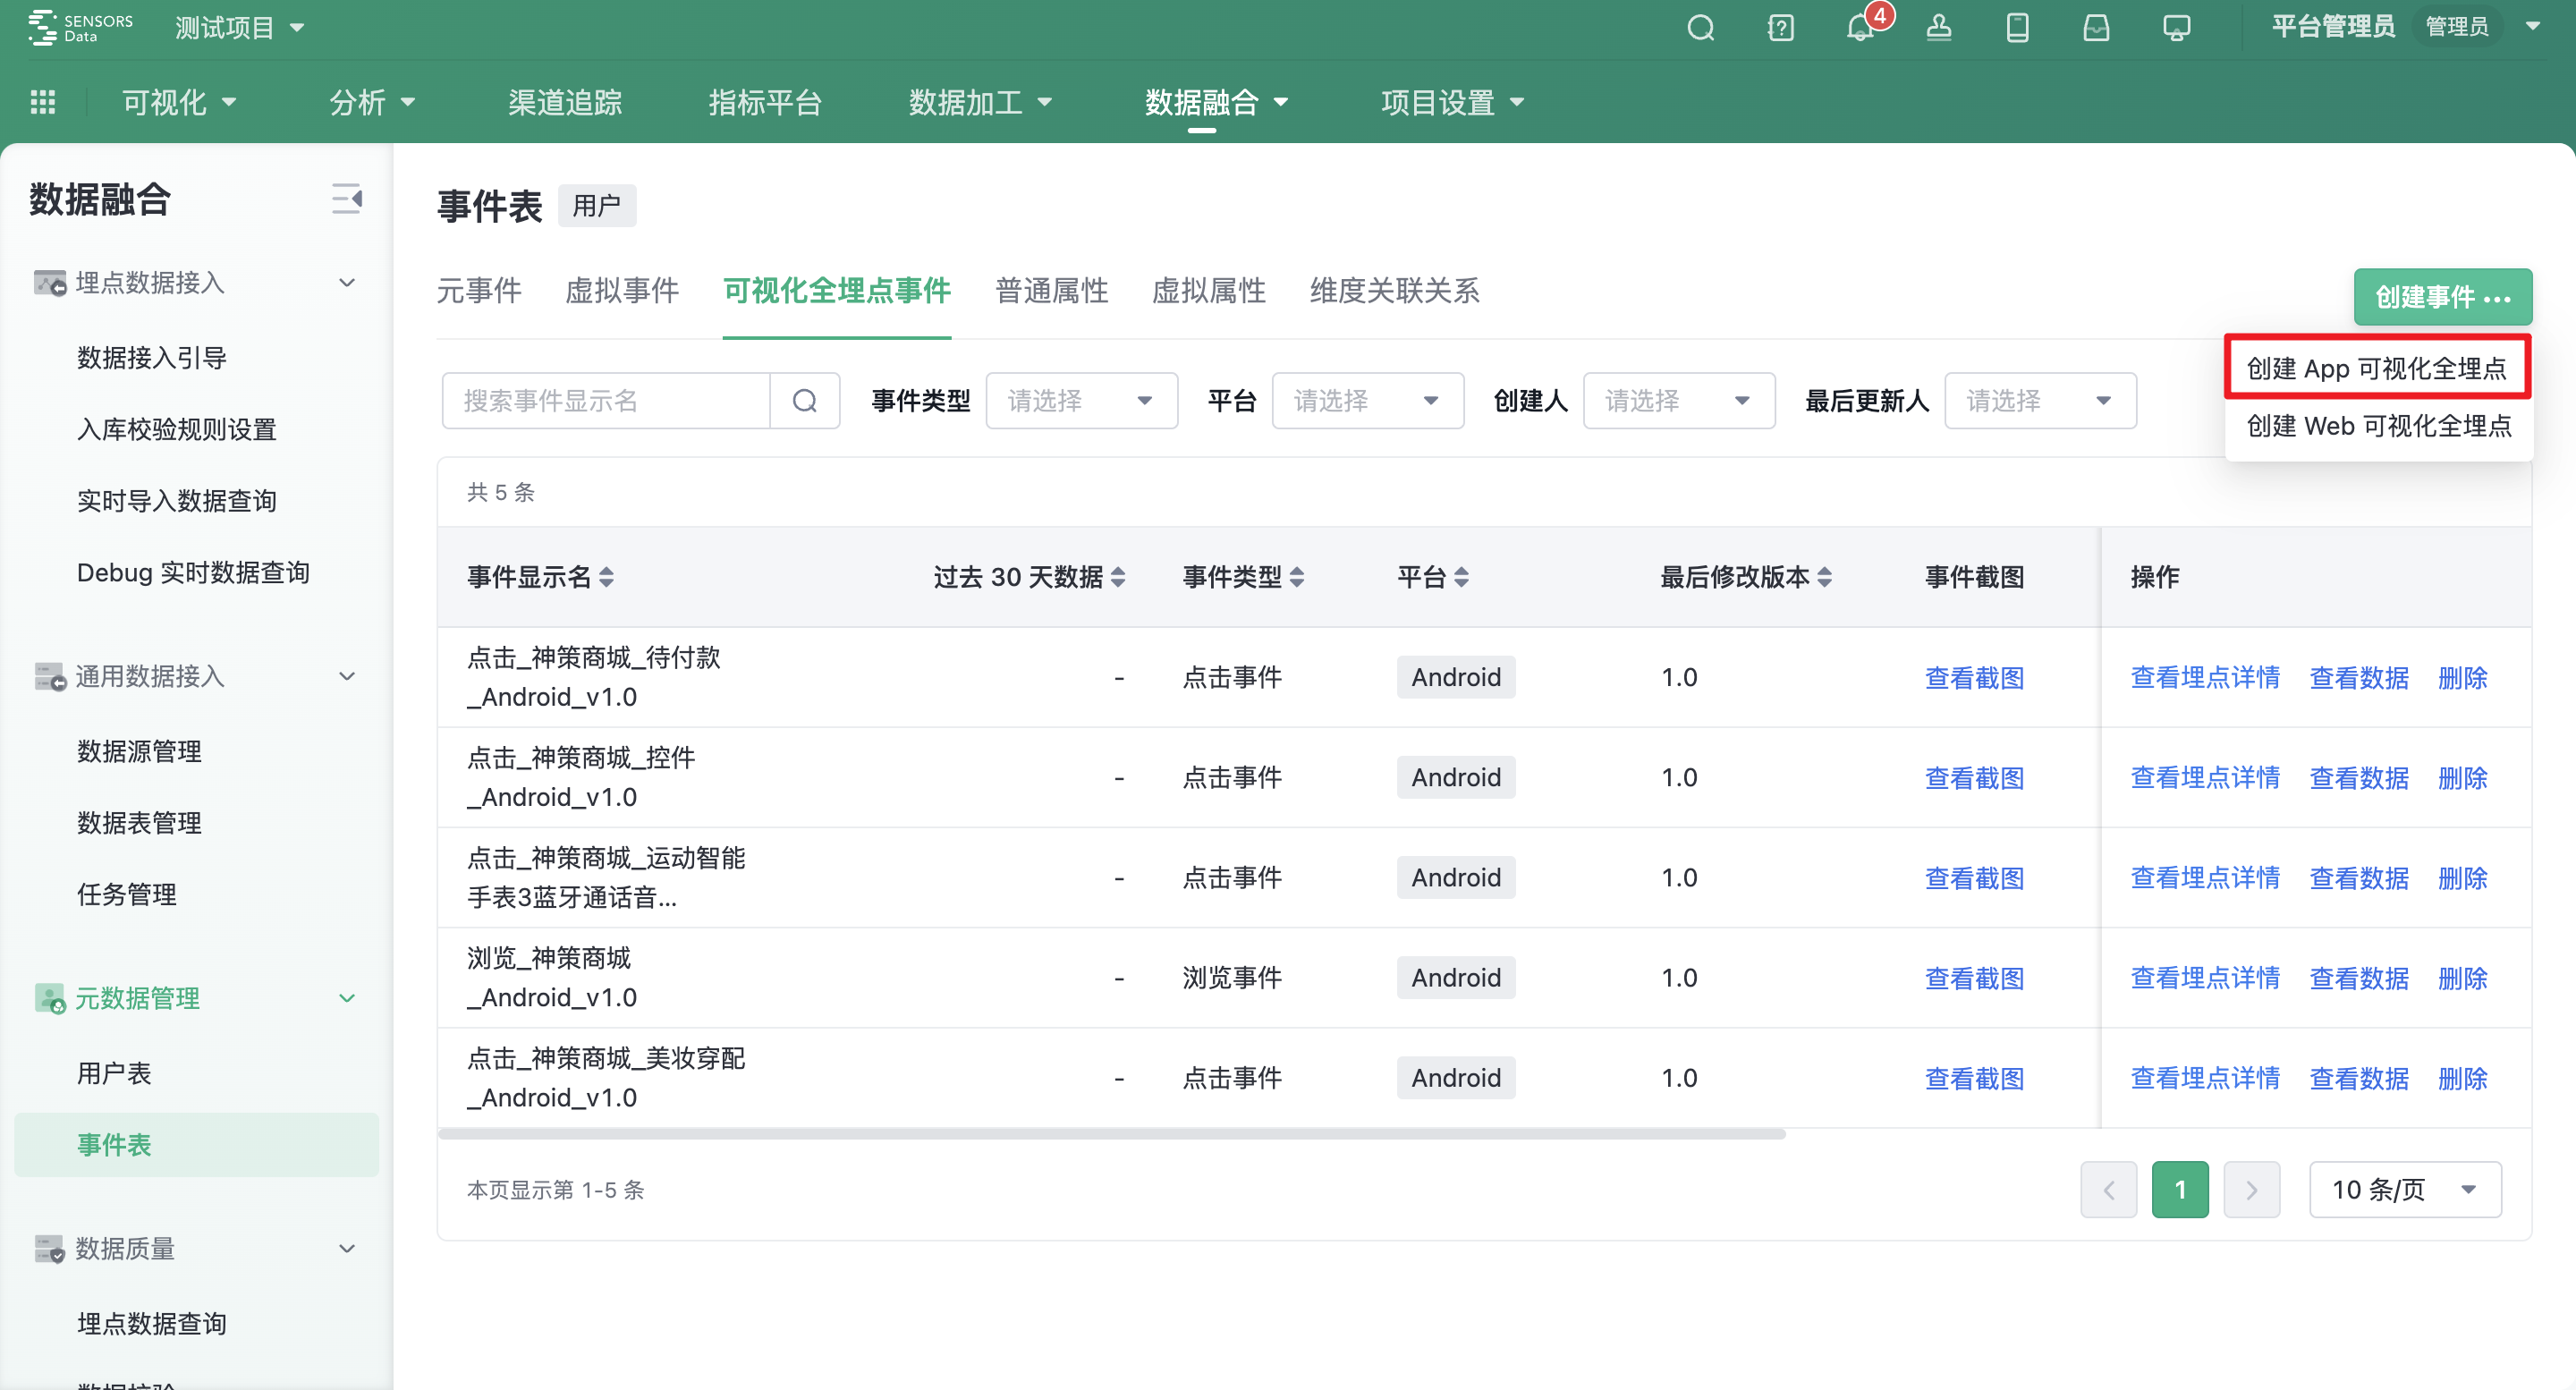
Click Data Fusion > Metadata Management > Event table > Visualizing full buried events > Create an App visual buried point and enter the App visual buried point page.
3.3. Scan code/match code connection
3.3.1. Scan connection
- Prerequisites: The corresponding App has been installed on the mobile phone, and the SDK has been correctly integrated
- Note: Please do not use Baidu browser to scan the code, because Baidu browser can not jump to the App, so can not complete the visual full buried point connection, please change another browser to scan the code
The steps are as follows:
- Select the scan code connection on the visualized all-buried event page, use the scan function of the mobile browser or wechat scan function to scan the code on the page of scanning the two-dimensional code, and open the corresponding App according to the operation prompted by the browser pop-up window. If there is no response after the scan code and the App cannot be correctly awakened, you can download "Palmtop" , use the "Palmtop" scan function to scan the QR code.
- After scanning the code of the mobile phone, click the button of "Open the App visual buried point", and then click the button of "Open" to successfully open the App to be analyzed.
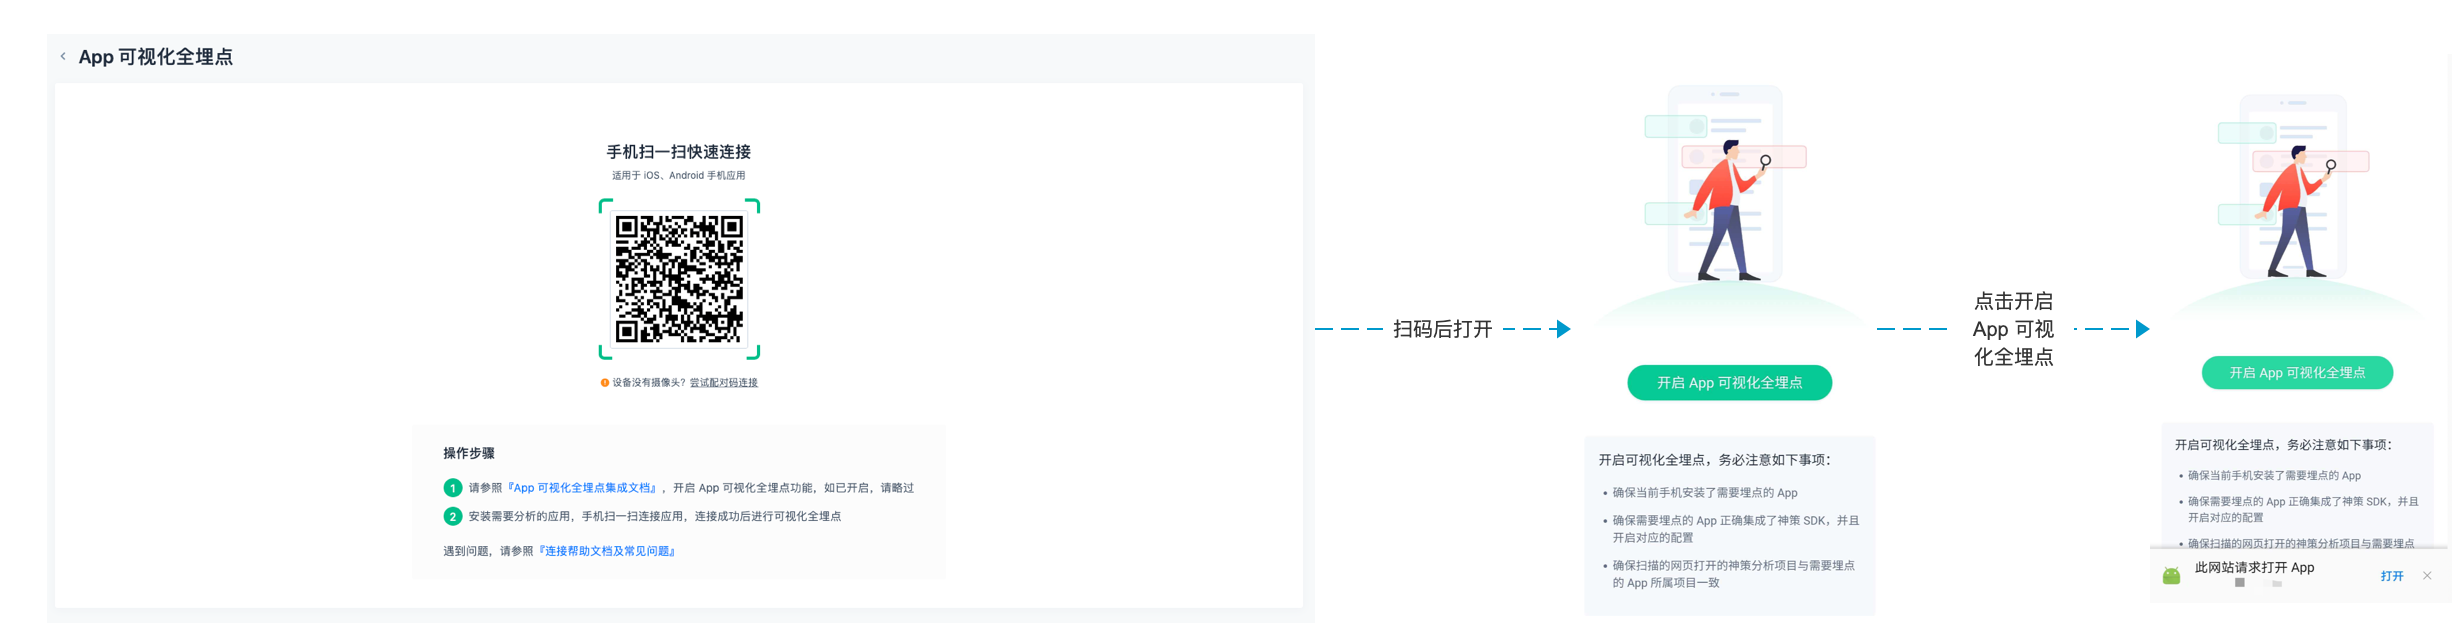
- After connecting the App successfully, the full buried point is visualized
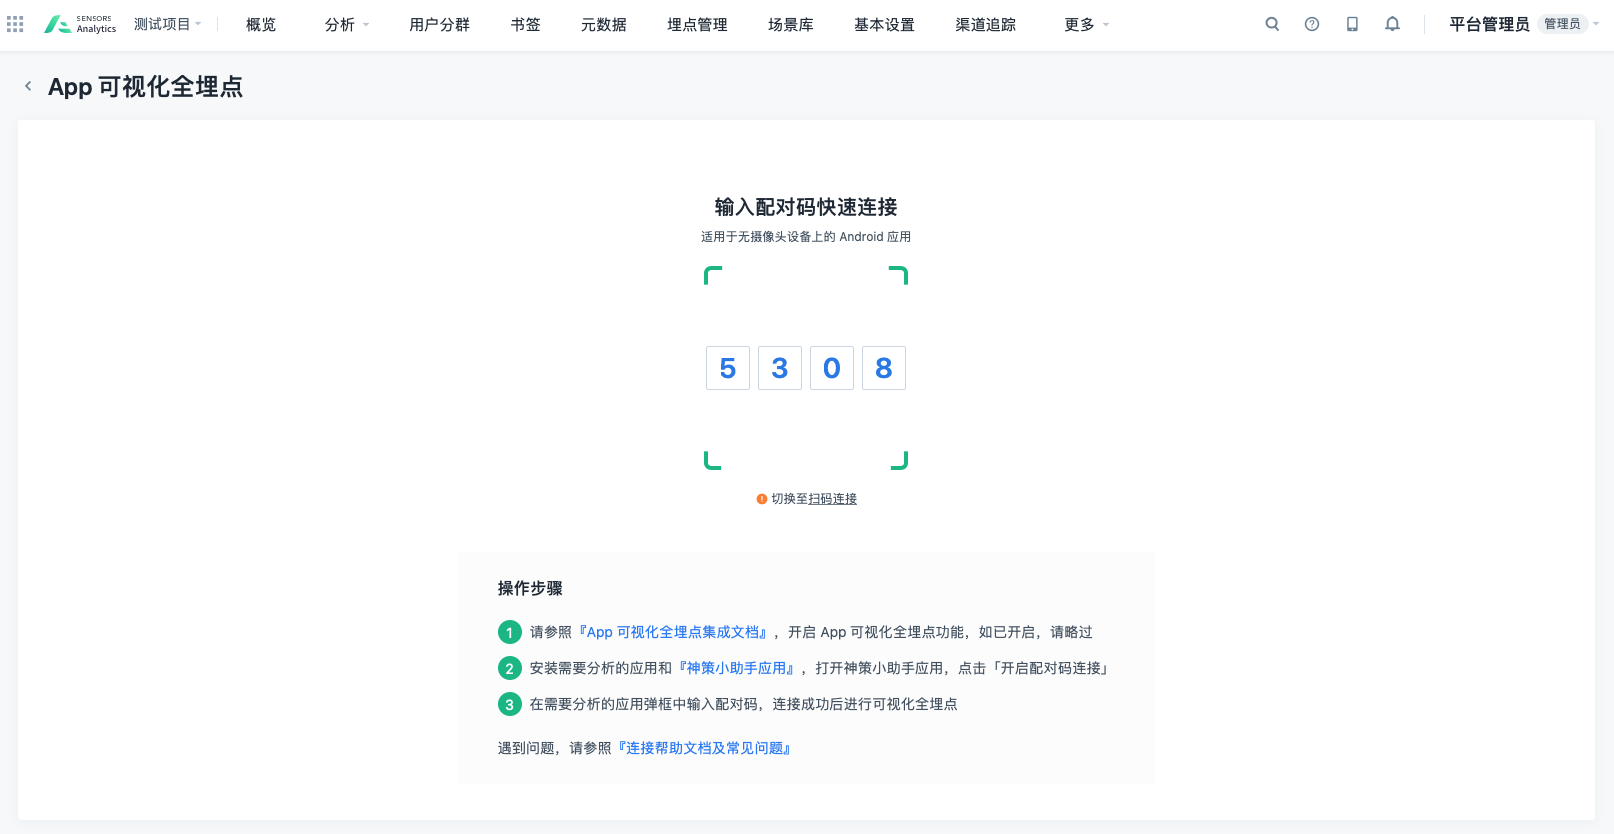
3.3.2. Pairing code join
Prerequisite: It is required that the corresponding app is installed on the device and the SDK is correctly integrated.
The steps are as follows:
- In the visual tracking event page, click the "pairing code connection" below the two-dimensional code to switch to the pairing code connection mode.
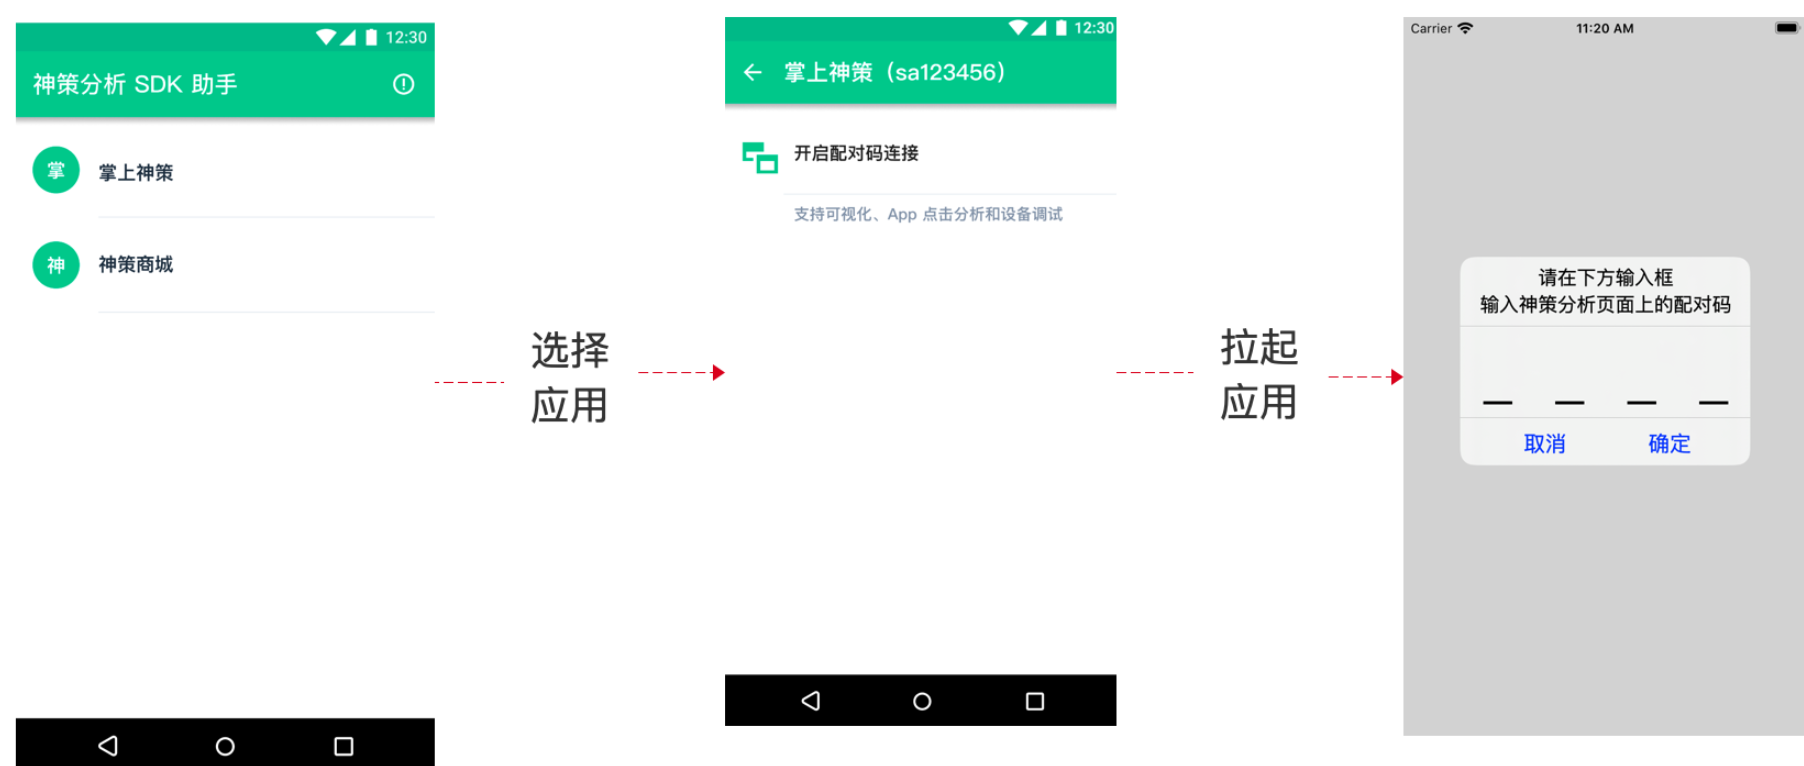
- Download "Sensors Analytics SDK Assistant", open the Sensors Analytics SDK Assistant App on the device, click the application name, click "Open pairing code connection", and pull up the corresponding application.
- Enter the pairing code in the application pop-up window to complete the pairing code connection.
3.4. View connection status and basic App information
3.4.1. Basic Information
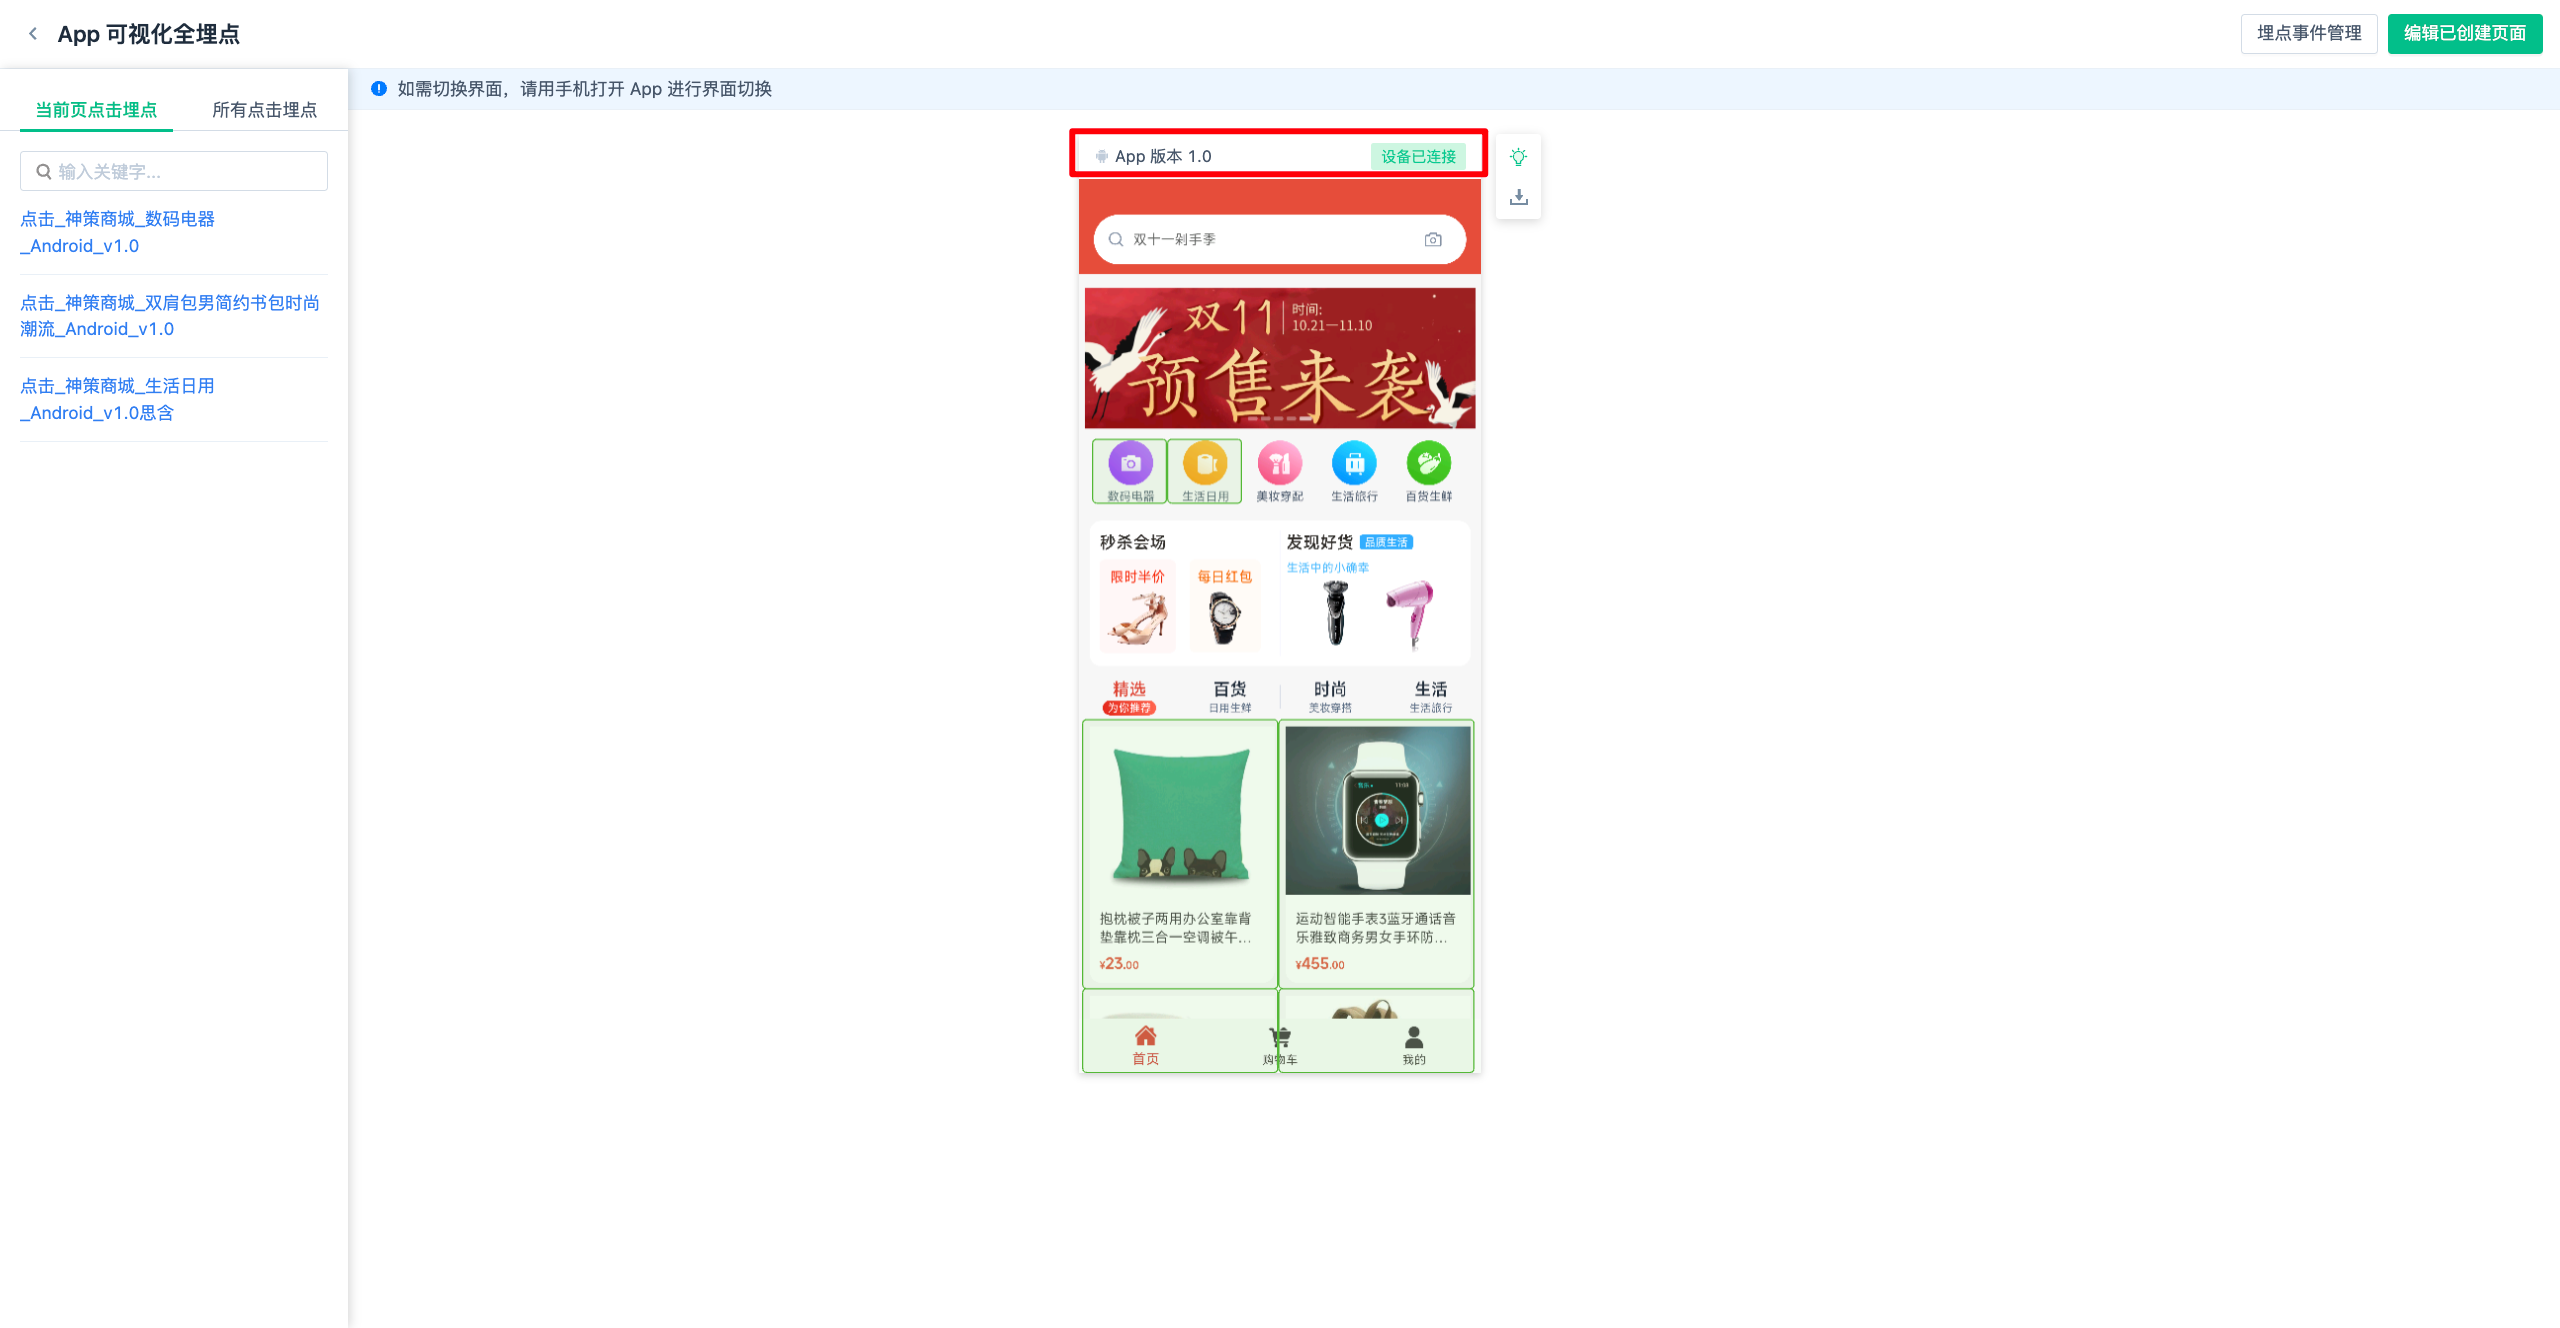
You can view the current platform, app version, and device connection status by checking the information at the top of the App interface.
3.4.2. Interface pause synchronization

When the computer interface is defining elements, the interface synchronization will be paused to avoid simultaneous element definition and interface changes. The interface will automatically sync once the definition is complete.
4. Define event
4.1. Define element click event
4.1.1. Element tracking and conditions
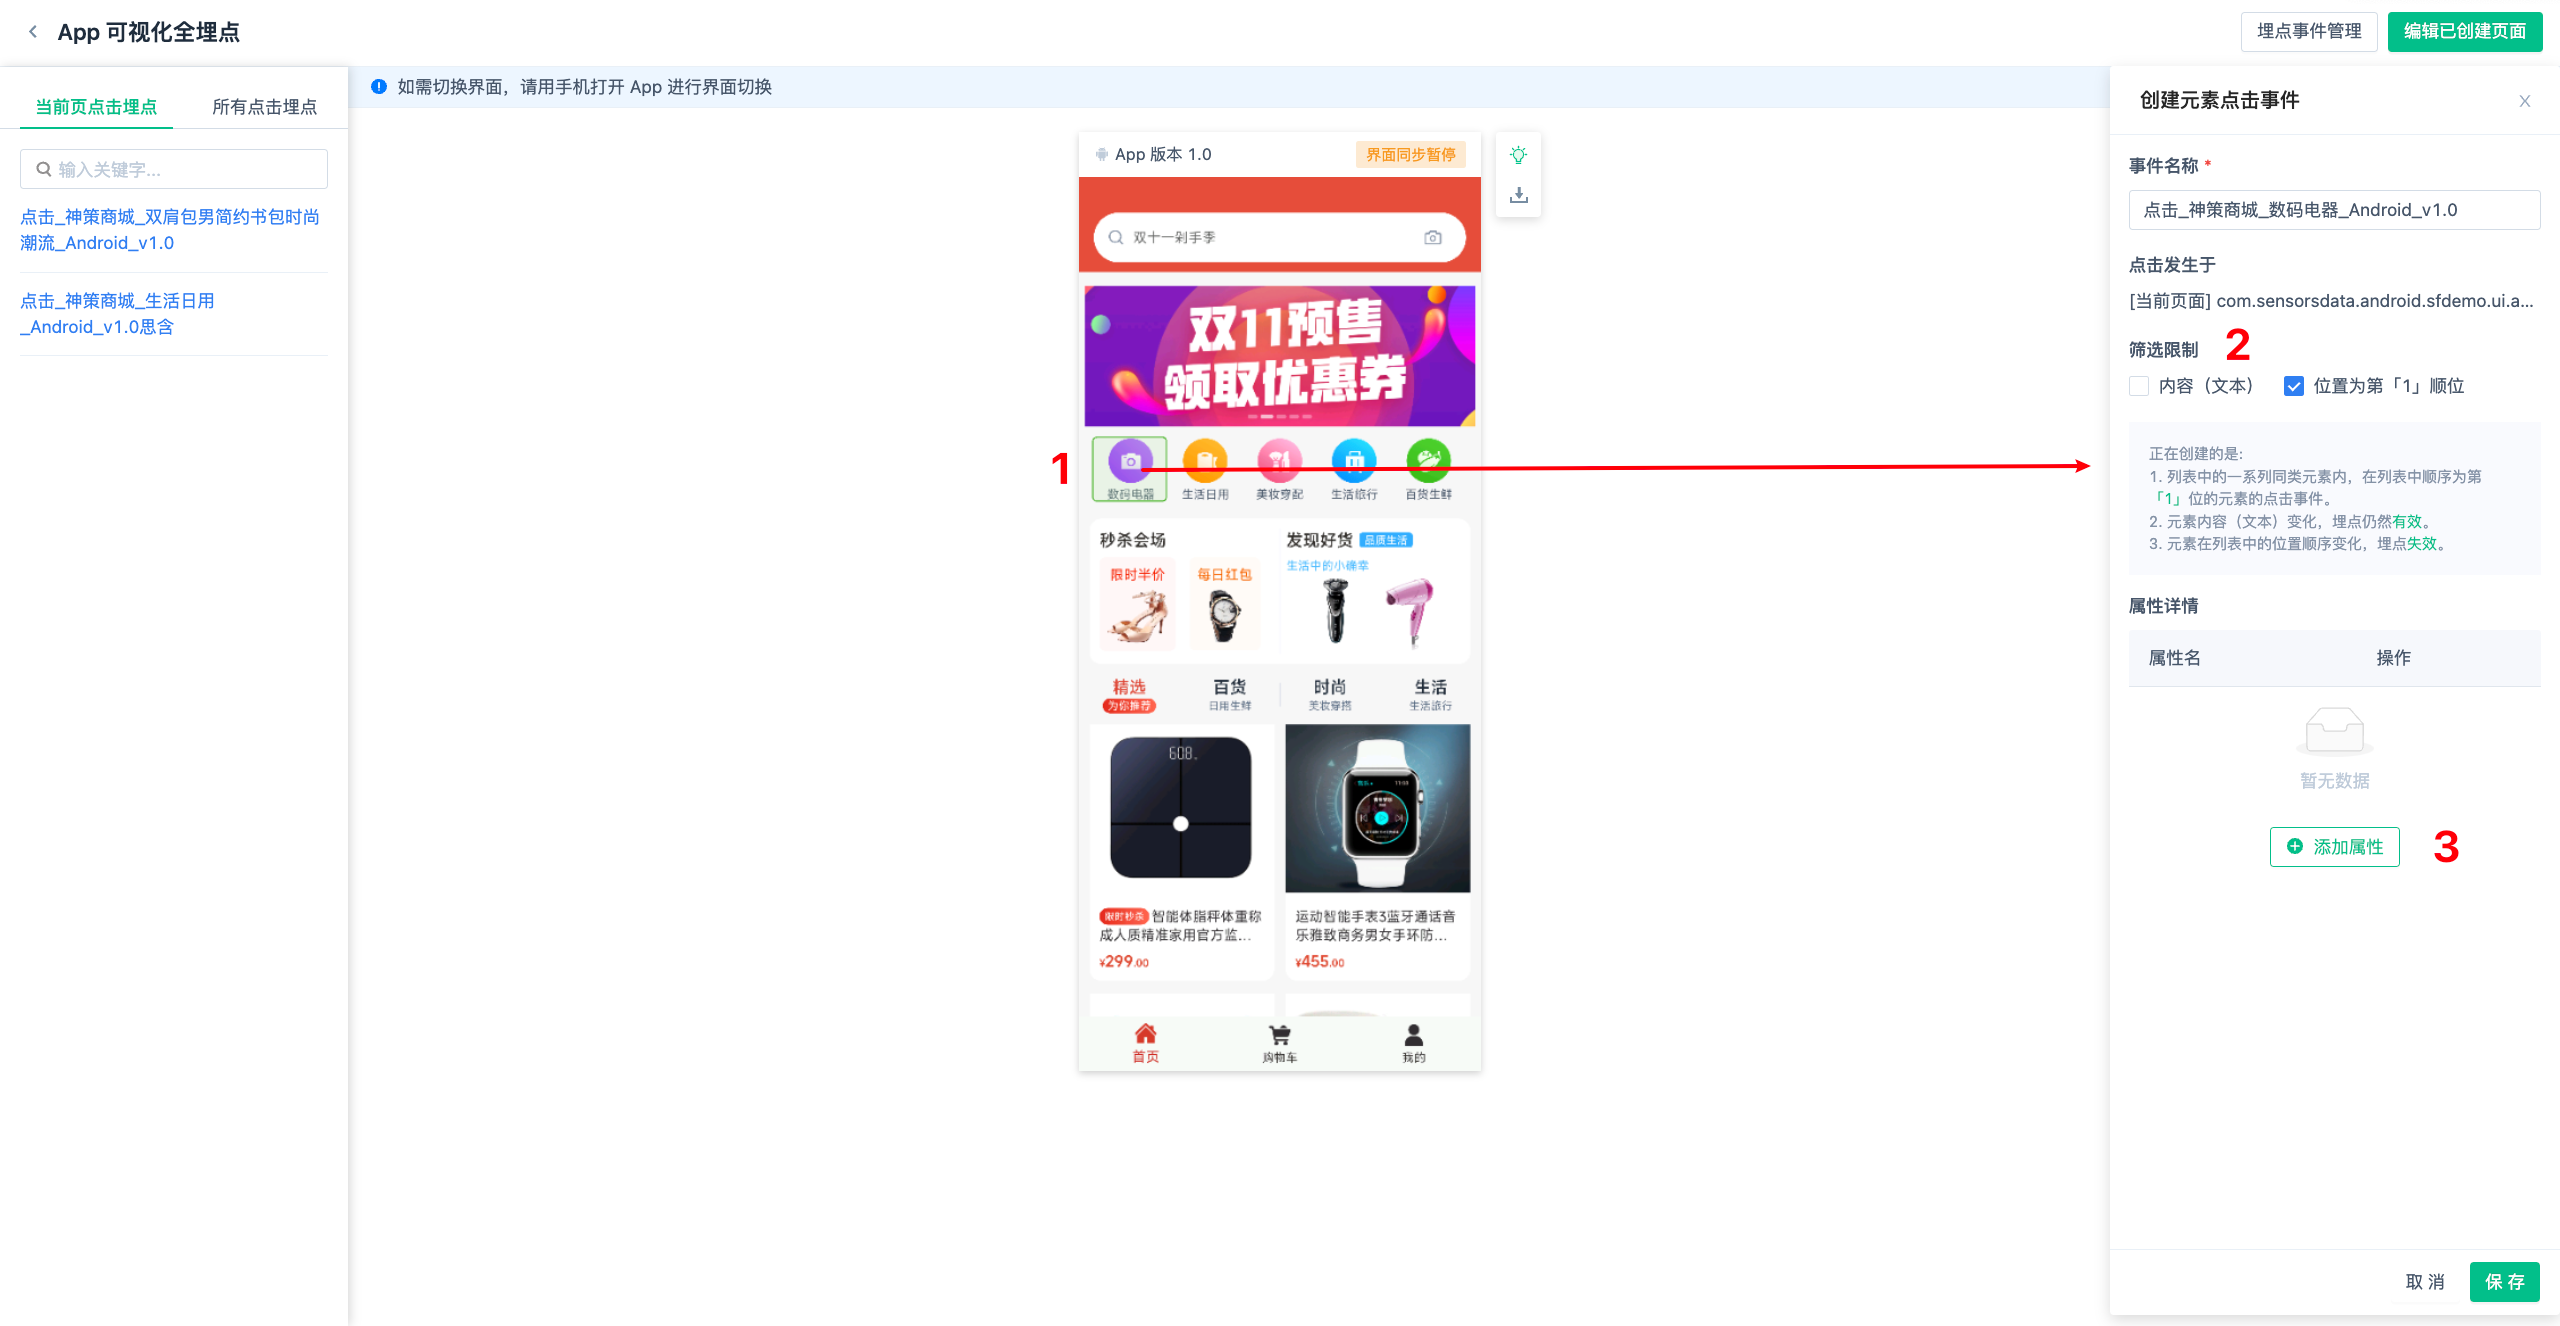
4.1.1.1. Define a click event for an element at a specific location

Click an element to see the restricted condition content as follows:
- Unrestricted content (text)
- Restricted order to the 3rd position
The above two conditions mean that the currently defined event is a click event for the 3rd element of the same kind on the current page. If the element's content (text) changes, tracking remains valid.
The event display name can be modified. Once the content is confirmed to be correct, click save.
4.1.1.2. Define a click event for an element with specific content

Change the condition to see the restricted condition content as follows:
- Restricted content (text)
- Unrestricted order
The above two conditions mean that the currently defined event is a click event for an element with content (text) "Life Travel" of the same kind on the current page. If the order of the elements changes, tracking remains valid. If the element's content (text) changes, tracking becomes invalid.
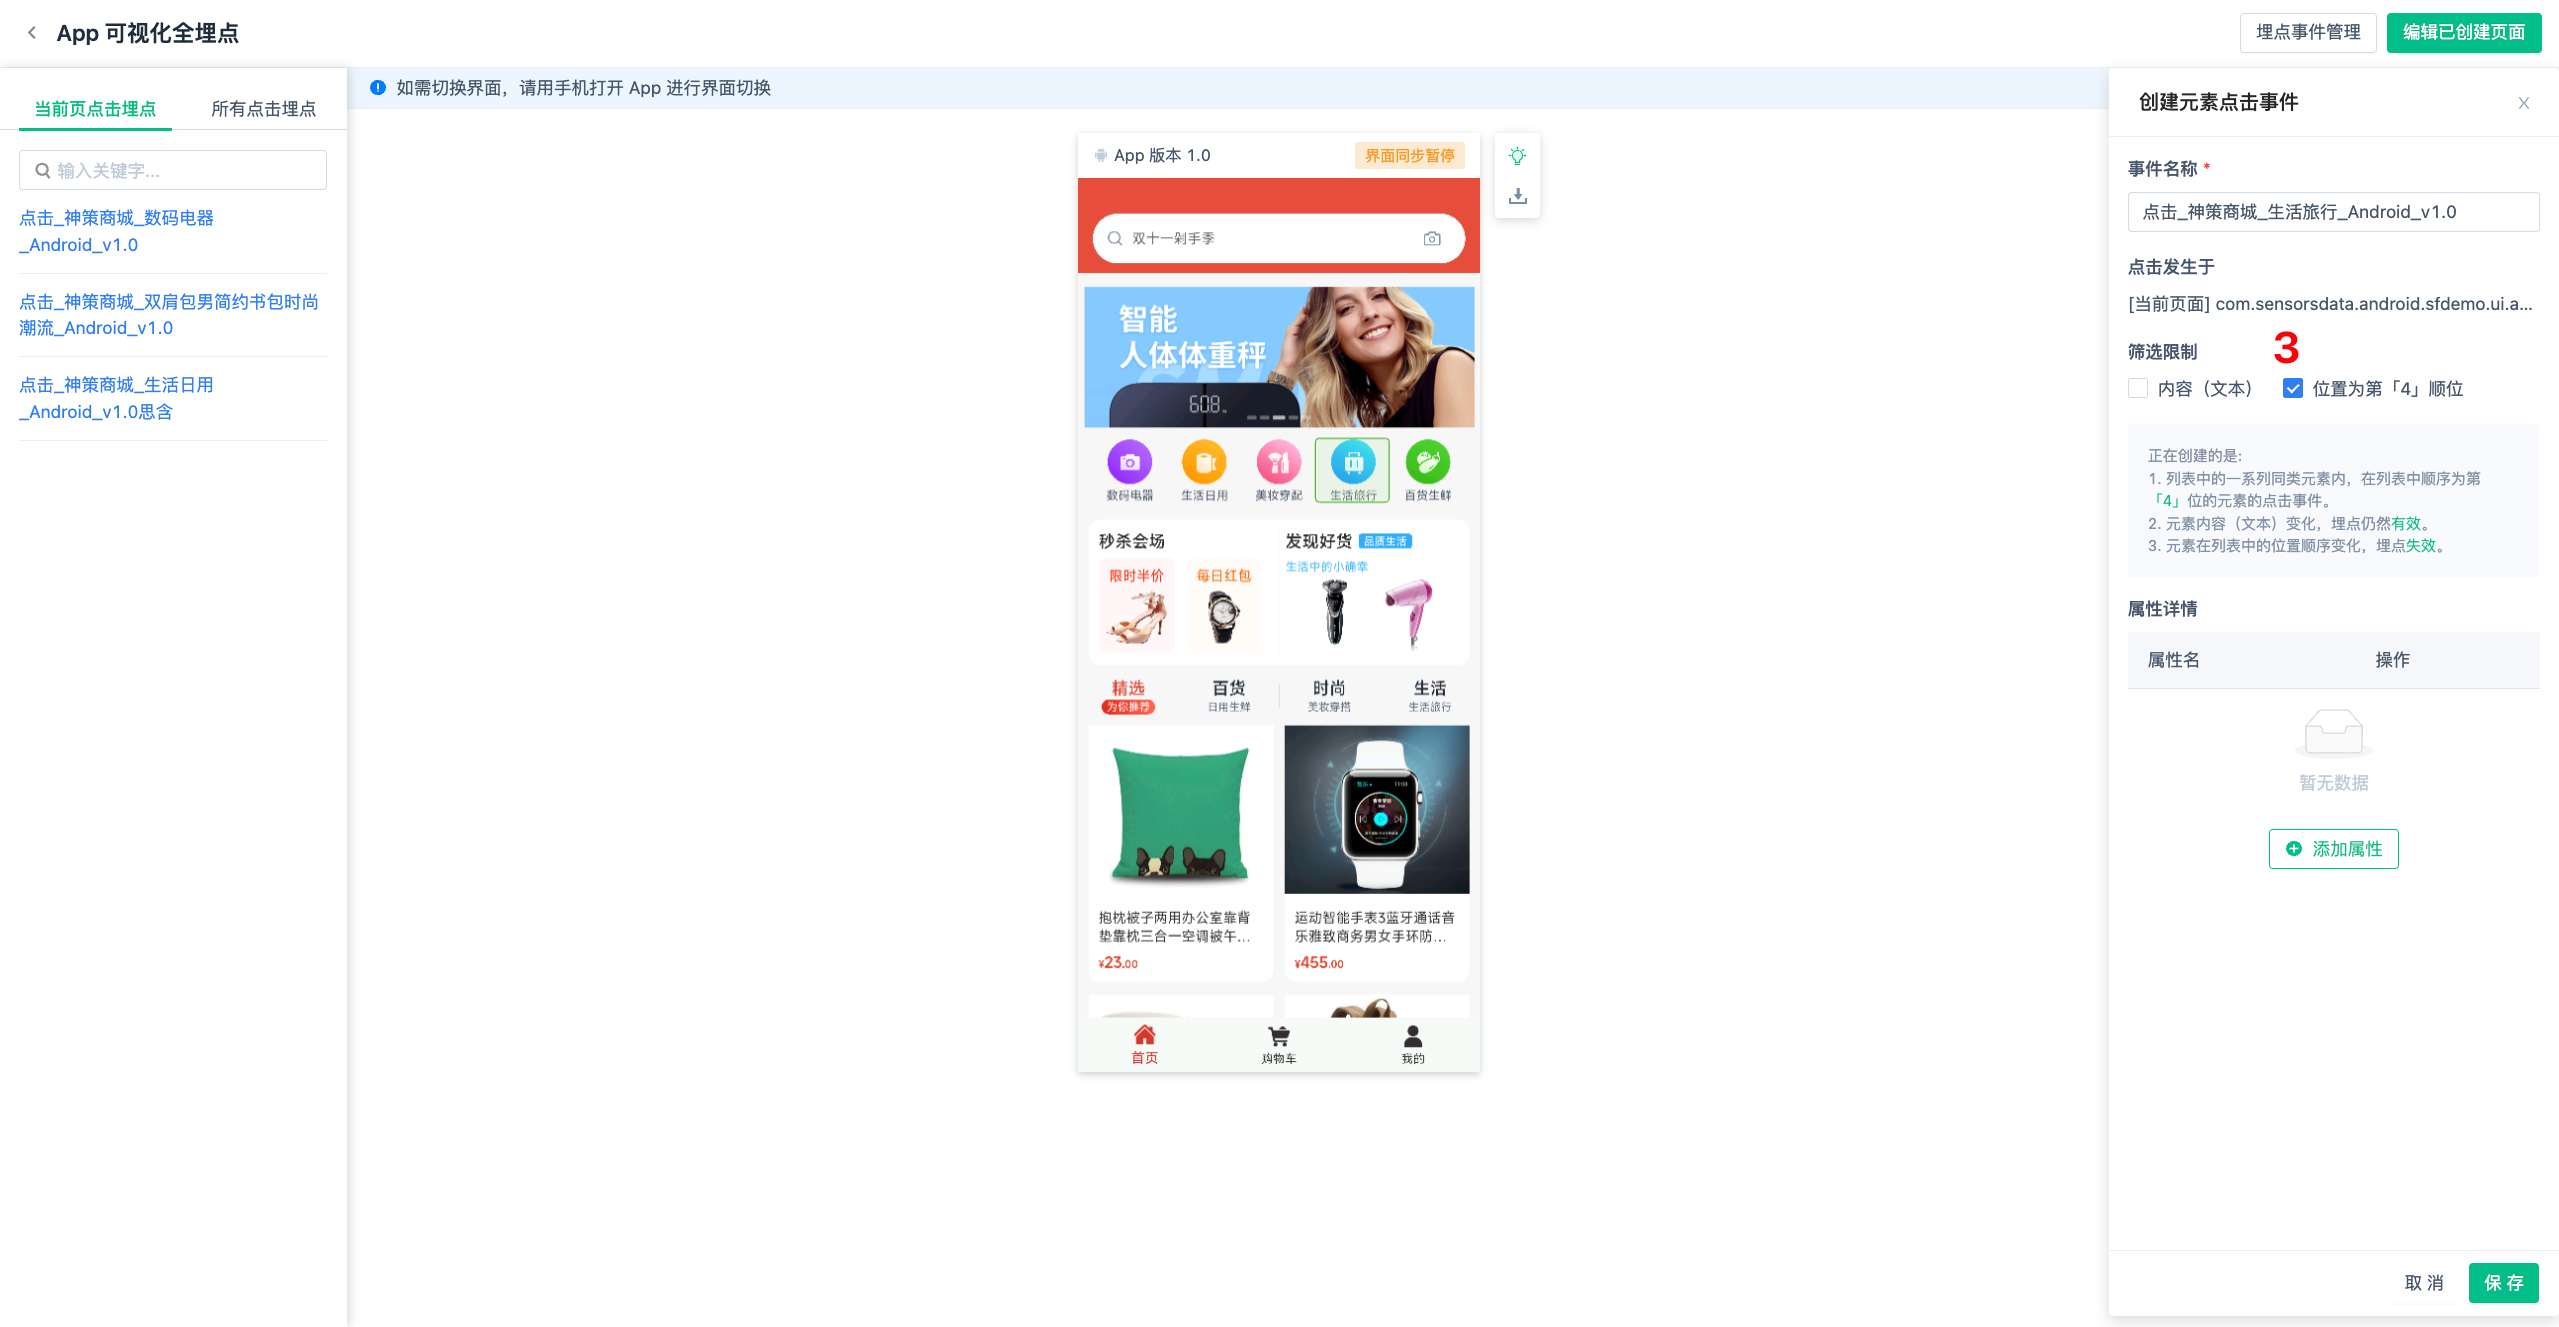
4.1.1.3. Define a specific element with specific content and position
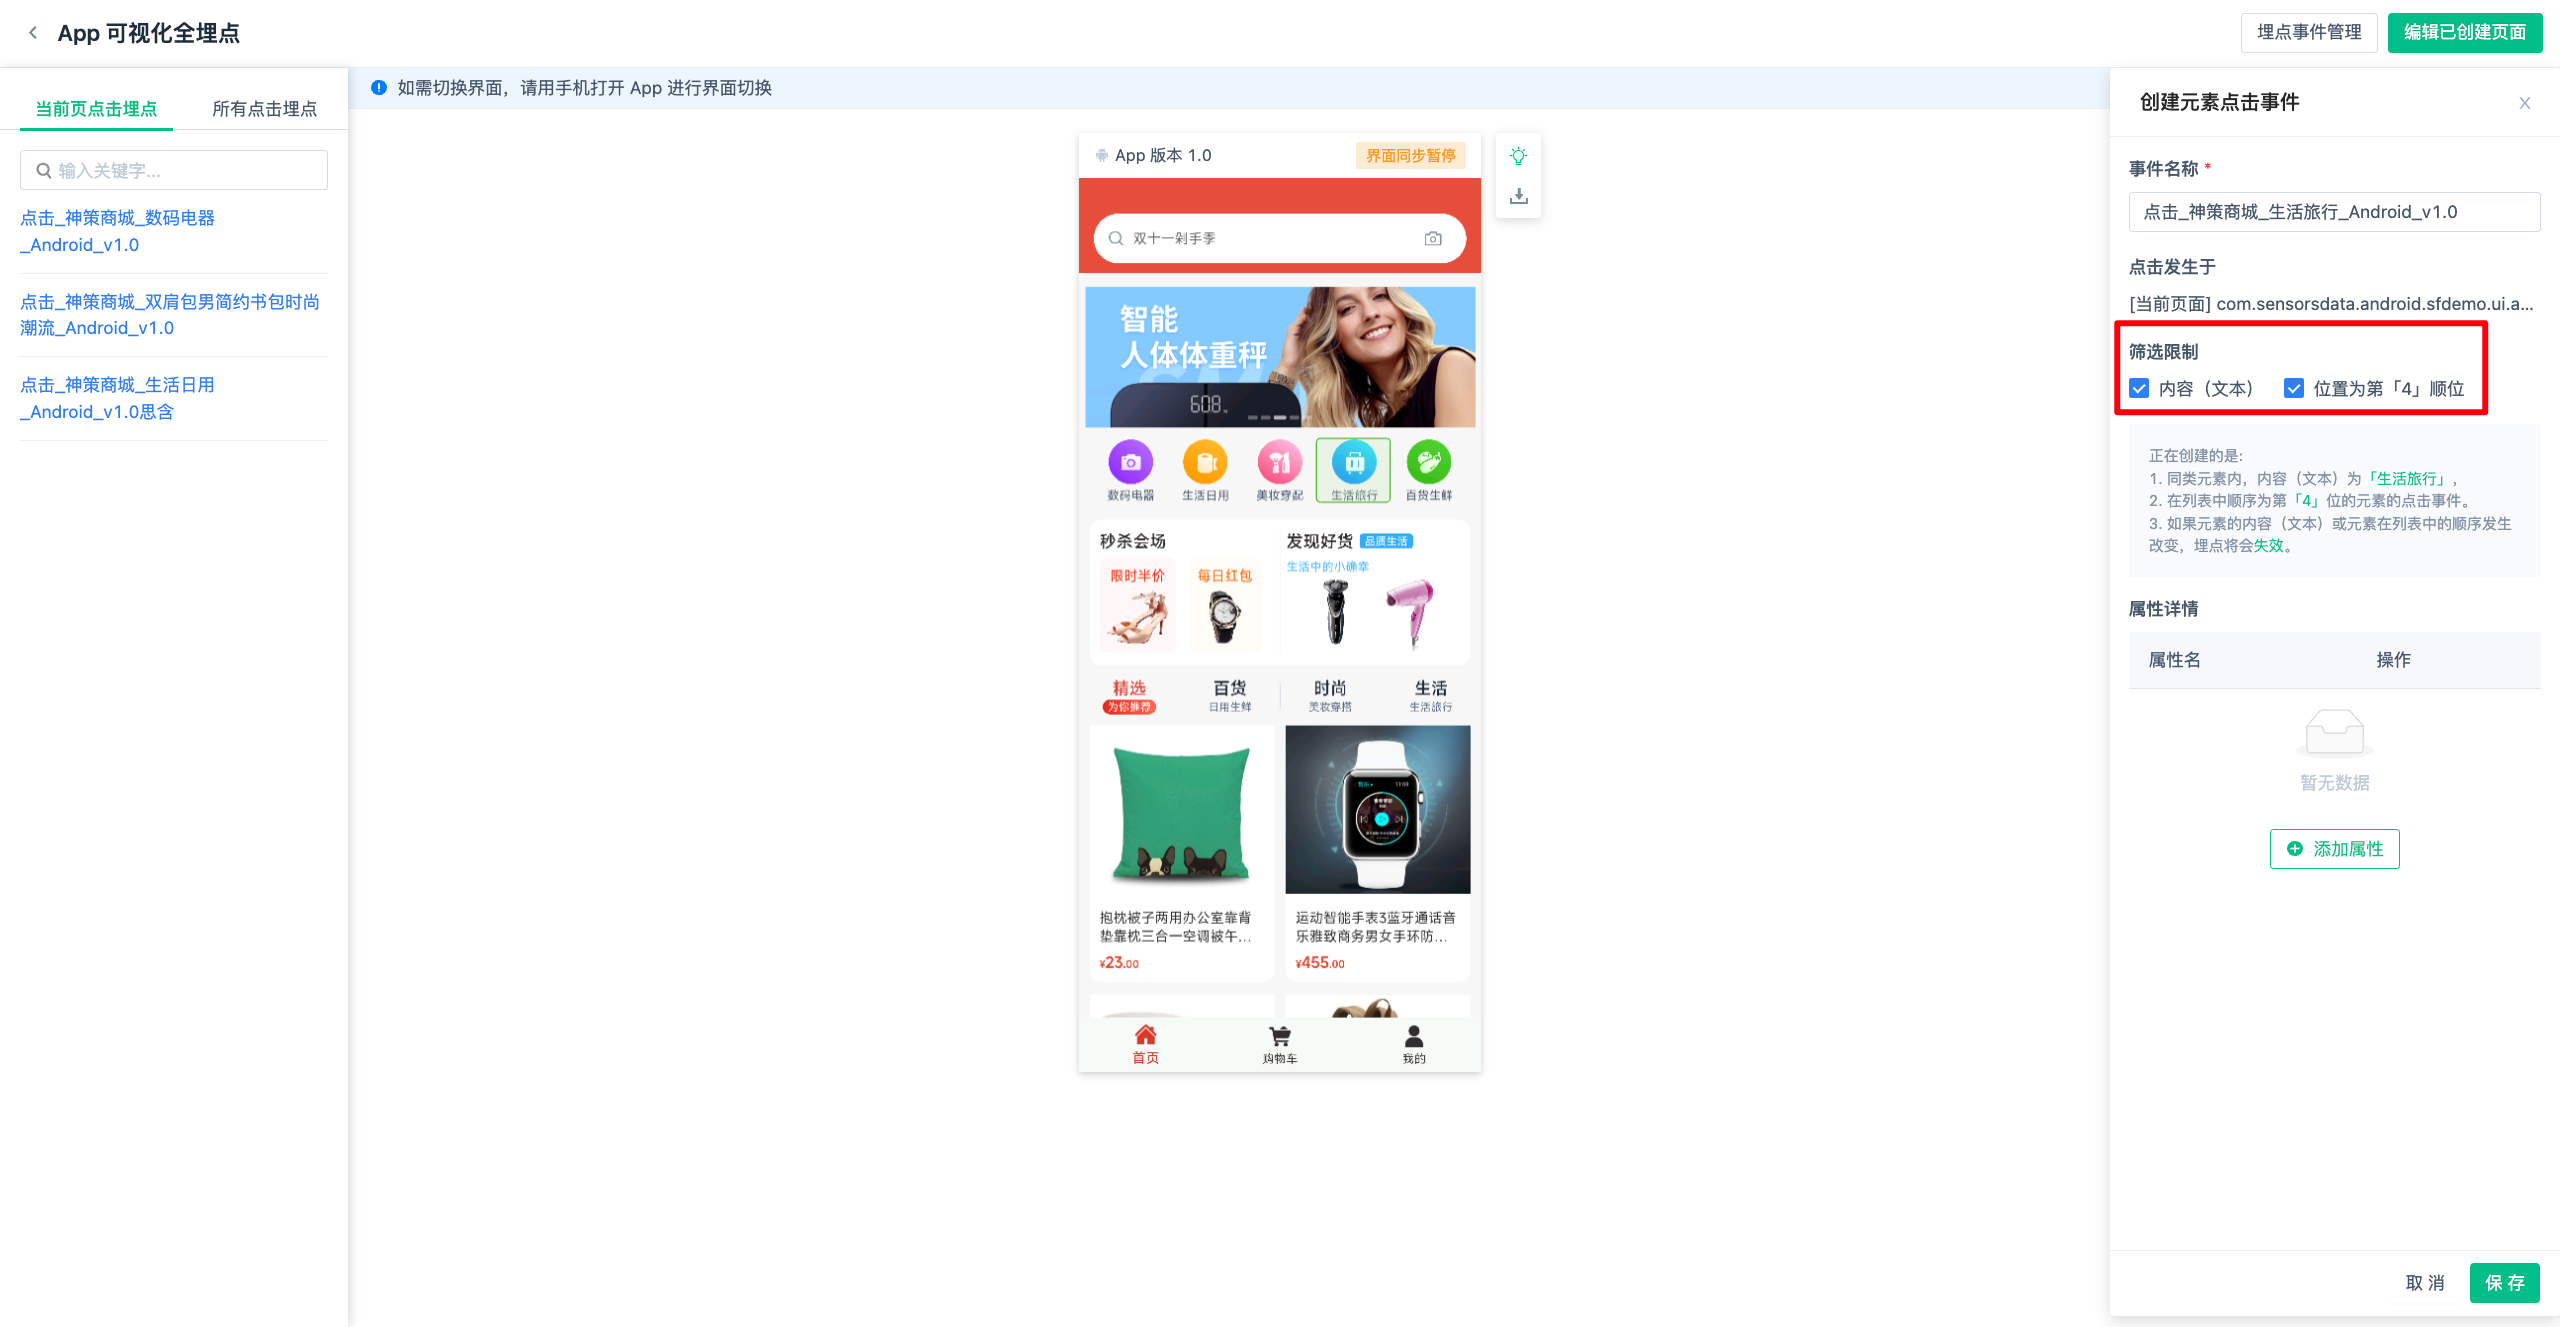
Change the condition to see the limited condition content as follows:
- Limited content (text)
- Limited sequential position
The above two conditions mean that the current definition is the click event of an element that takes place under the "current page," within similar elements, with the content (text) as "Life Travel," and is the 4th in the list in terms of order. If the content or the order of the element changes, the event tracking will become invalid.
4.1.1.4. Define the entire list button
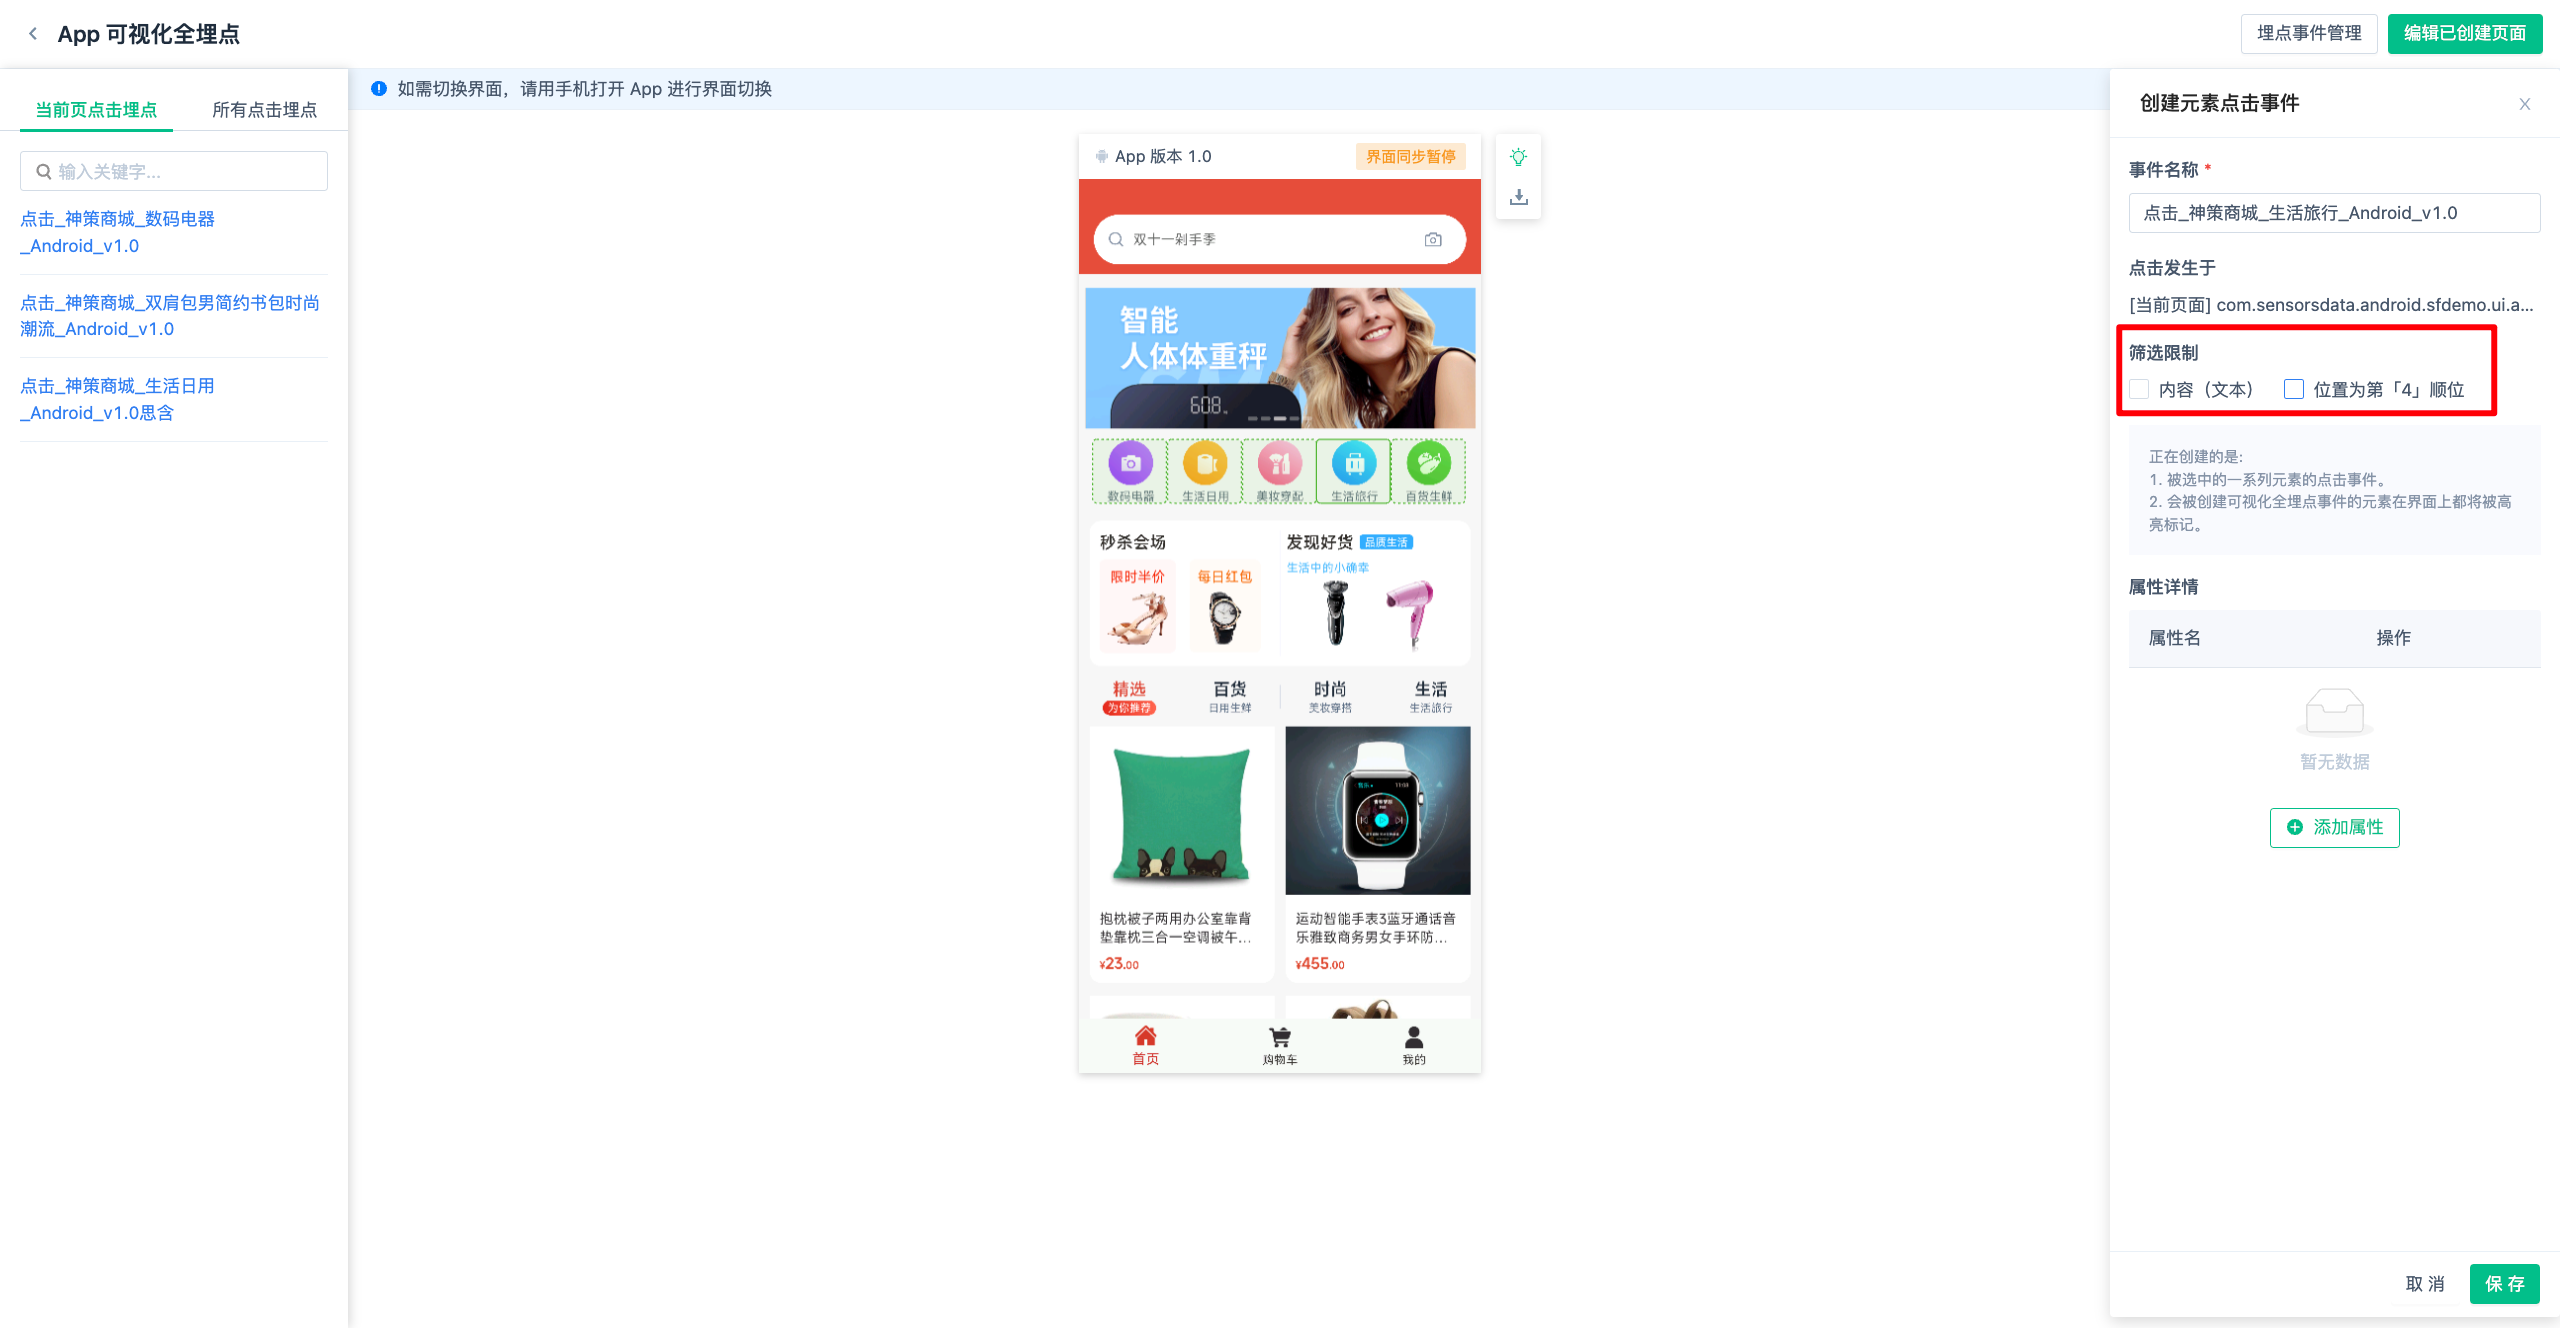
Change the condition to see the limited condition content as follows:
- Unlimited content (text)
- Unlimited sequential position
The above two conditions mean that the current definition is the click event for a series of selected elements in the screenshot under the "current page."
4.1.2. Define a specific independent button on a clickable card
When multiple elements share a click area, the Sensel's system will identify it as a single click element. However, if a clickable function within the card is independent of other elements, that element can be marked separately as shown in the above figure.
4.1.3. Redefine the already tracked elements
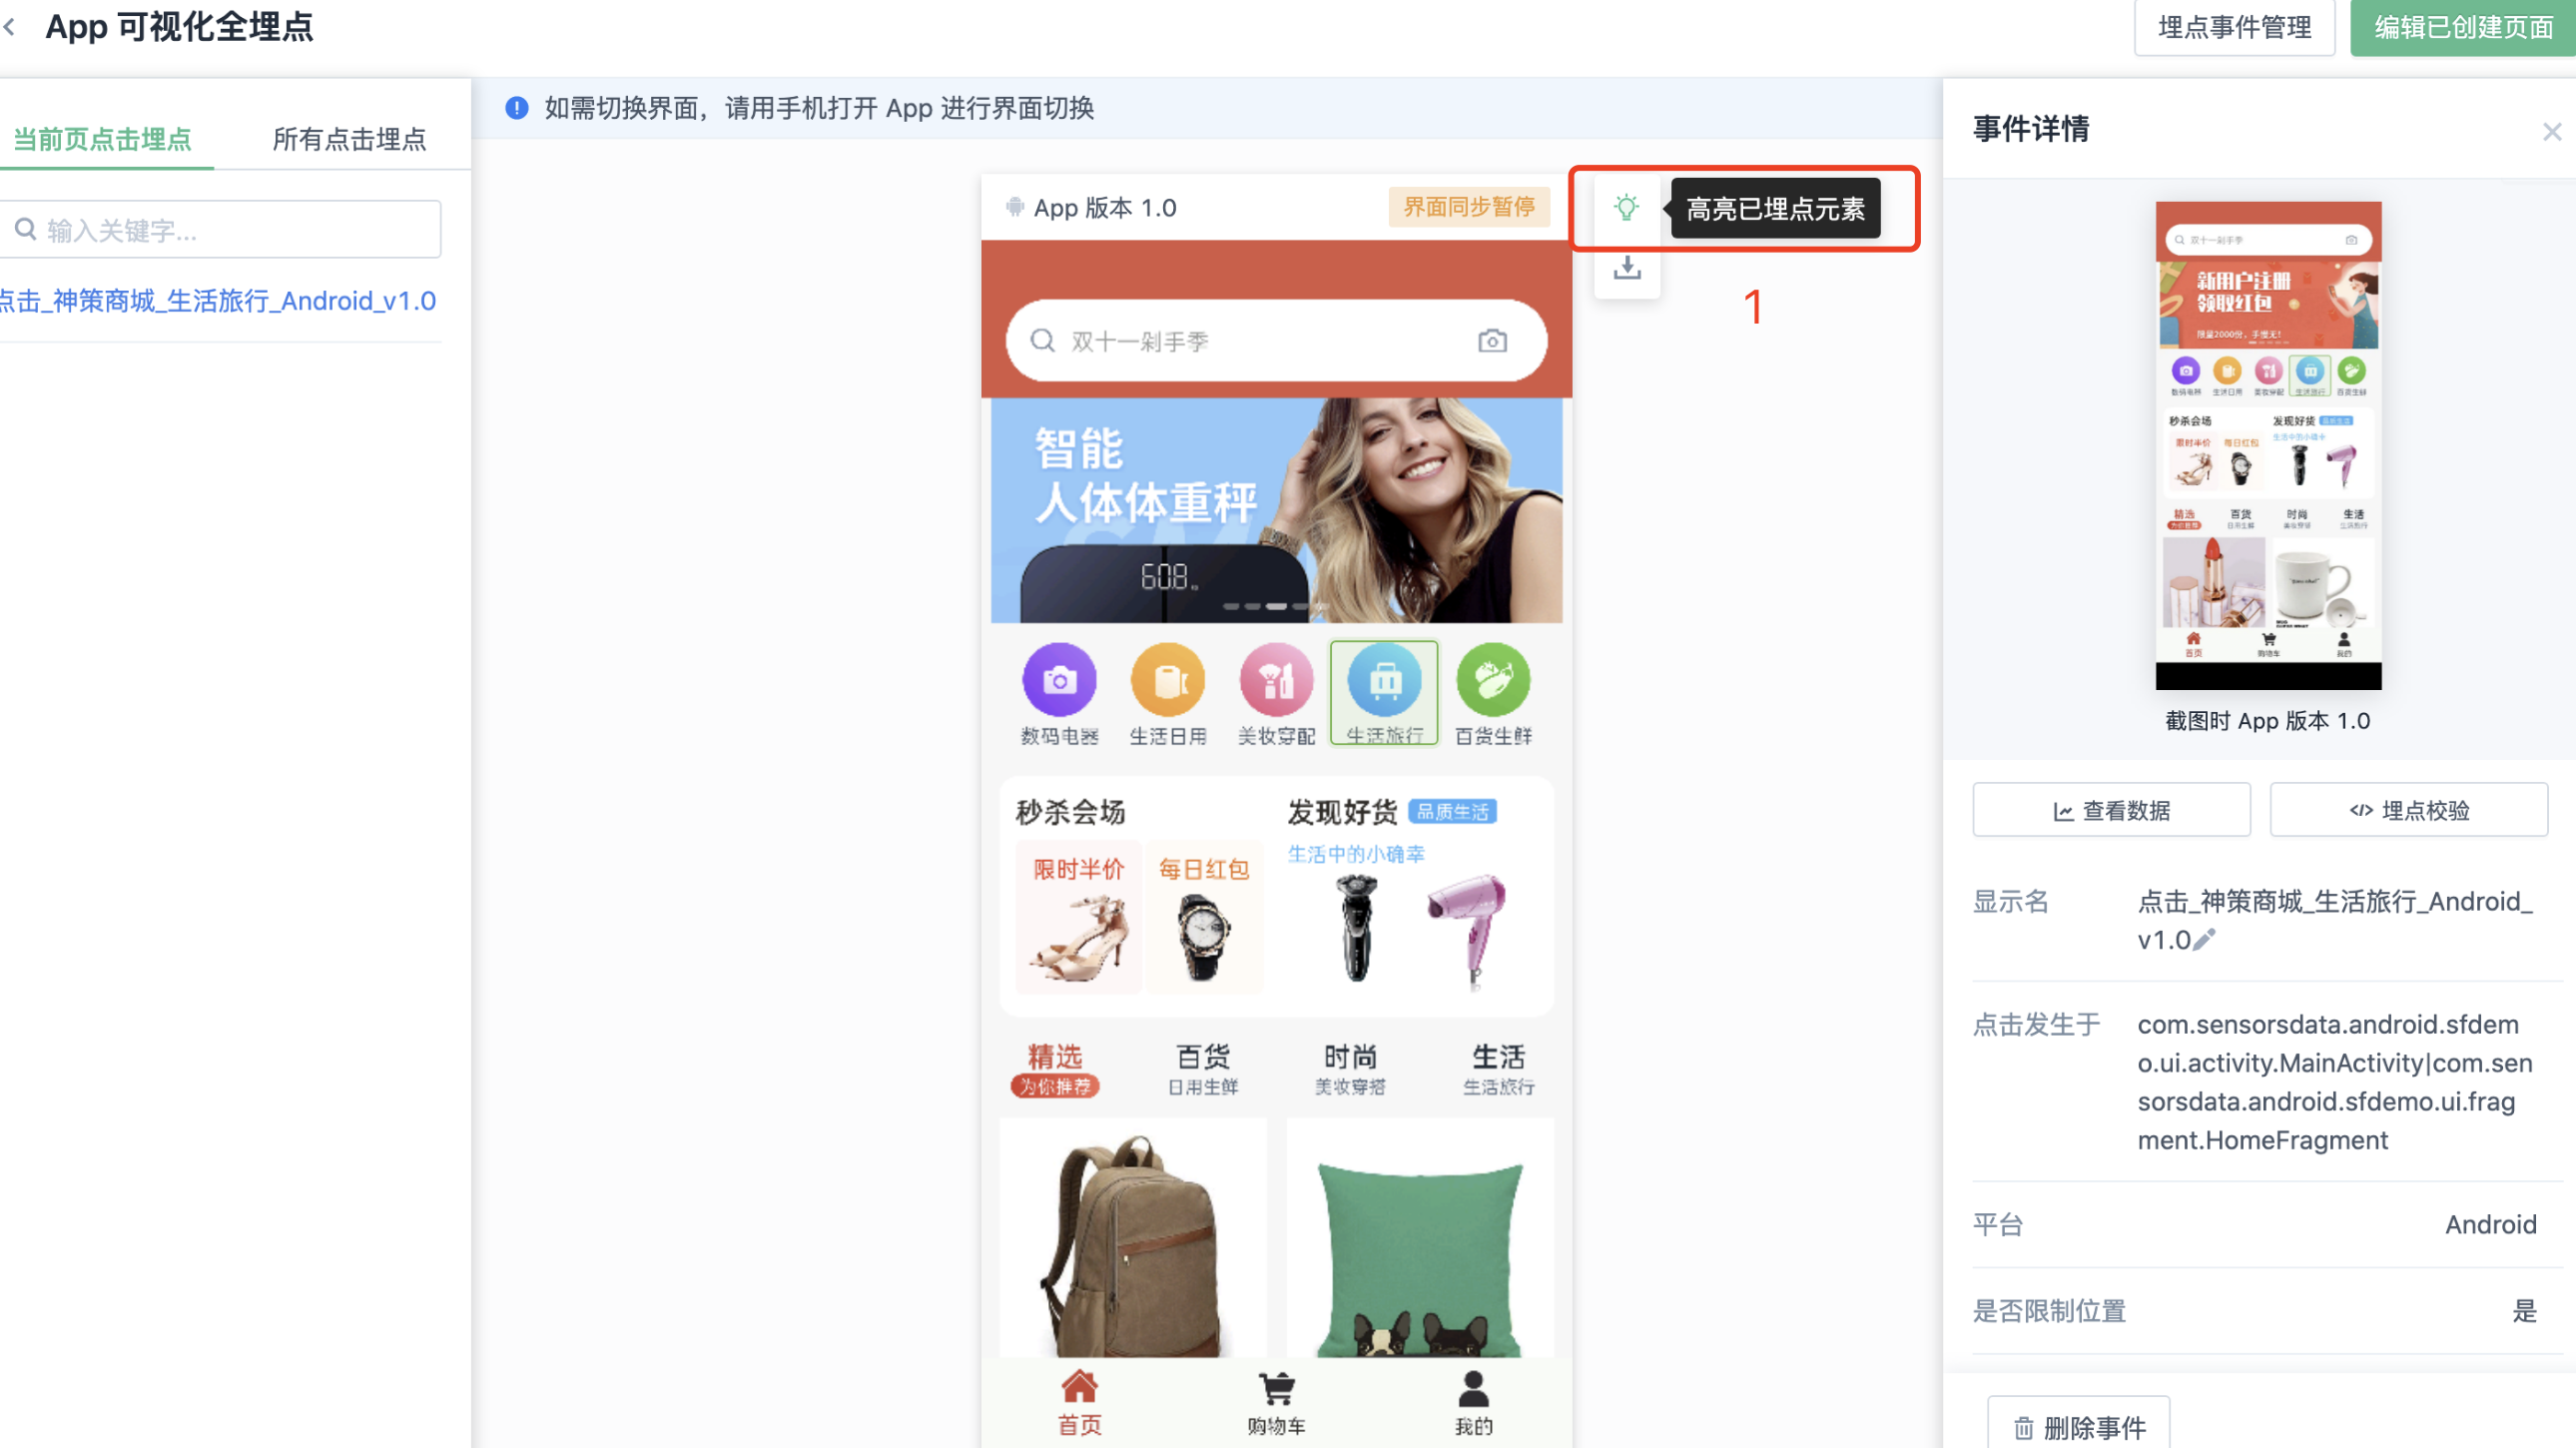
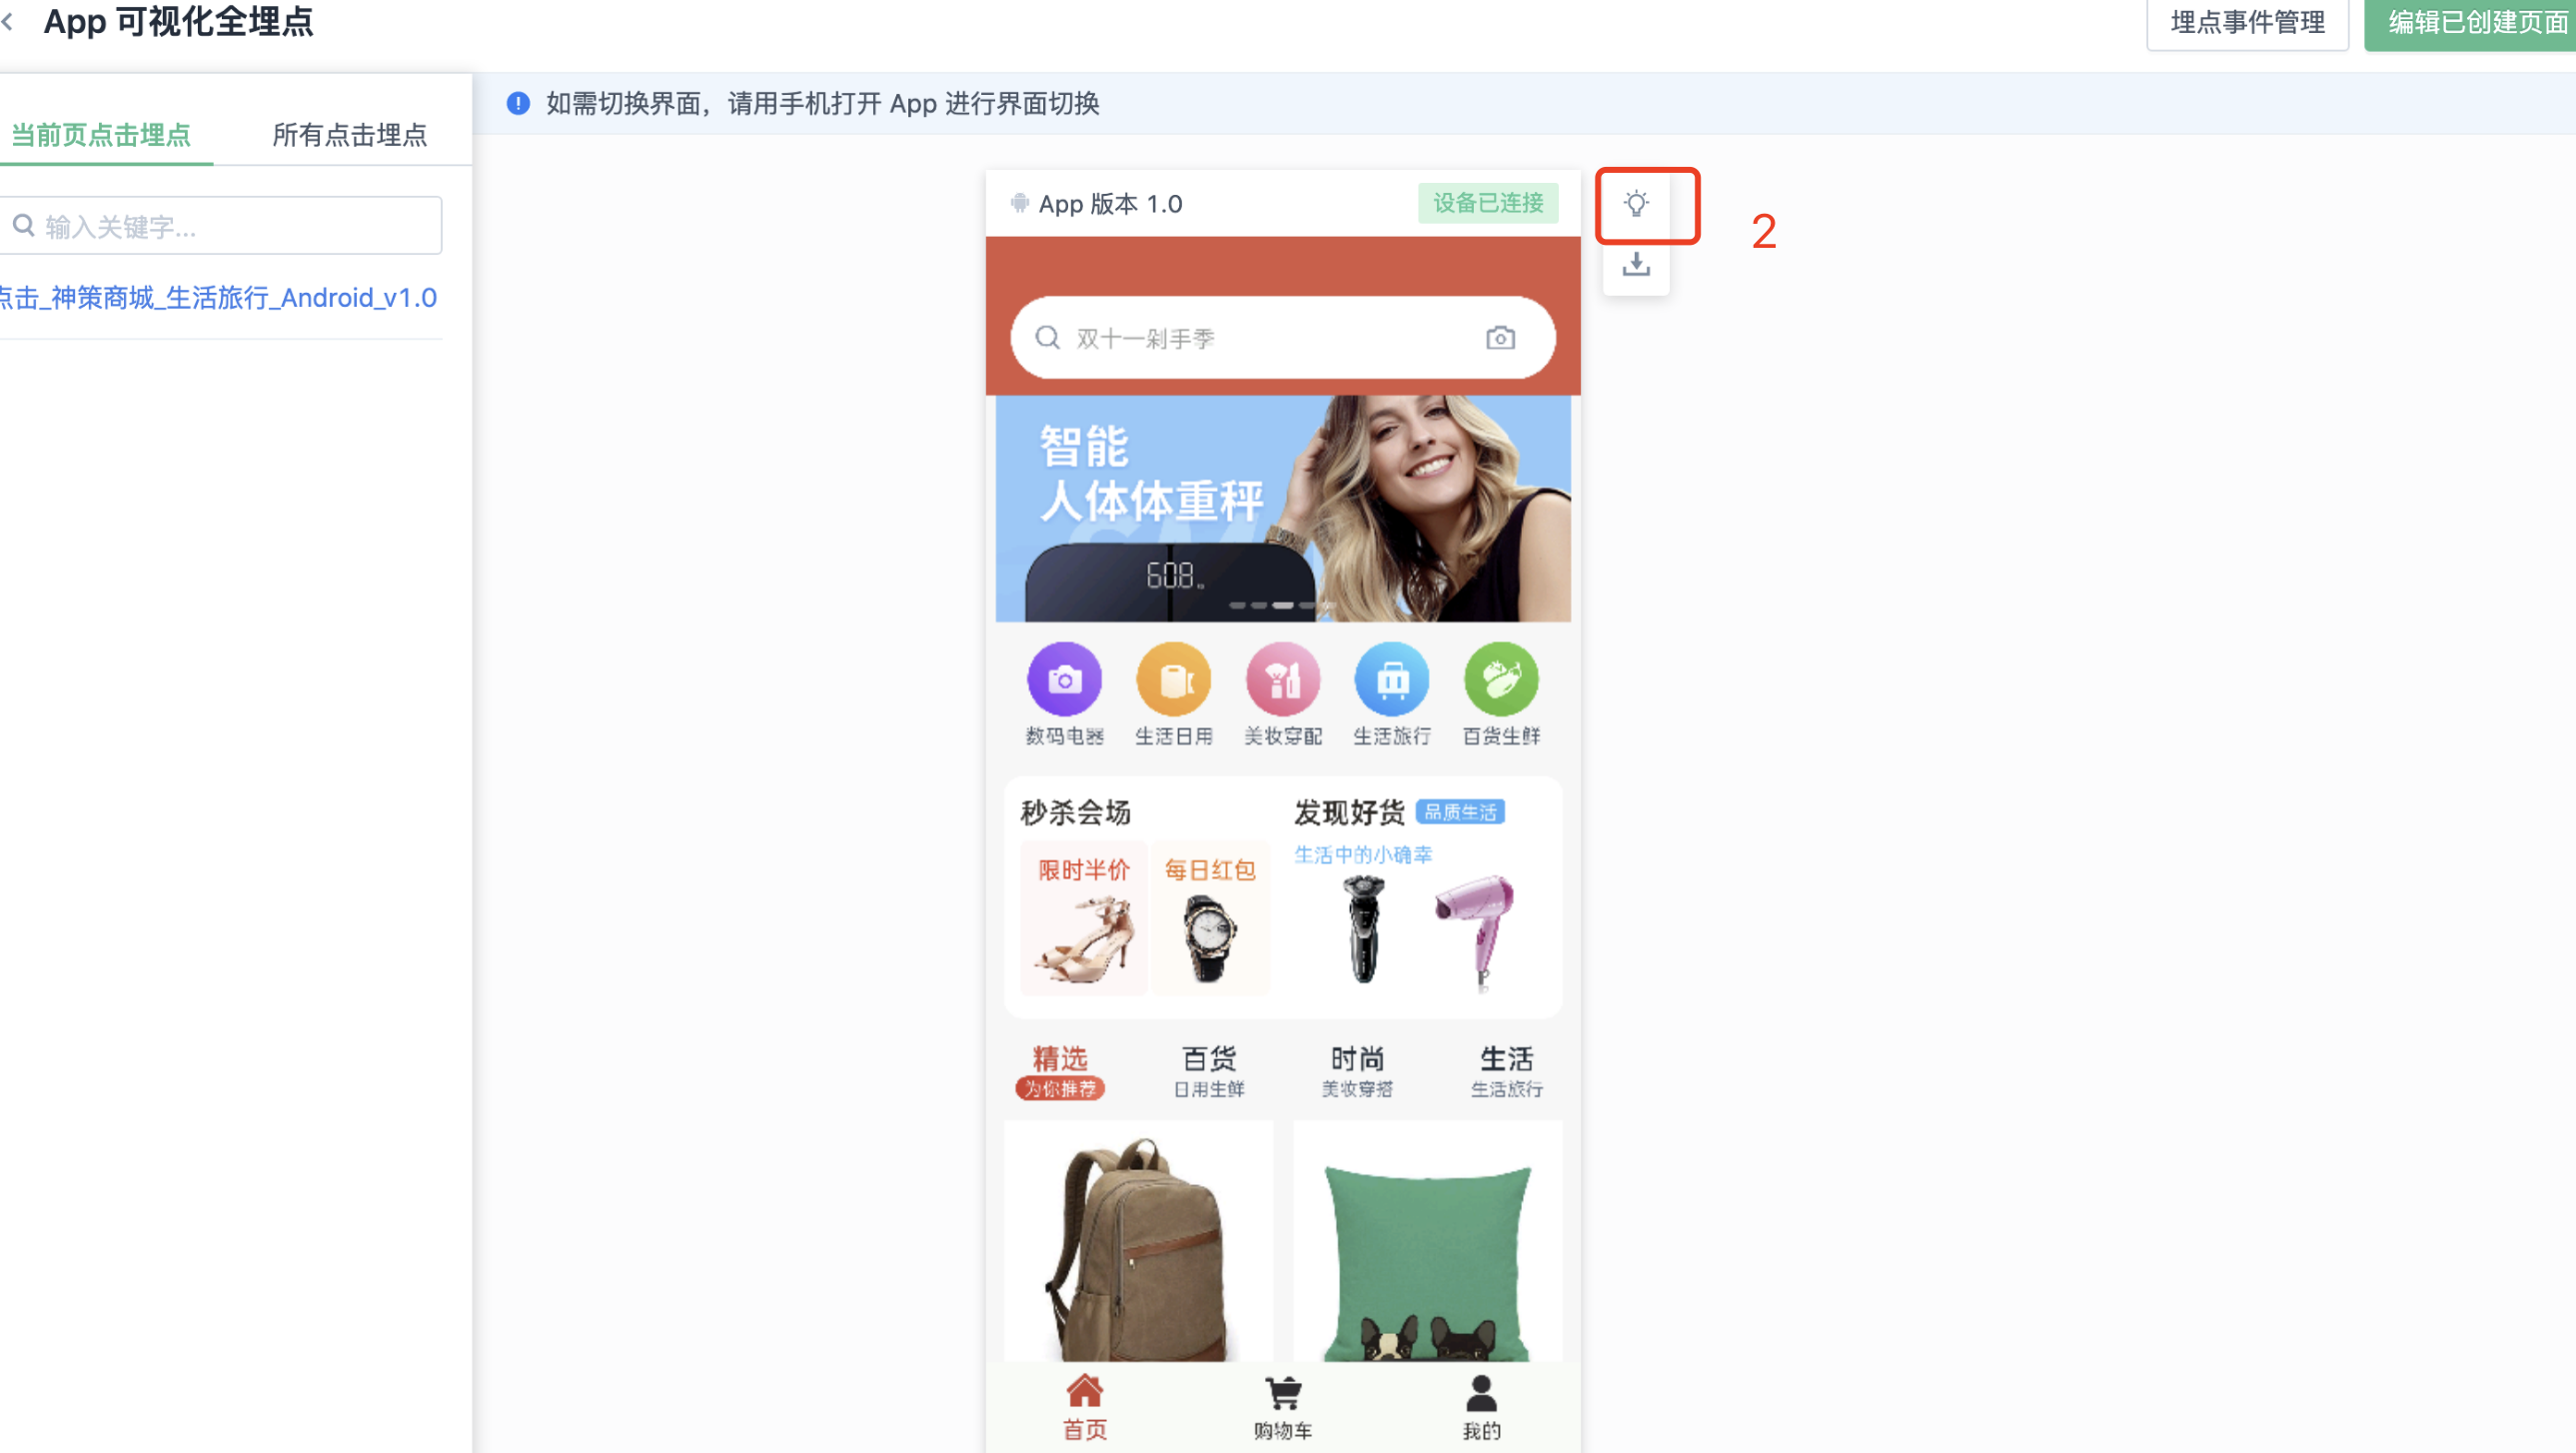
Take the elements in the figure as an example, if you have defined a click event with limited content and limited location, and you want to define a click event with unlimited content for the same element, you need to close the "highlight buried elements" first, and then enter the event definition interface to define the required events.
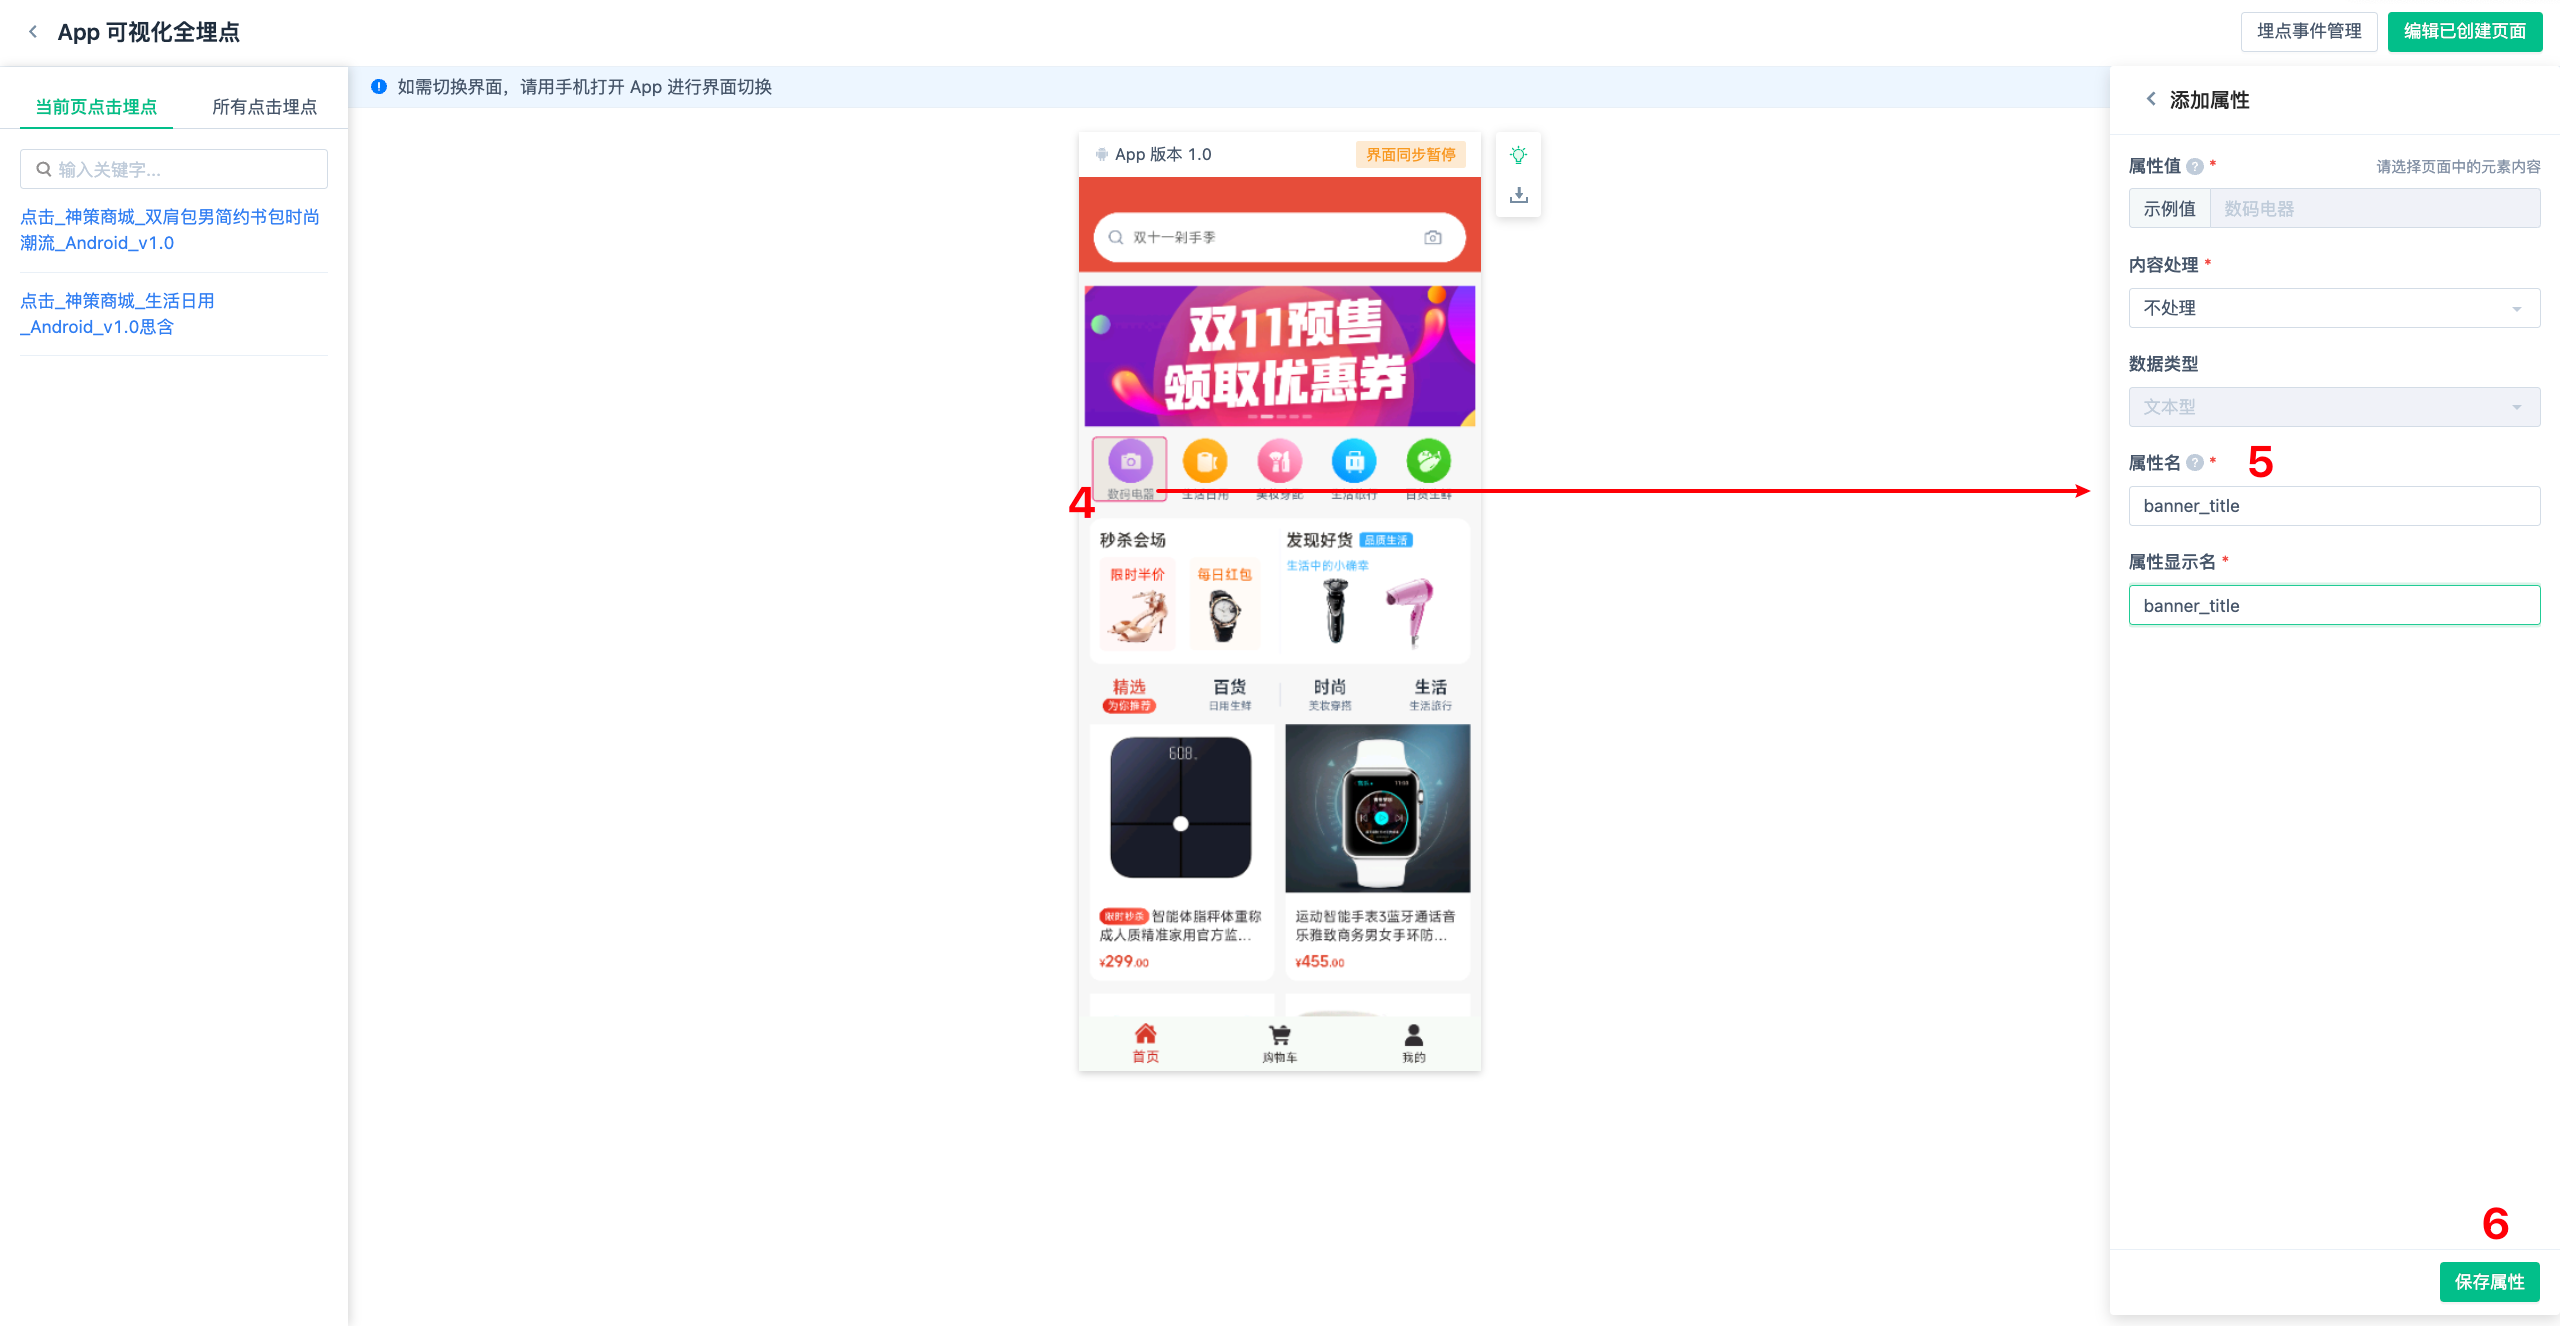
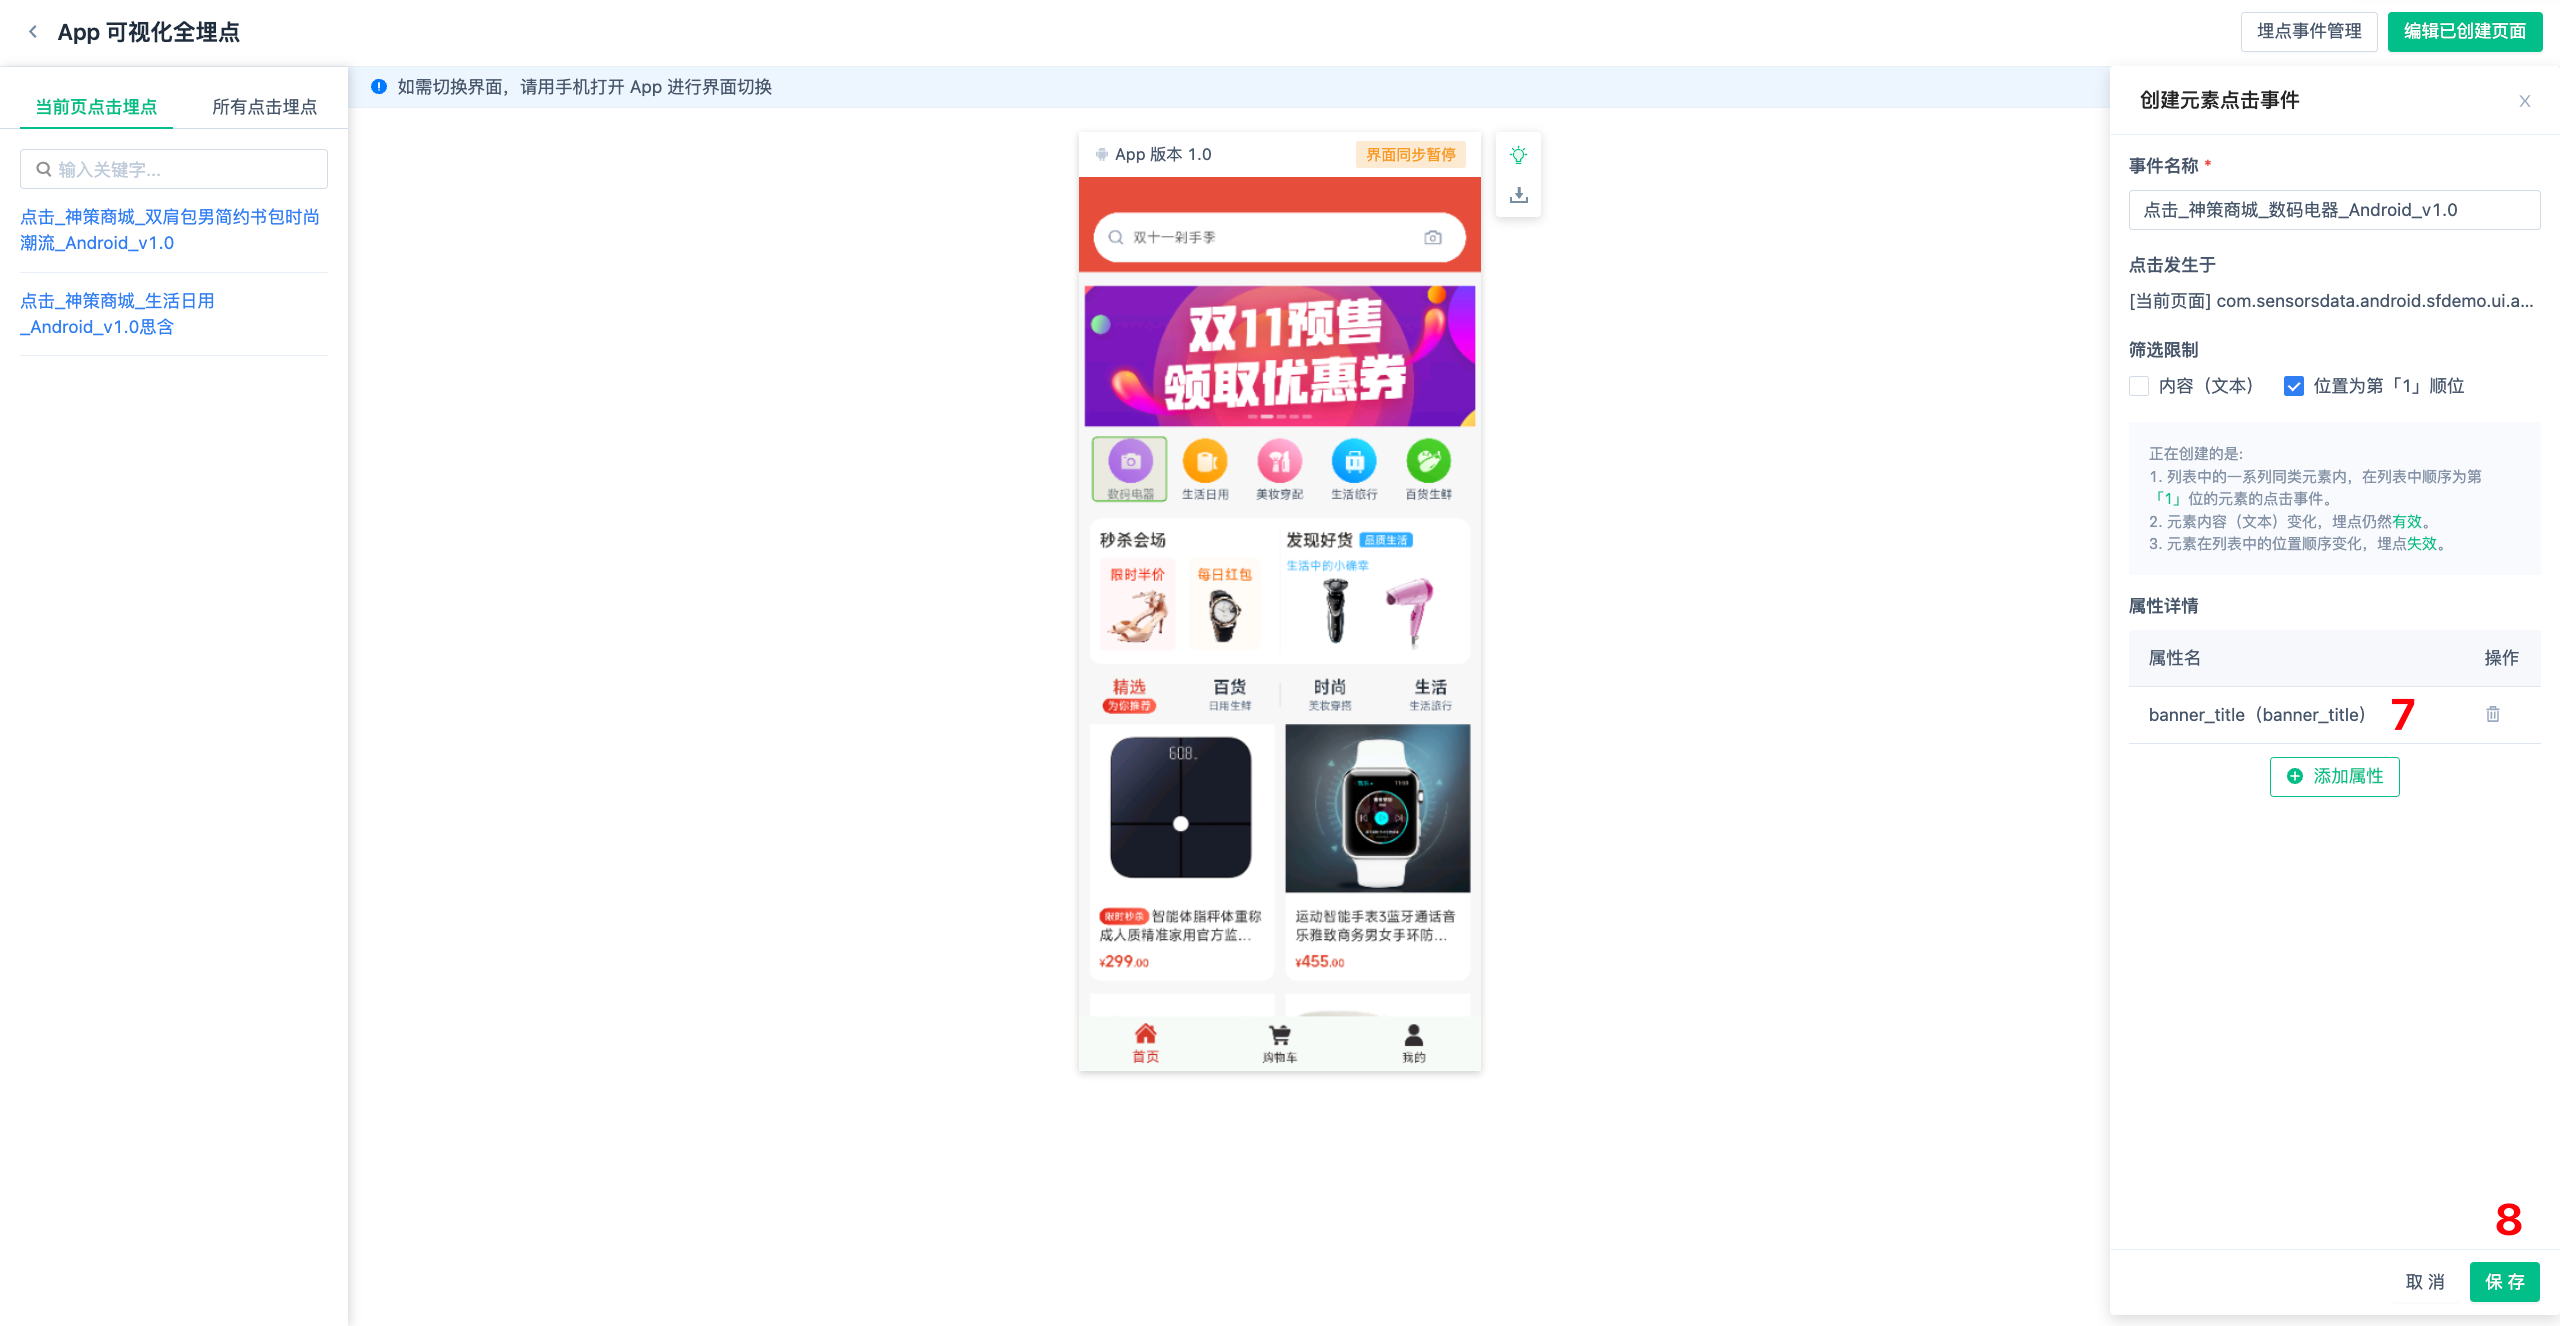
4.1.4. Customize the attributes of the element click event
First of all, click the "Add attribute" button in the Create Element Click event page, click the element in the page, save the attribute information, and confirm the creation event after saving.
4.1.5. List of sibling elements click the properties of the event
For clicked elements of the same class in the list, you can set the attributes of the same element path.
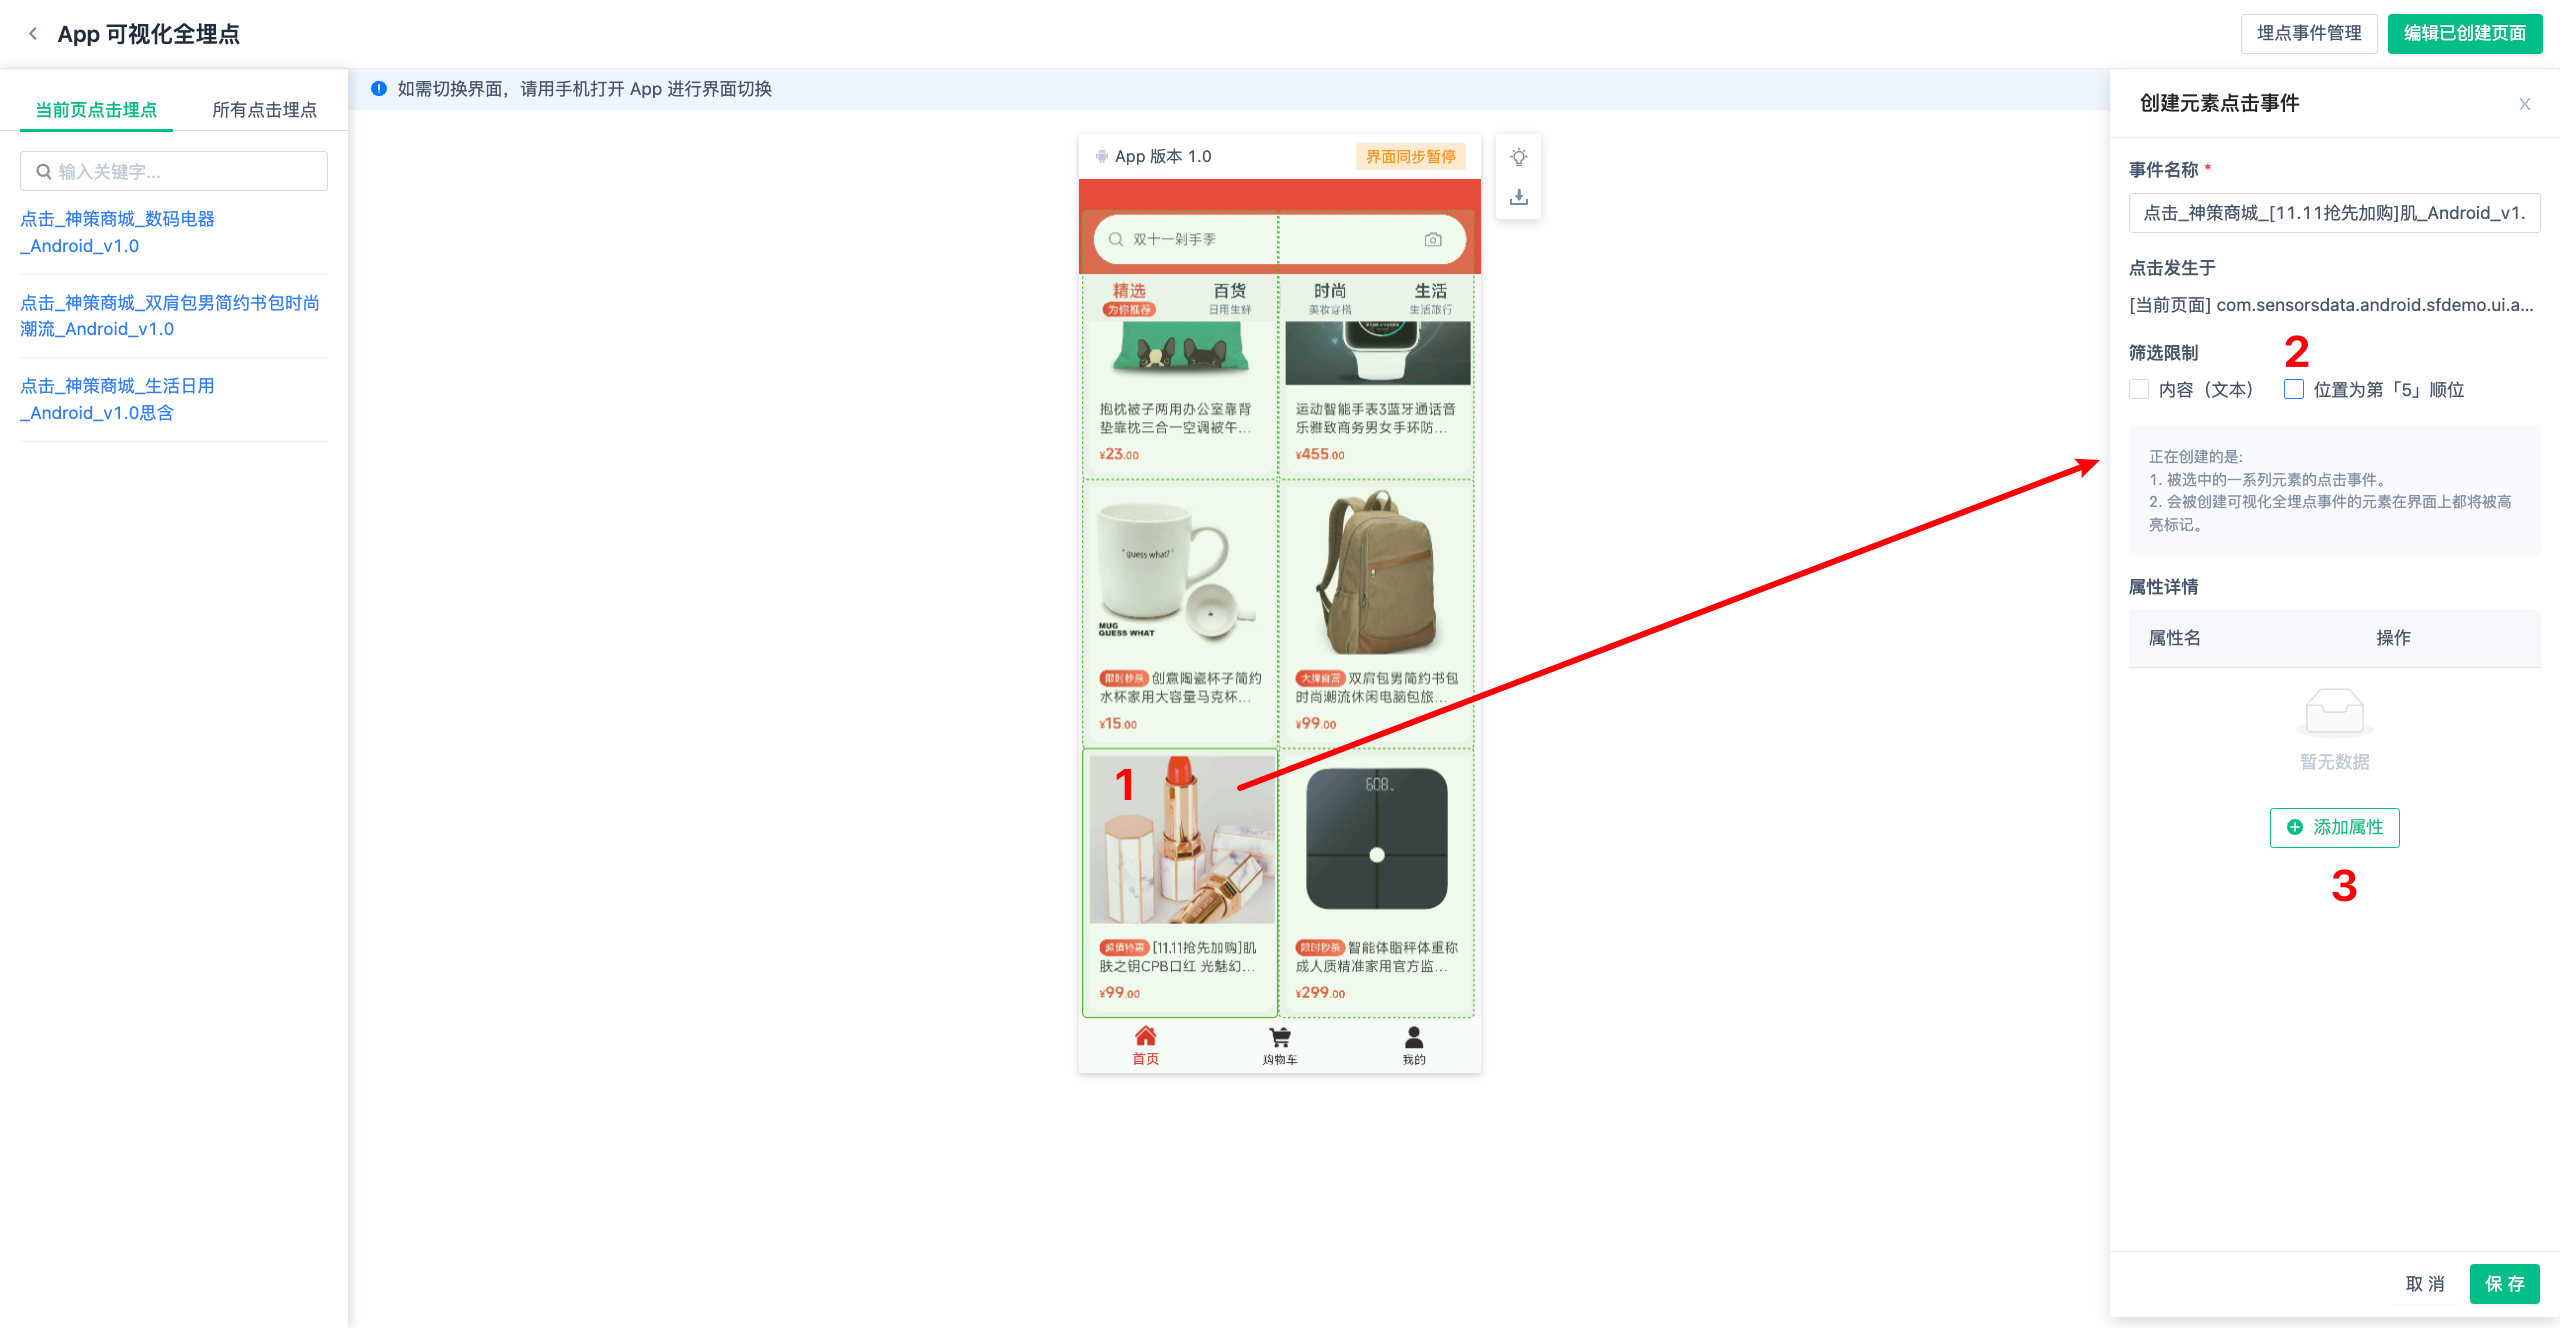
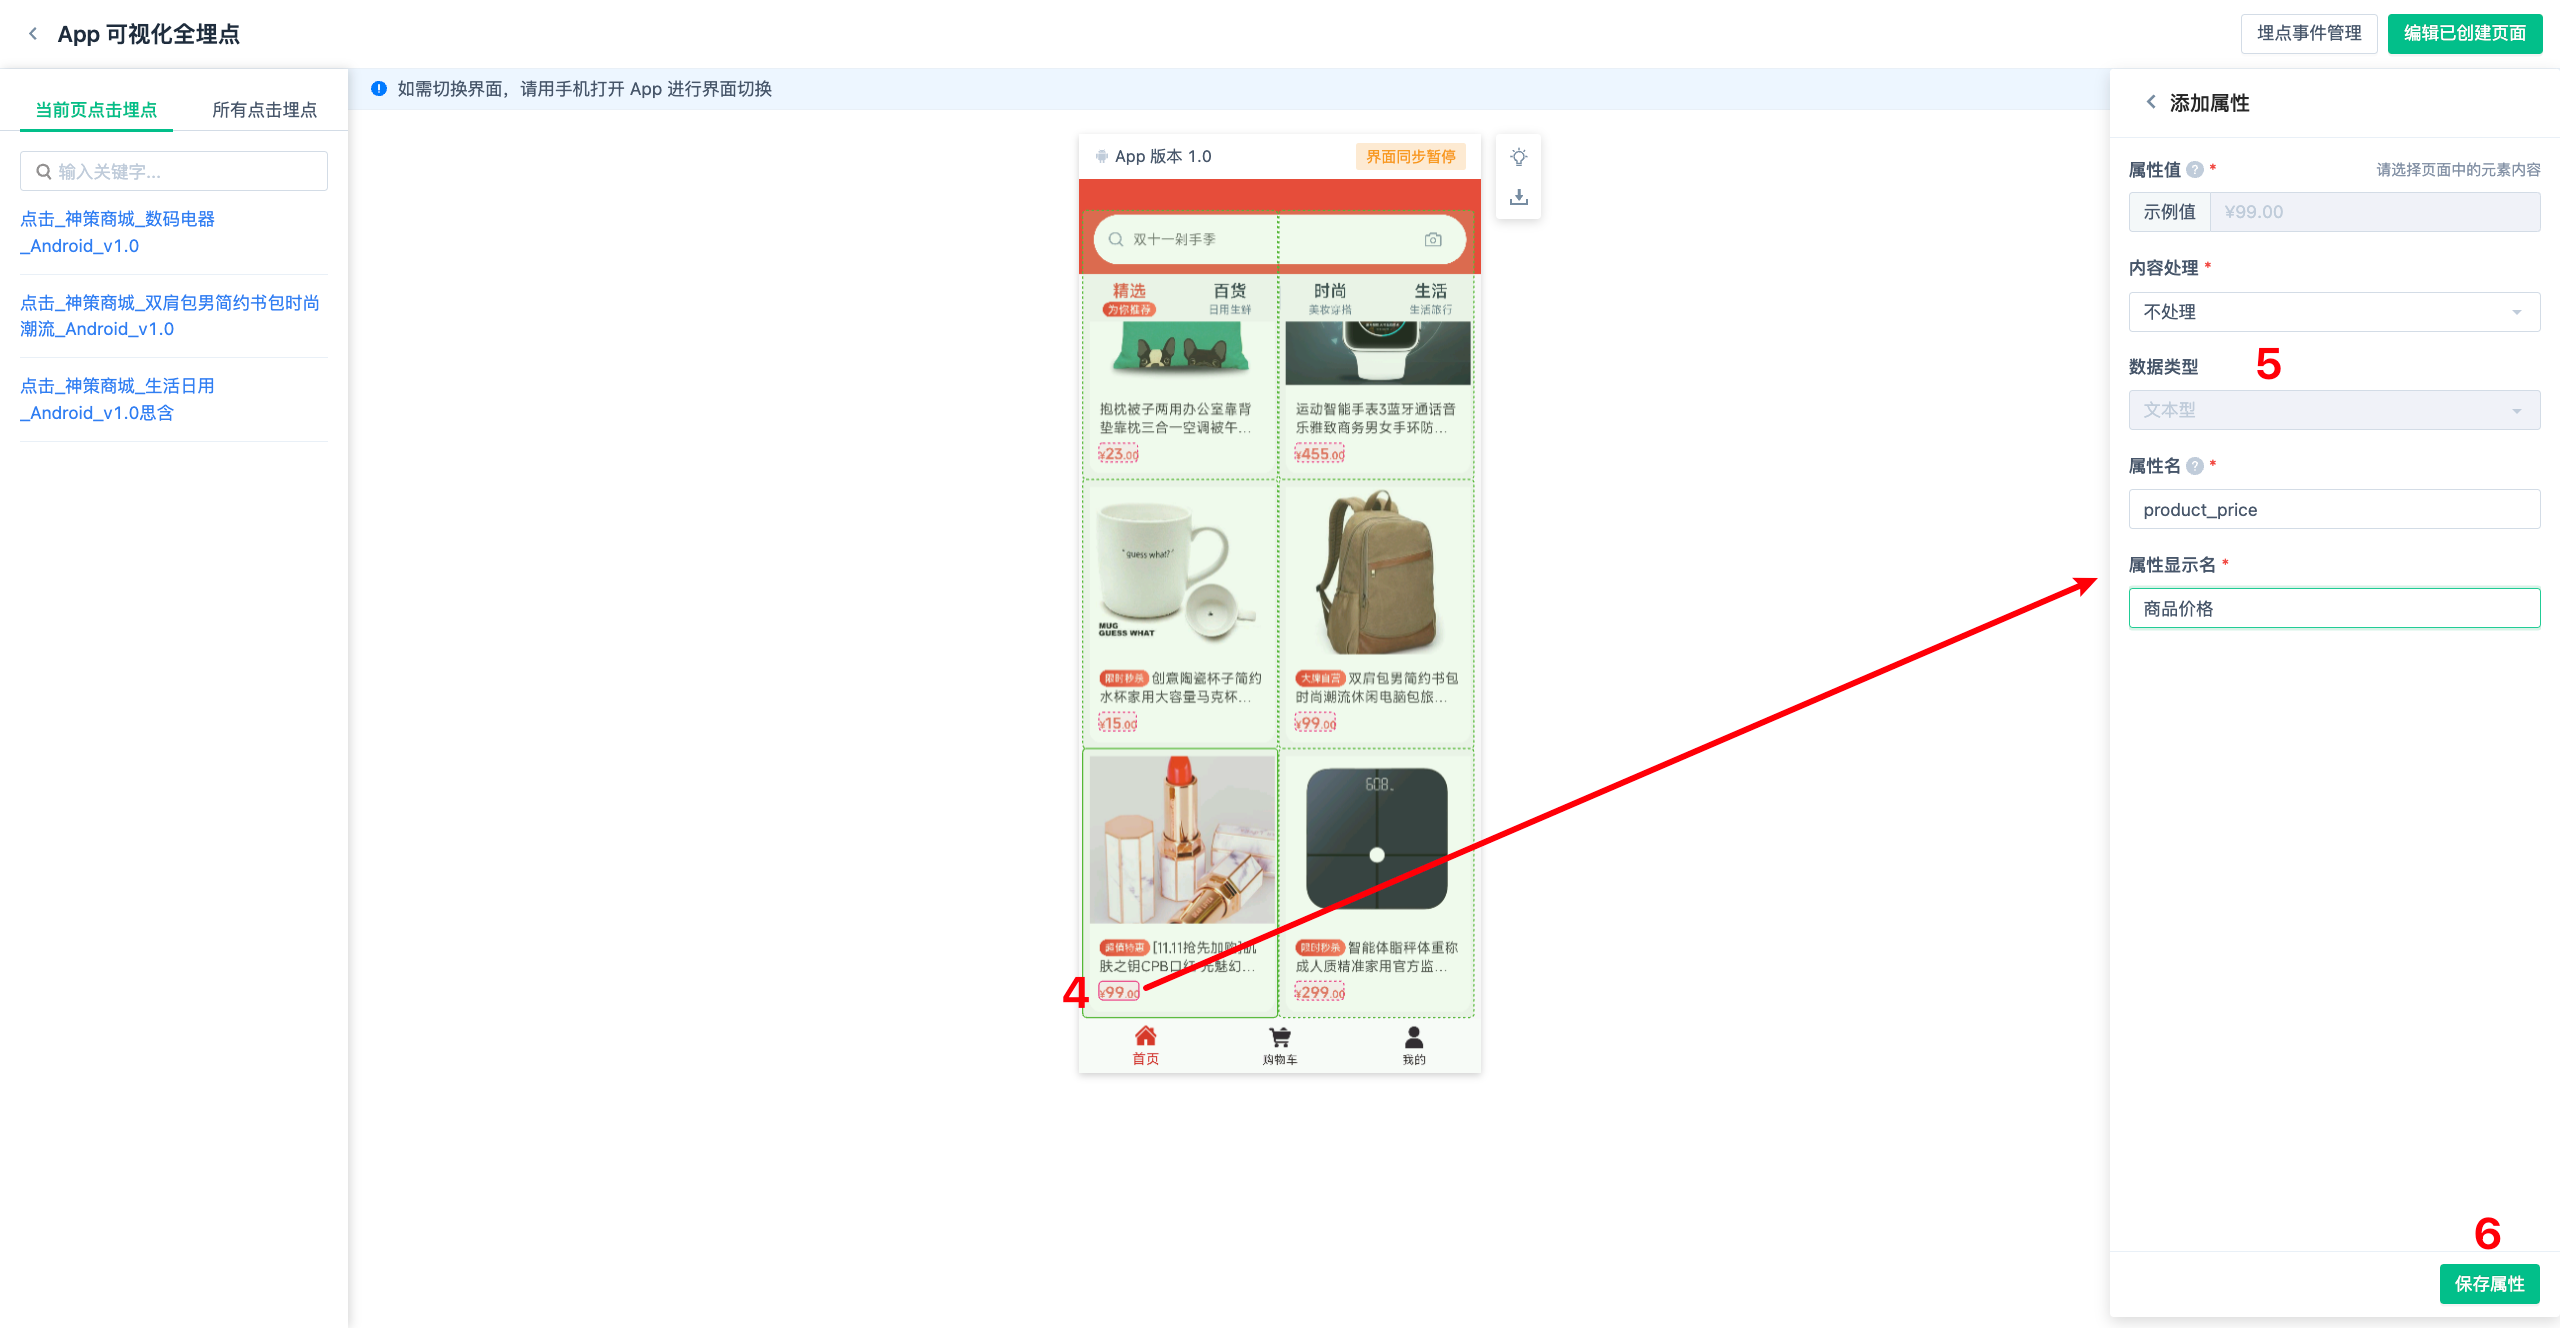

Click on an element in the page, modify the filter restrictions, no longer limit the position, limit the content, select all the elements in the list.
In the Create Element click event page, click the "Add attribute" button, click the element on the page, and save the attribute information. After saving, confirm the creation event.
4.1.6. Defines the properties of the H5 click event embedded in the App
For App embedded H5 click event elements support custom attributes, the operation is the same as above.
4.2. Define page browsing events
4.2.1. Define a page browsing event
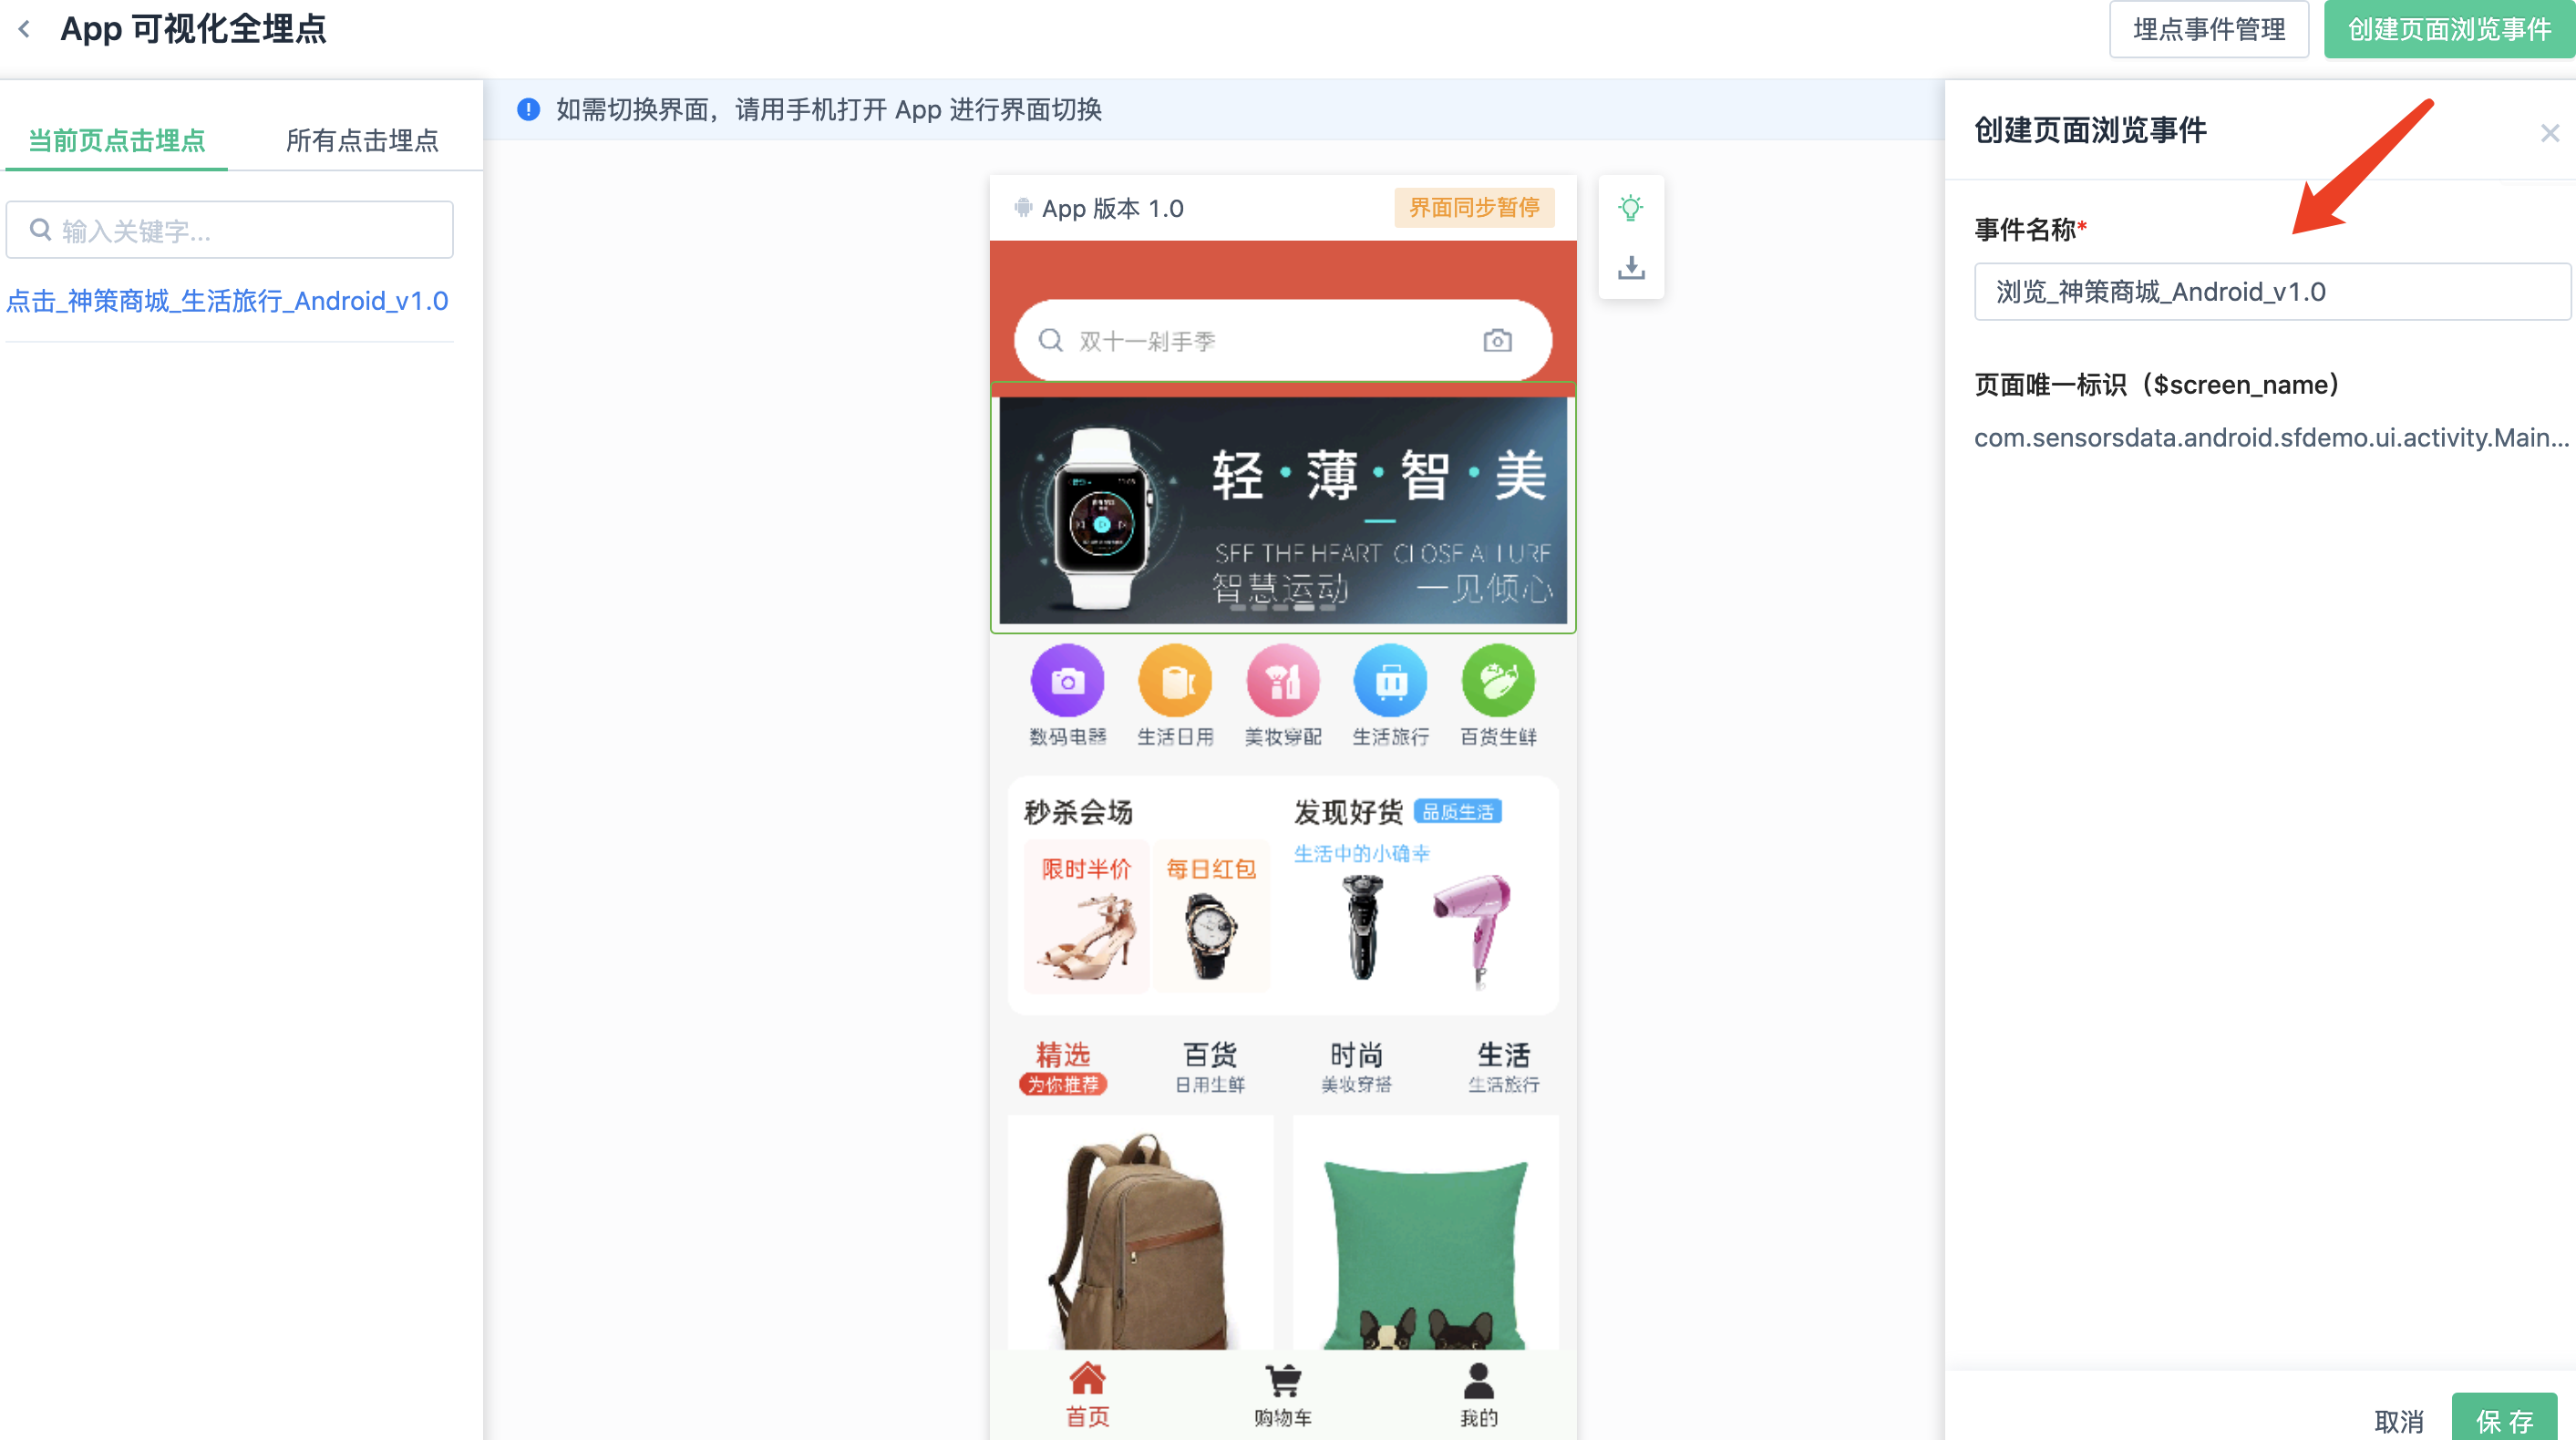
Click the "Create page browsing Event" button, in the pop-up page, confirm the event name, and click Save.
4.3. Manage visual all-tracking events
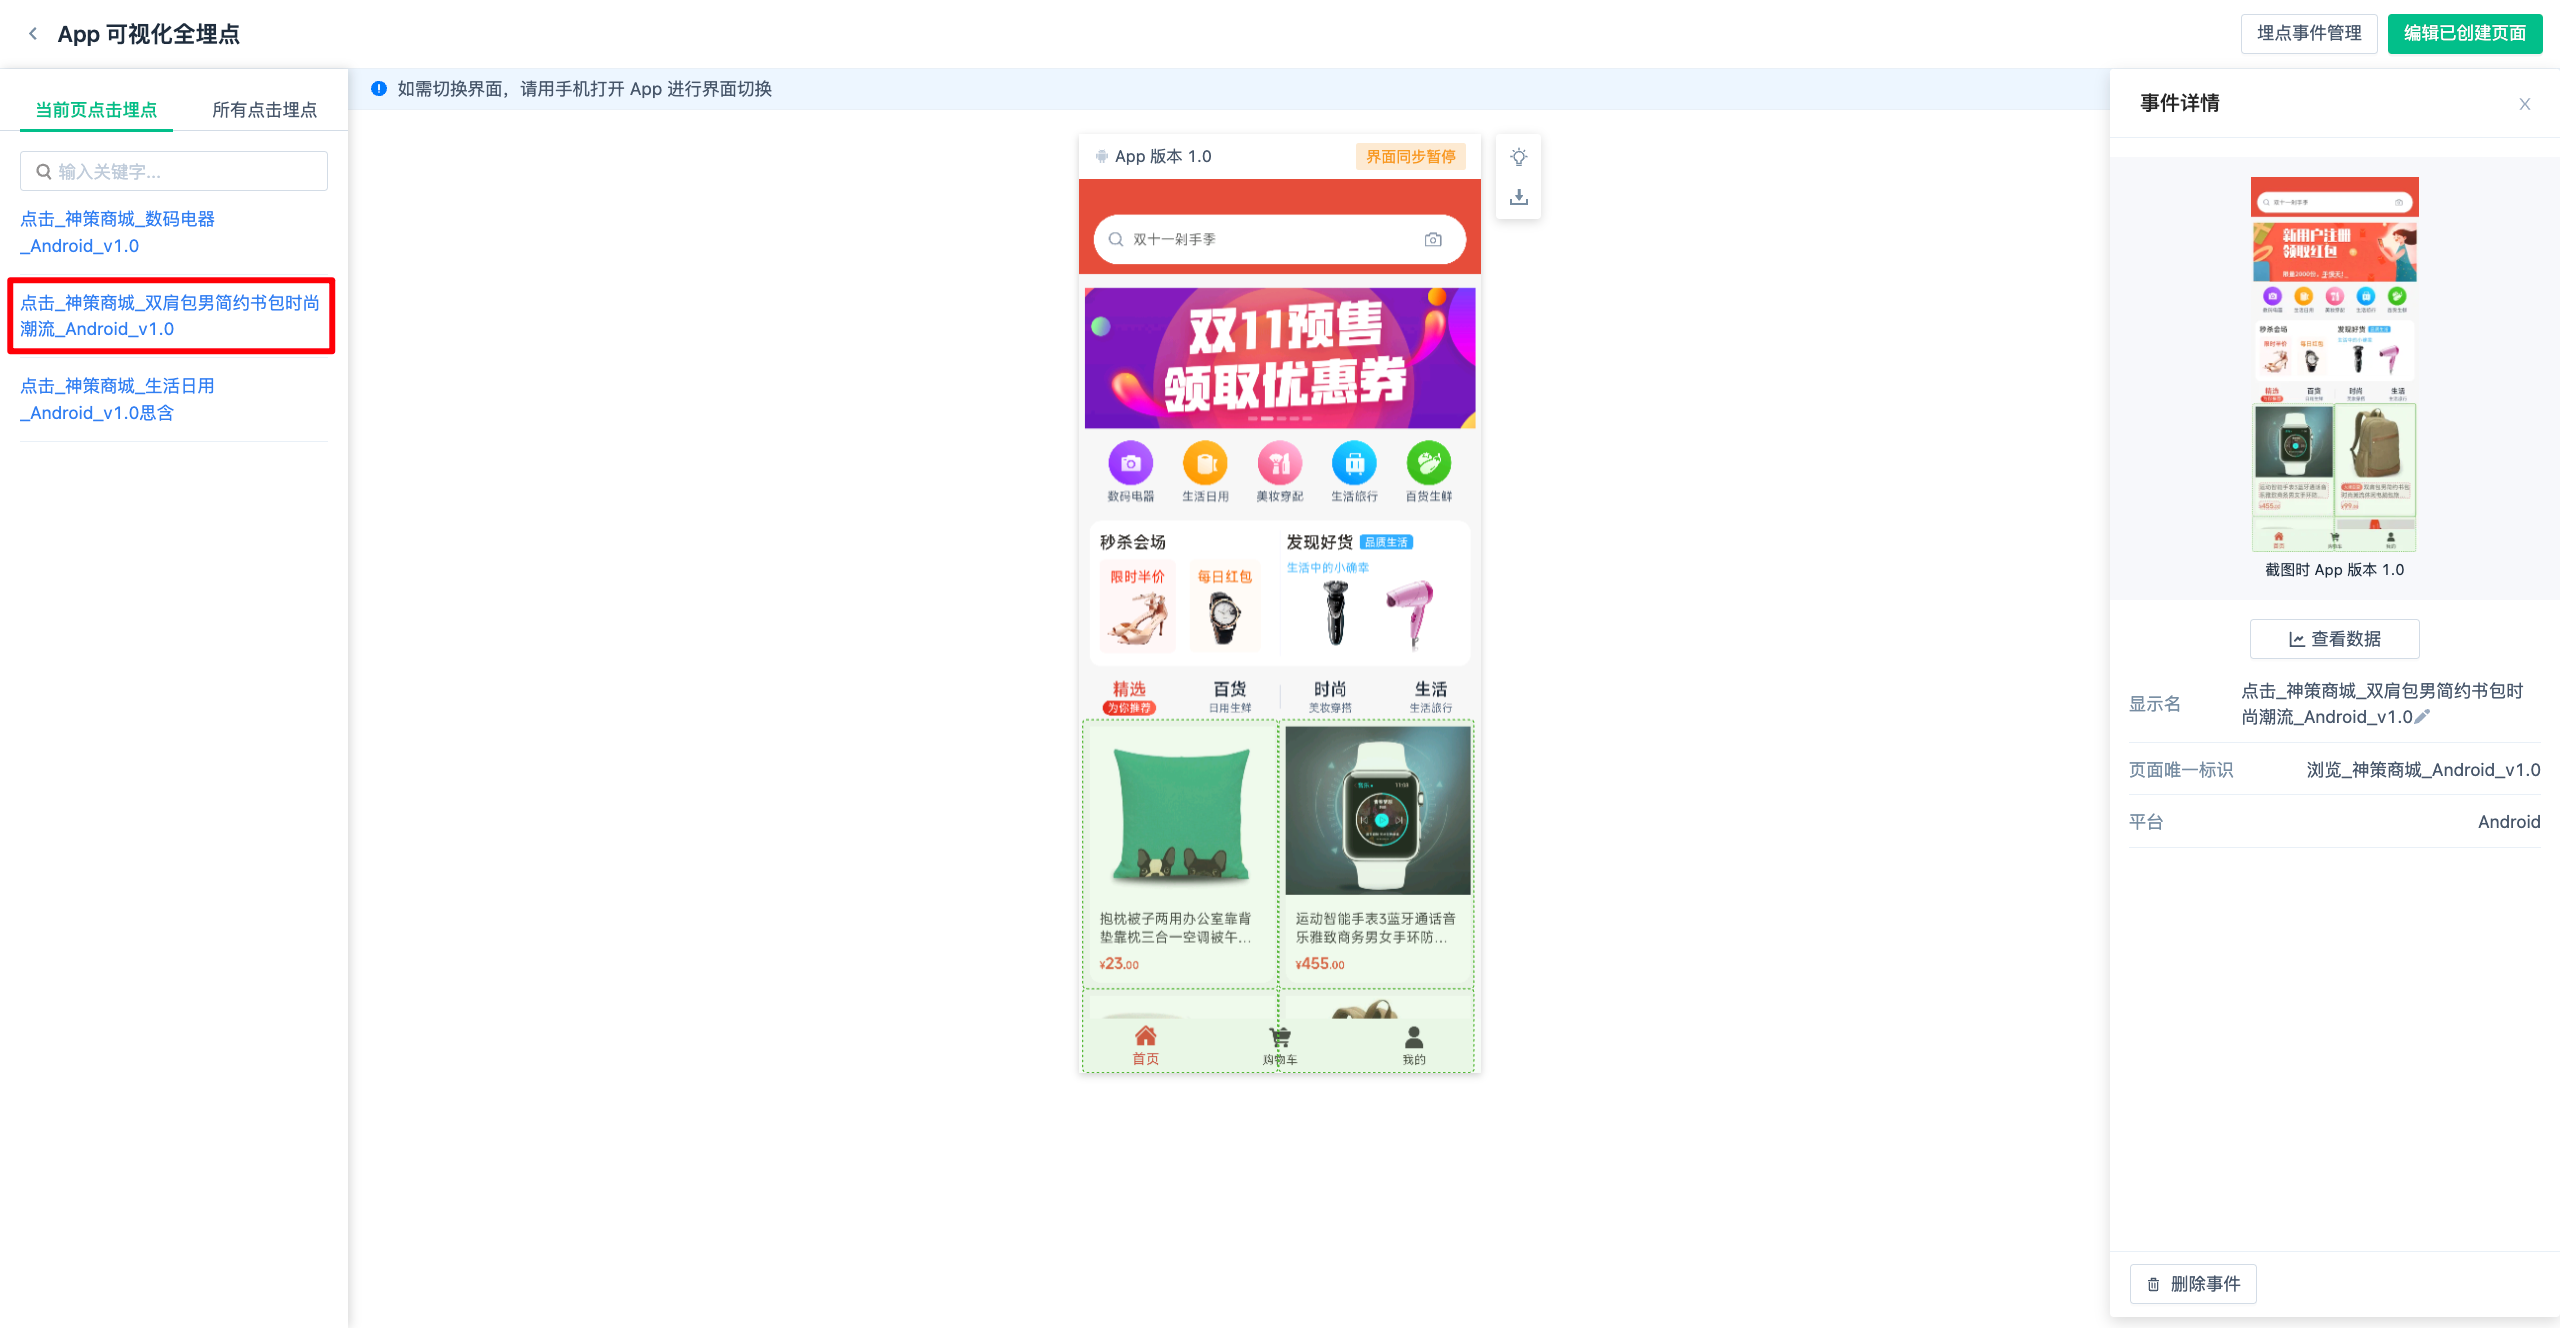
4.3.1. View events
There are two methods to view event details. One is during the definition process, you can directly view the event details in the left column.
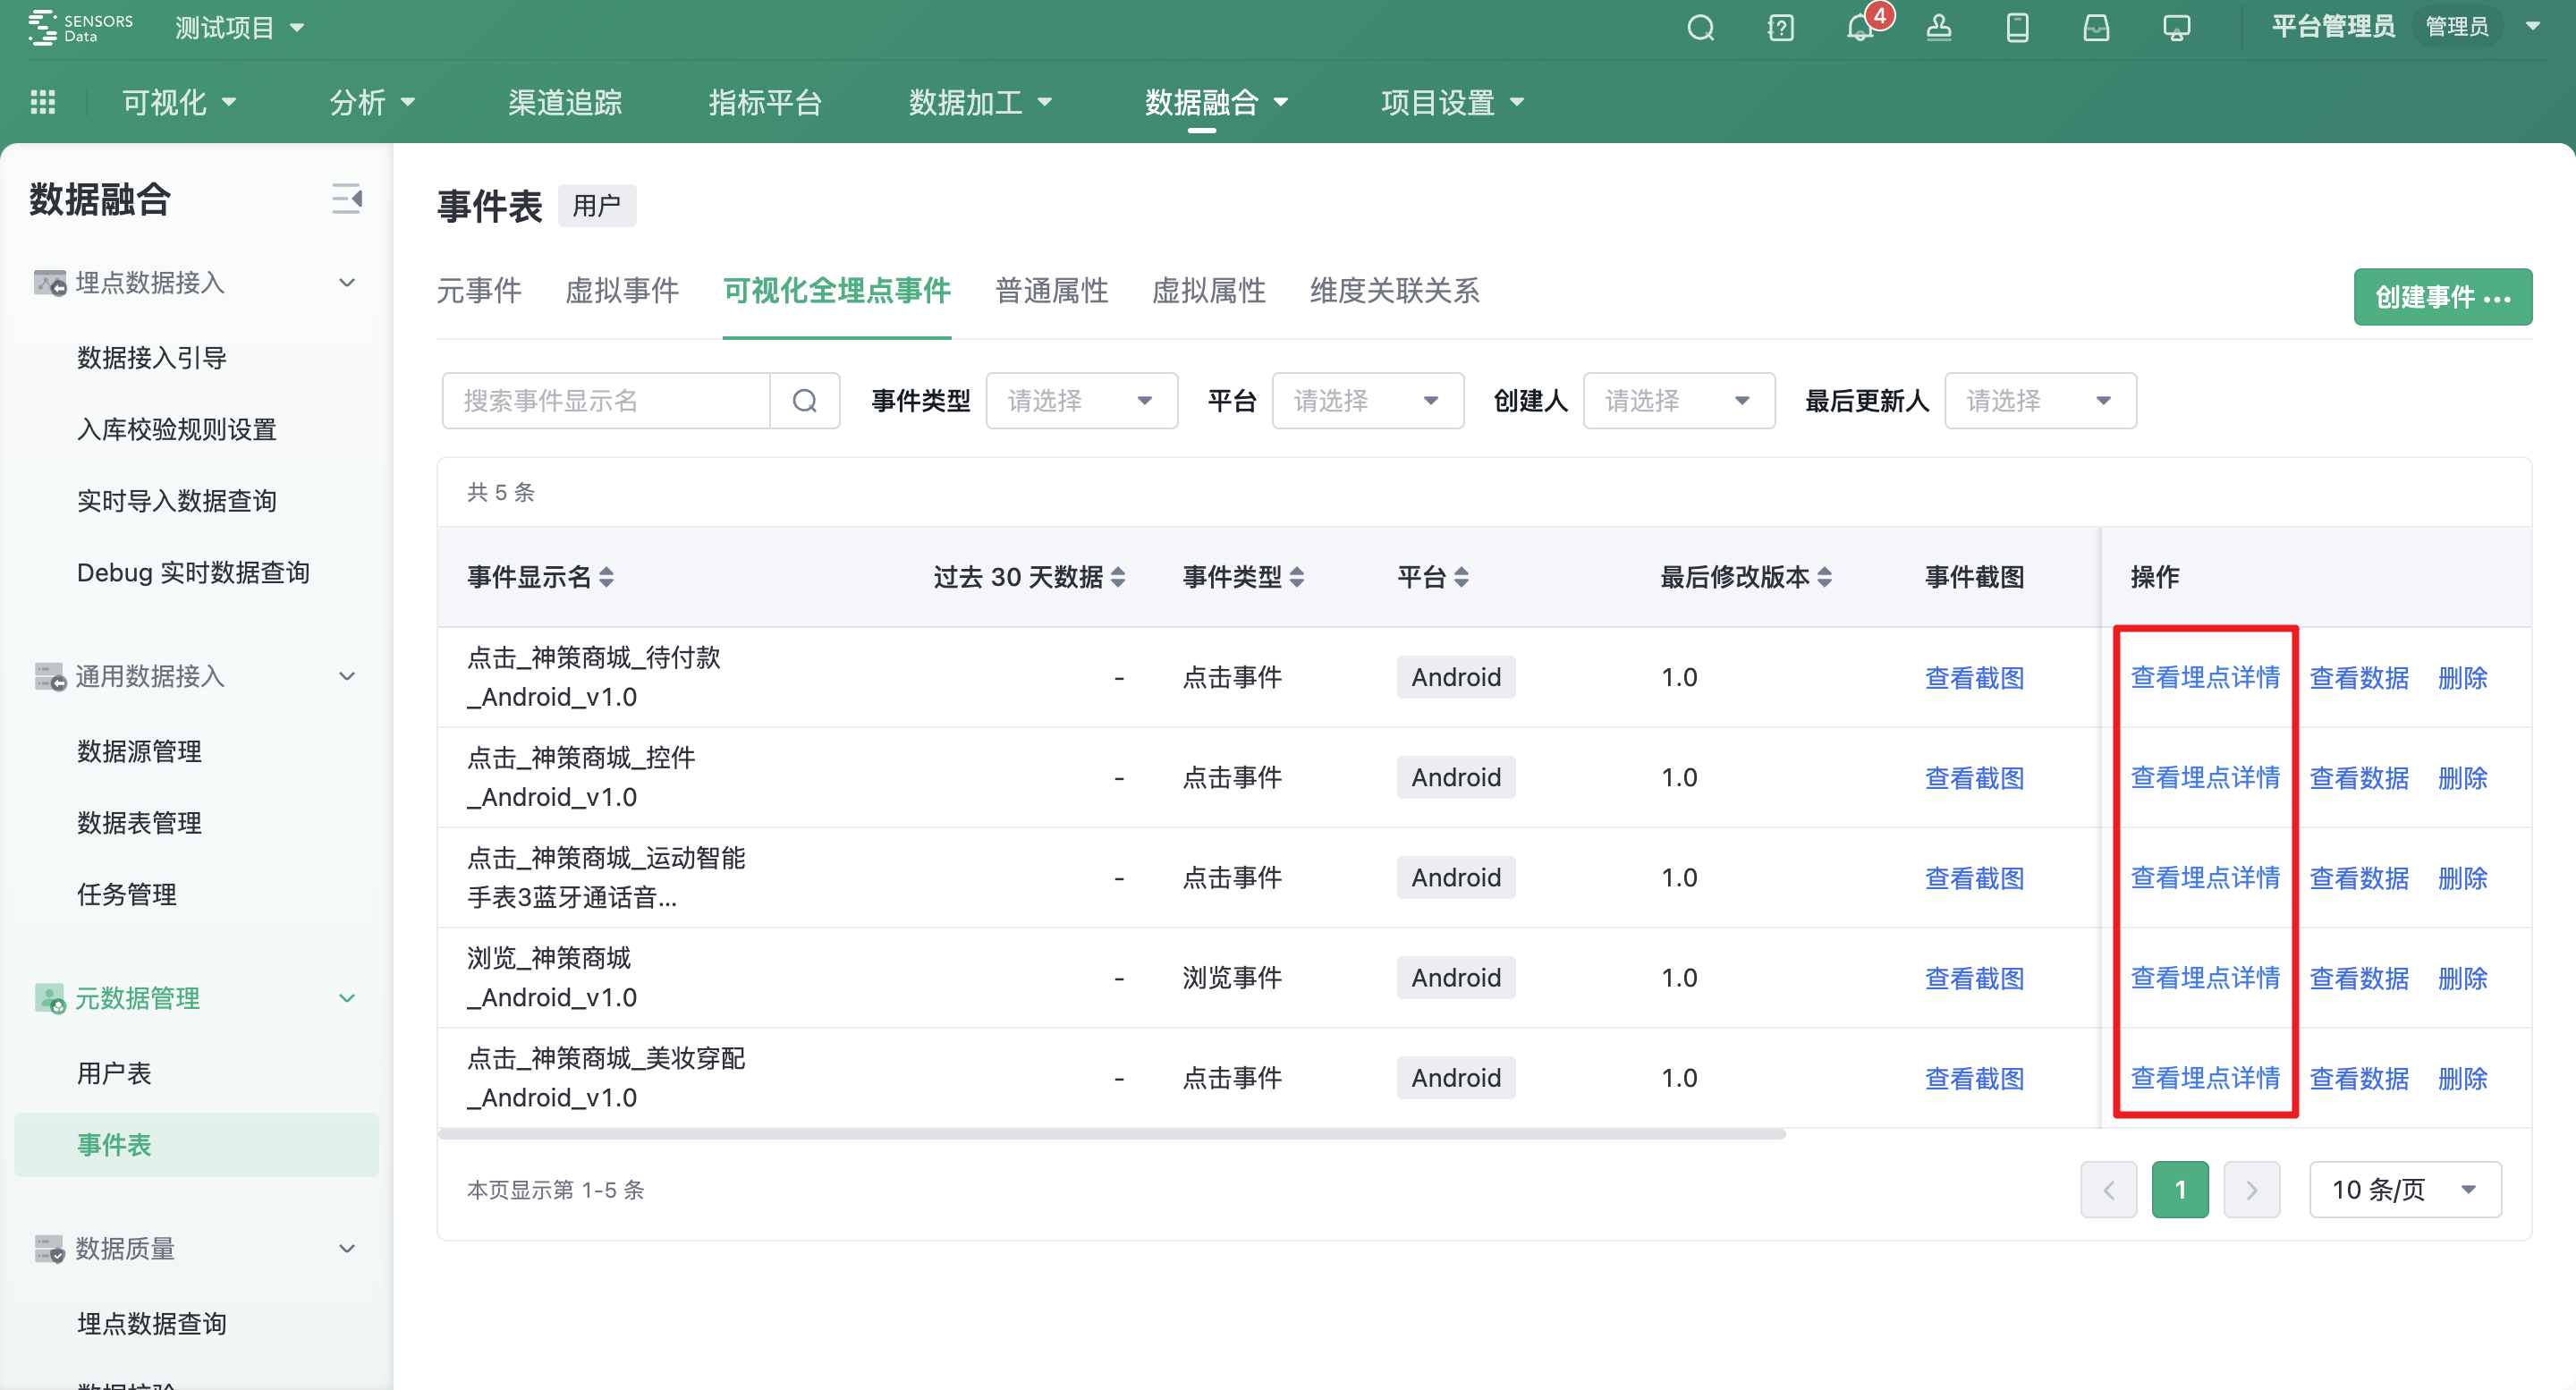
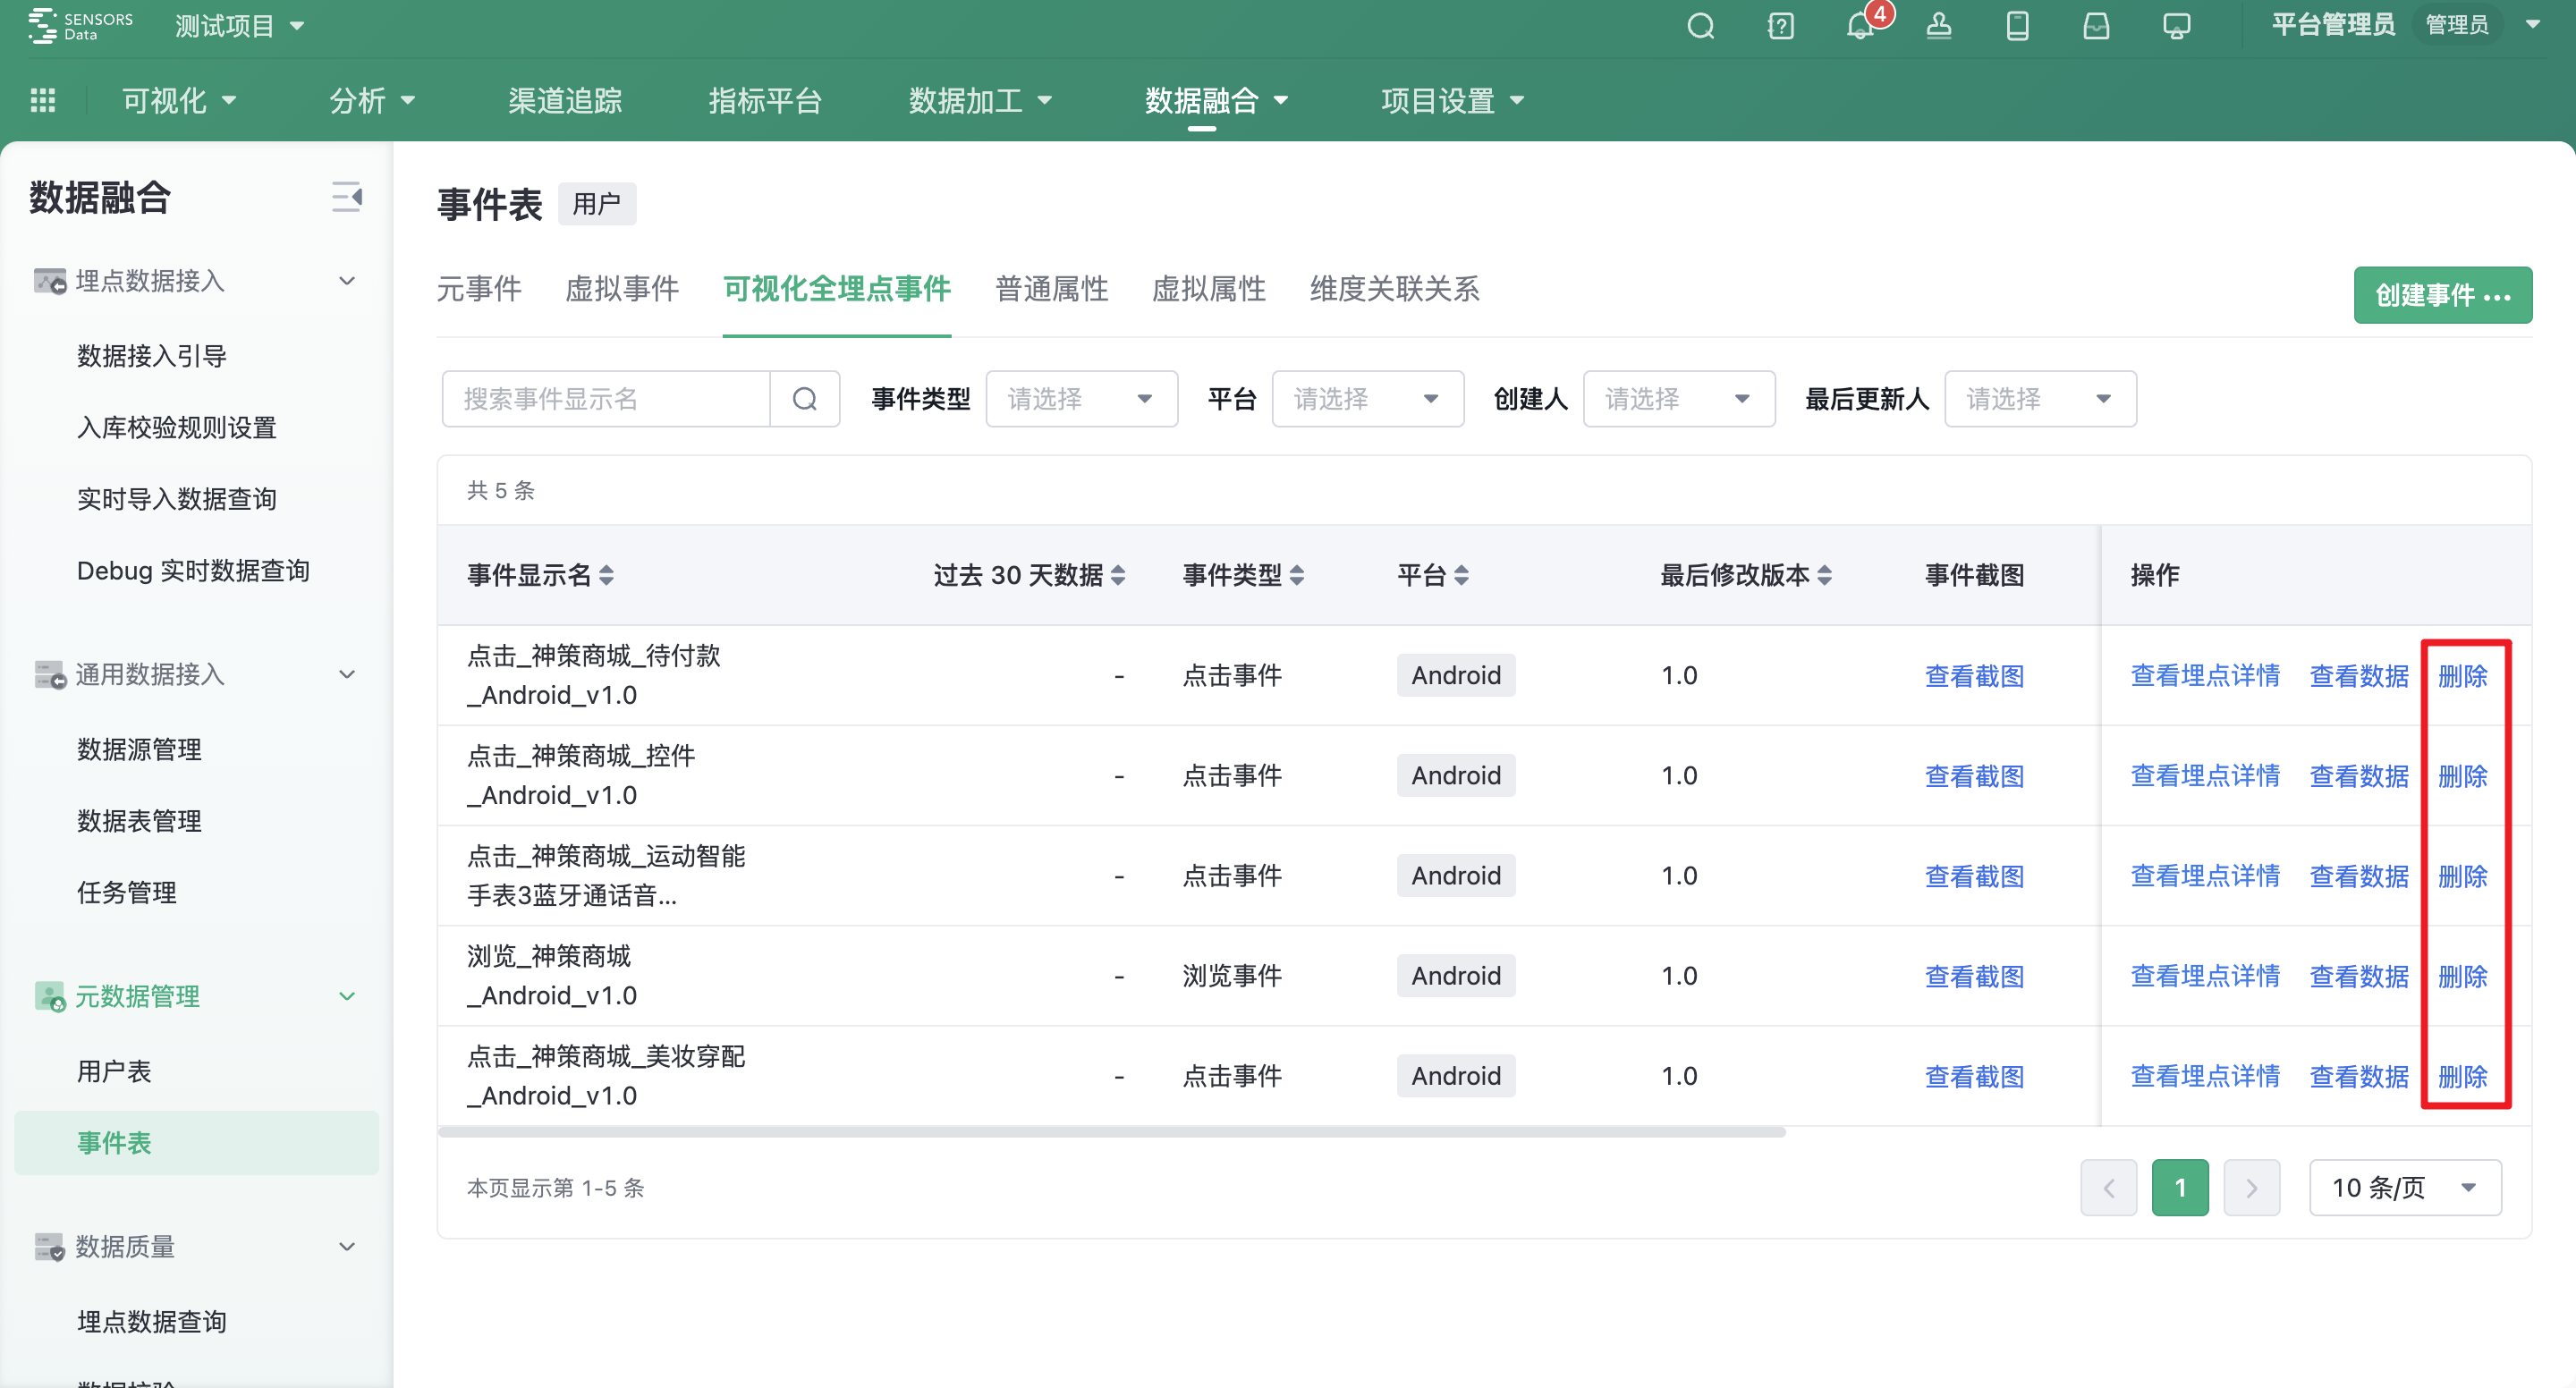
The other is to view the buried point details in the outermost visual full buried point event management list.
4.3.2. Delete Event
There are two methods to delete an event. One is during the definition process; if an error is found in the defined visual full buried point event, you can directly delete the event in the left column.
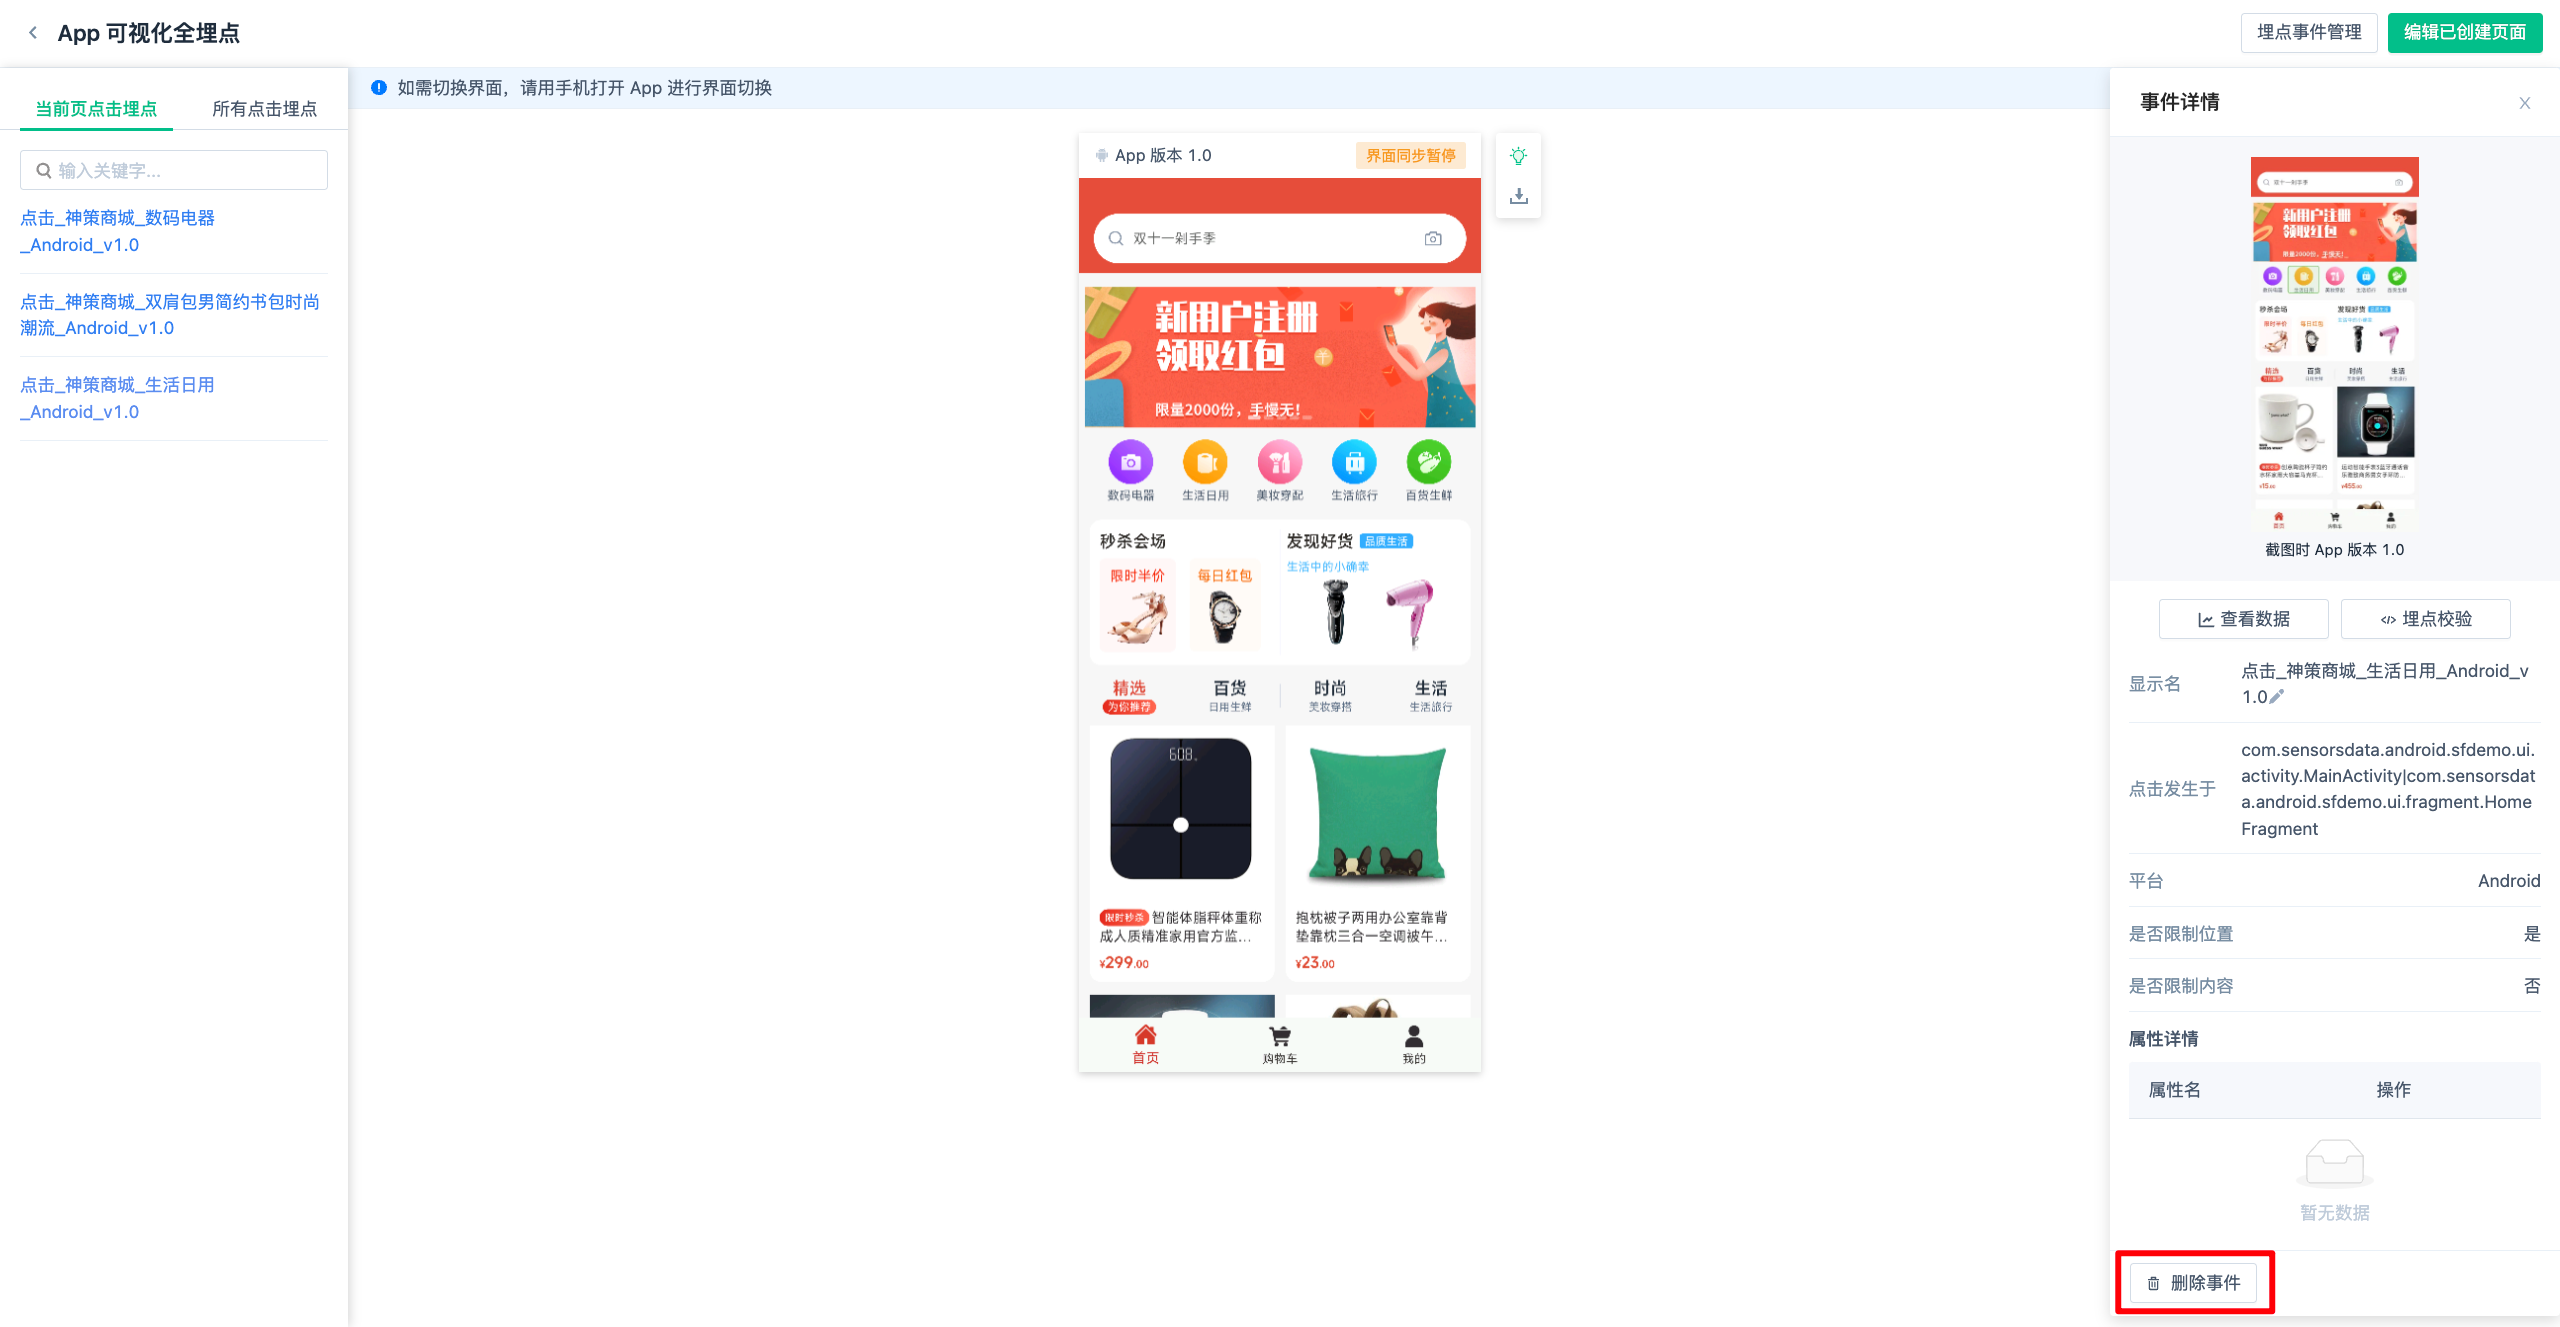
Or you can delete it in the outermost visual full buried point event management list.
5. FAQ
5.1. Cannot open the page by scanning the code
Answer: Check if the network terminal and the project are in an intranet project. Please switch the phone to the same network.
5.2. Clicking the button on the page results in an error (unable to wake up the App)
Answer: Check if the App to be analyzed is installed and if the scheme of the project is correctly filled. Please try again.
5.3. After waking up the App, the page prompts "Please upgrade the SDK"
Answer: The current SDK version is too low, please upgrade the SDK.
5.4. QR code / pairing code has expired
Answer: After it expires, please refresh the QR code / pairing code.
5.5. After waking up the App, the App prompts that the project is inconsistent with other errors
Answer: The App to be connected is inconsistent with the scheme of the Sensor Analysis project. Please check the scheme of the current project.
5.6. Which applications do pairing code connections work for?
A: Pairing code only applies to Android apps, not iOS apps.
5.7. How long is the validity period of the QR code connected by scanning code?
A: The validity period is 20 minutes, and you need to refresh it after the expiration.
Note: The content of this document is a technical document that provides details on how to use the Sensors product and does not include sales terms; the specific content of enterprise procurement products and technical services shall be subject to the commercial procurement contract.
 Popular Searches