Segments
|
Collect
1. Overview
Segments is a way to classify segments based on user attributes and behavior characteristics for observation and analysis.
2. How to create a user segment?
We can create segments in 3 ways:
- Create segments based on user attribute and behavior rules;
- Upload attribute data to the system, match it with existing attributes, and create segments;
- Create segments through user lists that save the analysis results.
Note: Each project can create up to 500 segments.
2.1. Create through user property and behavior rules
Click the Create Group button at the top right of the segments list page, select Rule Creation, and then enter the group creation page.

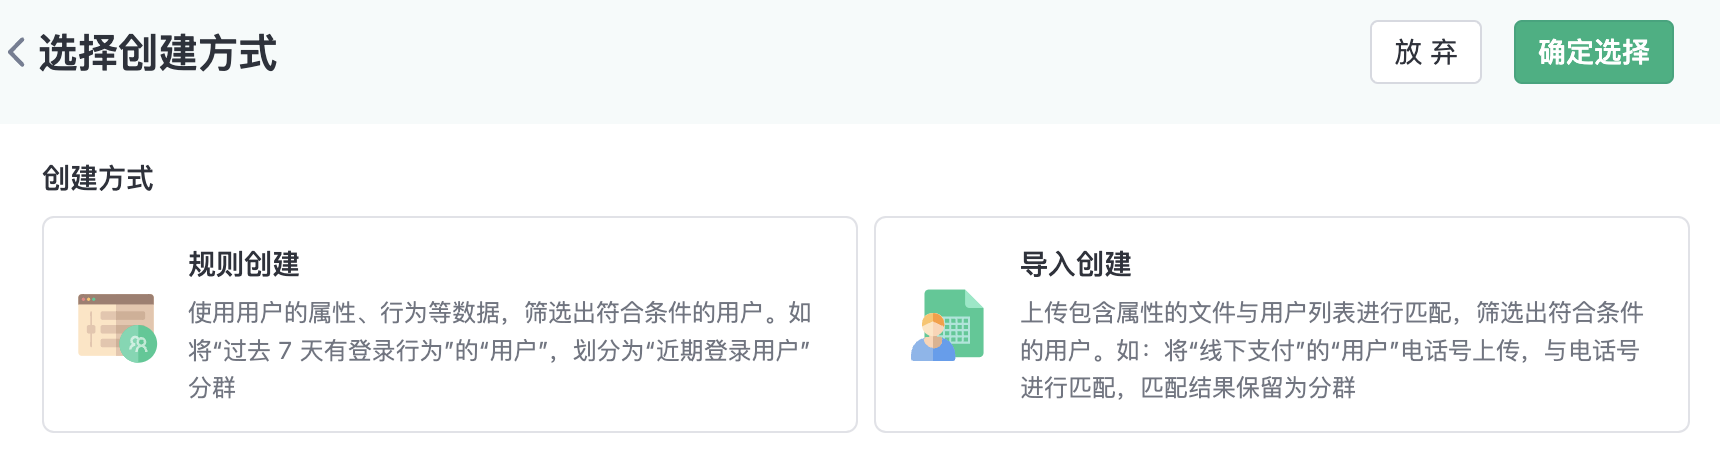
Rule creation group means: Selecting segments based on relatively complex rules configured with user attributes, events, details, etc.
2.1.1. Filter Rules
TThe types of rules supported by rule creation segments include attributes, events, segments, functions, and behavior sequences.

2.1.2. Rule Operations

- Click Add rule button, 可以选择需要添加的规则类型;
- If more than one rule has been added, you can select a rule add nested rules; clickadd nested rules , a new rule is created with the current ruleand / or relationships, and as a combination of rules, are formed between other rulesand / or relationships.
- You can perform the following operations on added rules: Set the logical relationship between rules (and/or), drag the rules in sequence, and copy the rules.
- You can add multiple rule segments. If multiple rule segments exist, you need to pass this command rule group Logical Relationship Configure the intersection difference between rule segments.
2.1.3. forecast
Rule creation segments support preestimation. By default, 1/16 samples are used for preestimation. The sampling ratio can be configured in the background.

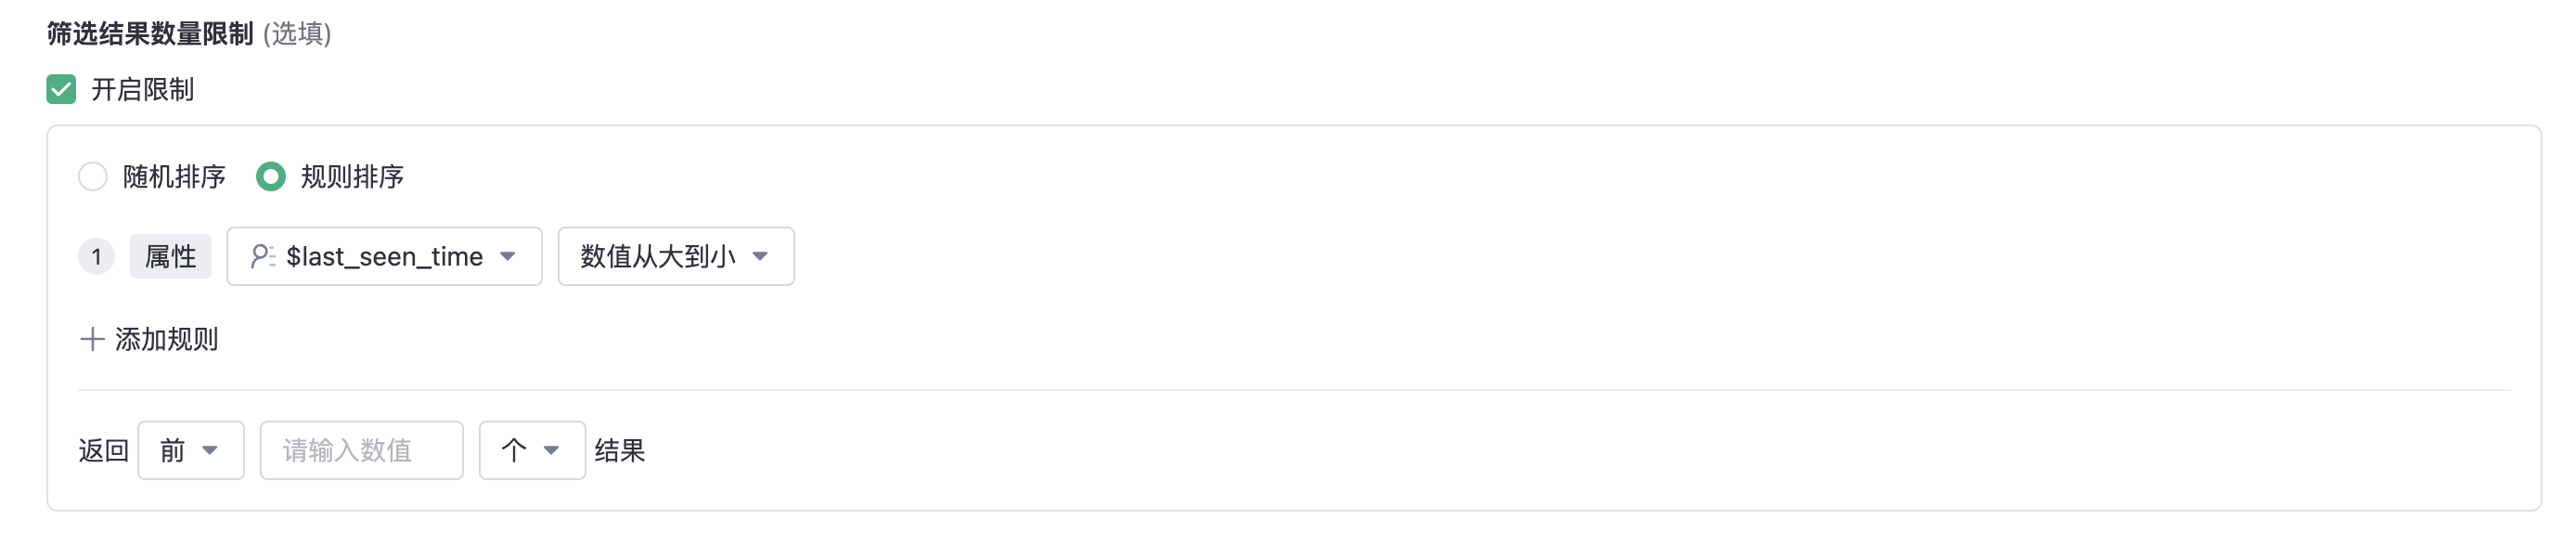
2.1.4. Sorting and intercepting of filtering results
Support random or according to rules, sorting the results of sorting rules.The following sorting rules are supported:
- Sort by the attribute of the numeric type, date and time type;
- According to Event aggregation calculation results ranking;
Support for intercepting sorted results:
- According to Top N, range to cut;
- Cut by number or percentage of results
2.2. Importing a Segment
Importing a cluster means uploading attribute data to the system, matching it with existing attributes, and filtering out target clusters.
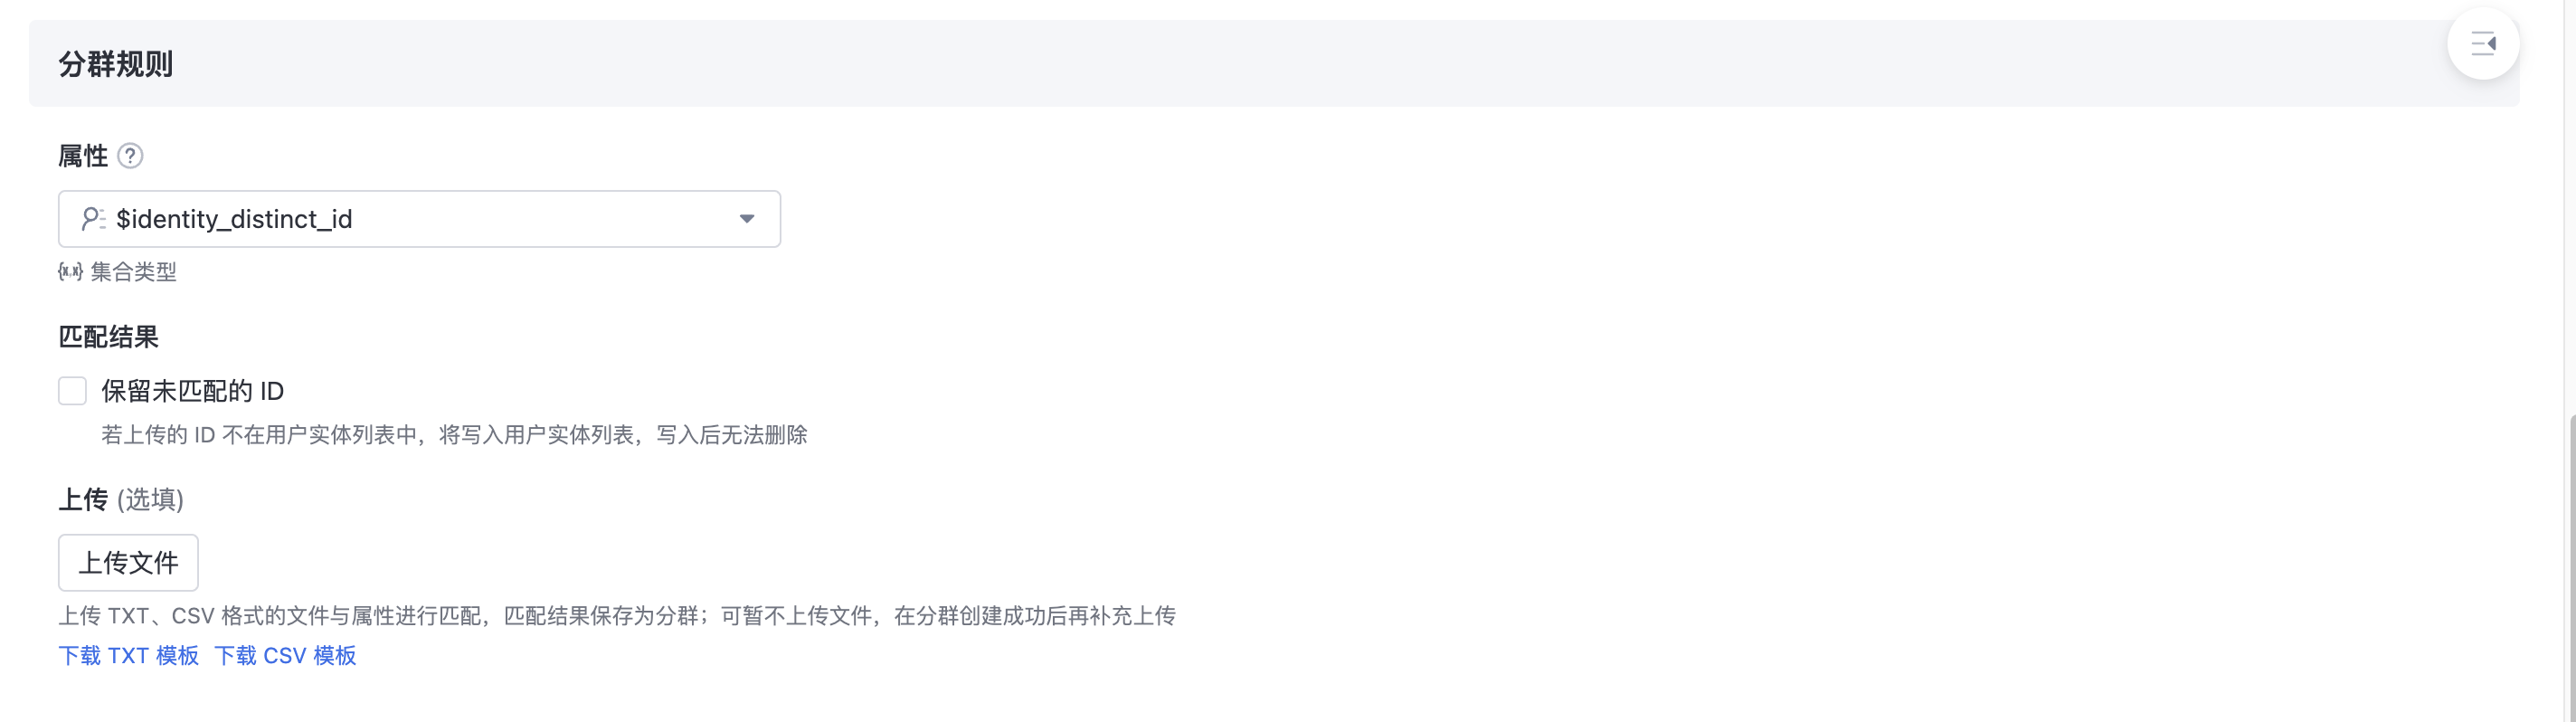
- Select match attribute
- Attributes that can be used for matching:
- All ID fields, not includedSensors ID
- User attribute
- Attributes that can be used for matching:
- Unmatched ids are reserved
- When you select the ID field in the previous step, you can import users in the mode of matching or adding ids. You can selectReserved unmatched ID . If checked Unmatched ids reserved:
- If the data does not match the existing user in the system, the system writes the data to the database, reports a new ID, and performs ID-mapping. Cannot be deleted after writing
- This ID will enter the cluster result
- When you select the ID field in the previous step, you can import users in the mode of matching or adding ids. You can selectReserved unmatched ID . If checked Unmatched ids reserved:
- Upload file
- txt and csv files can be uploaded.
2.3. Results are saved and grouped
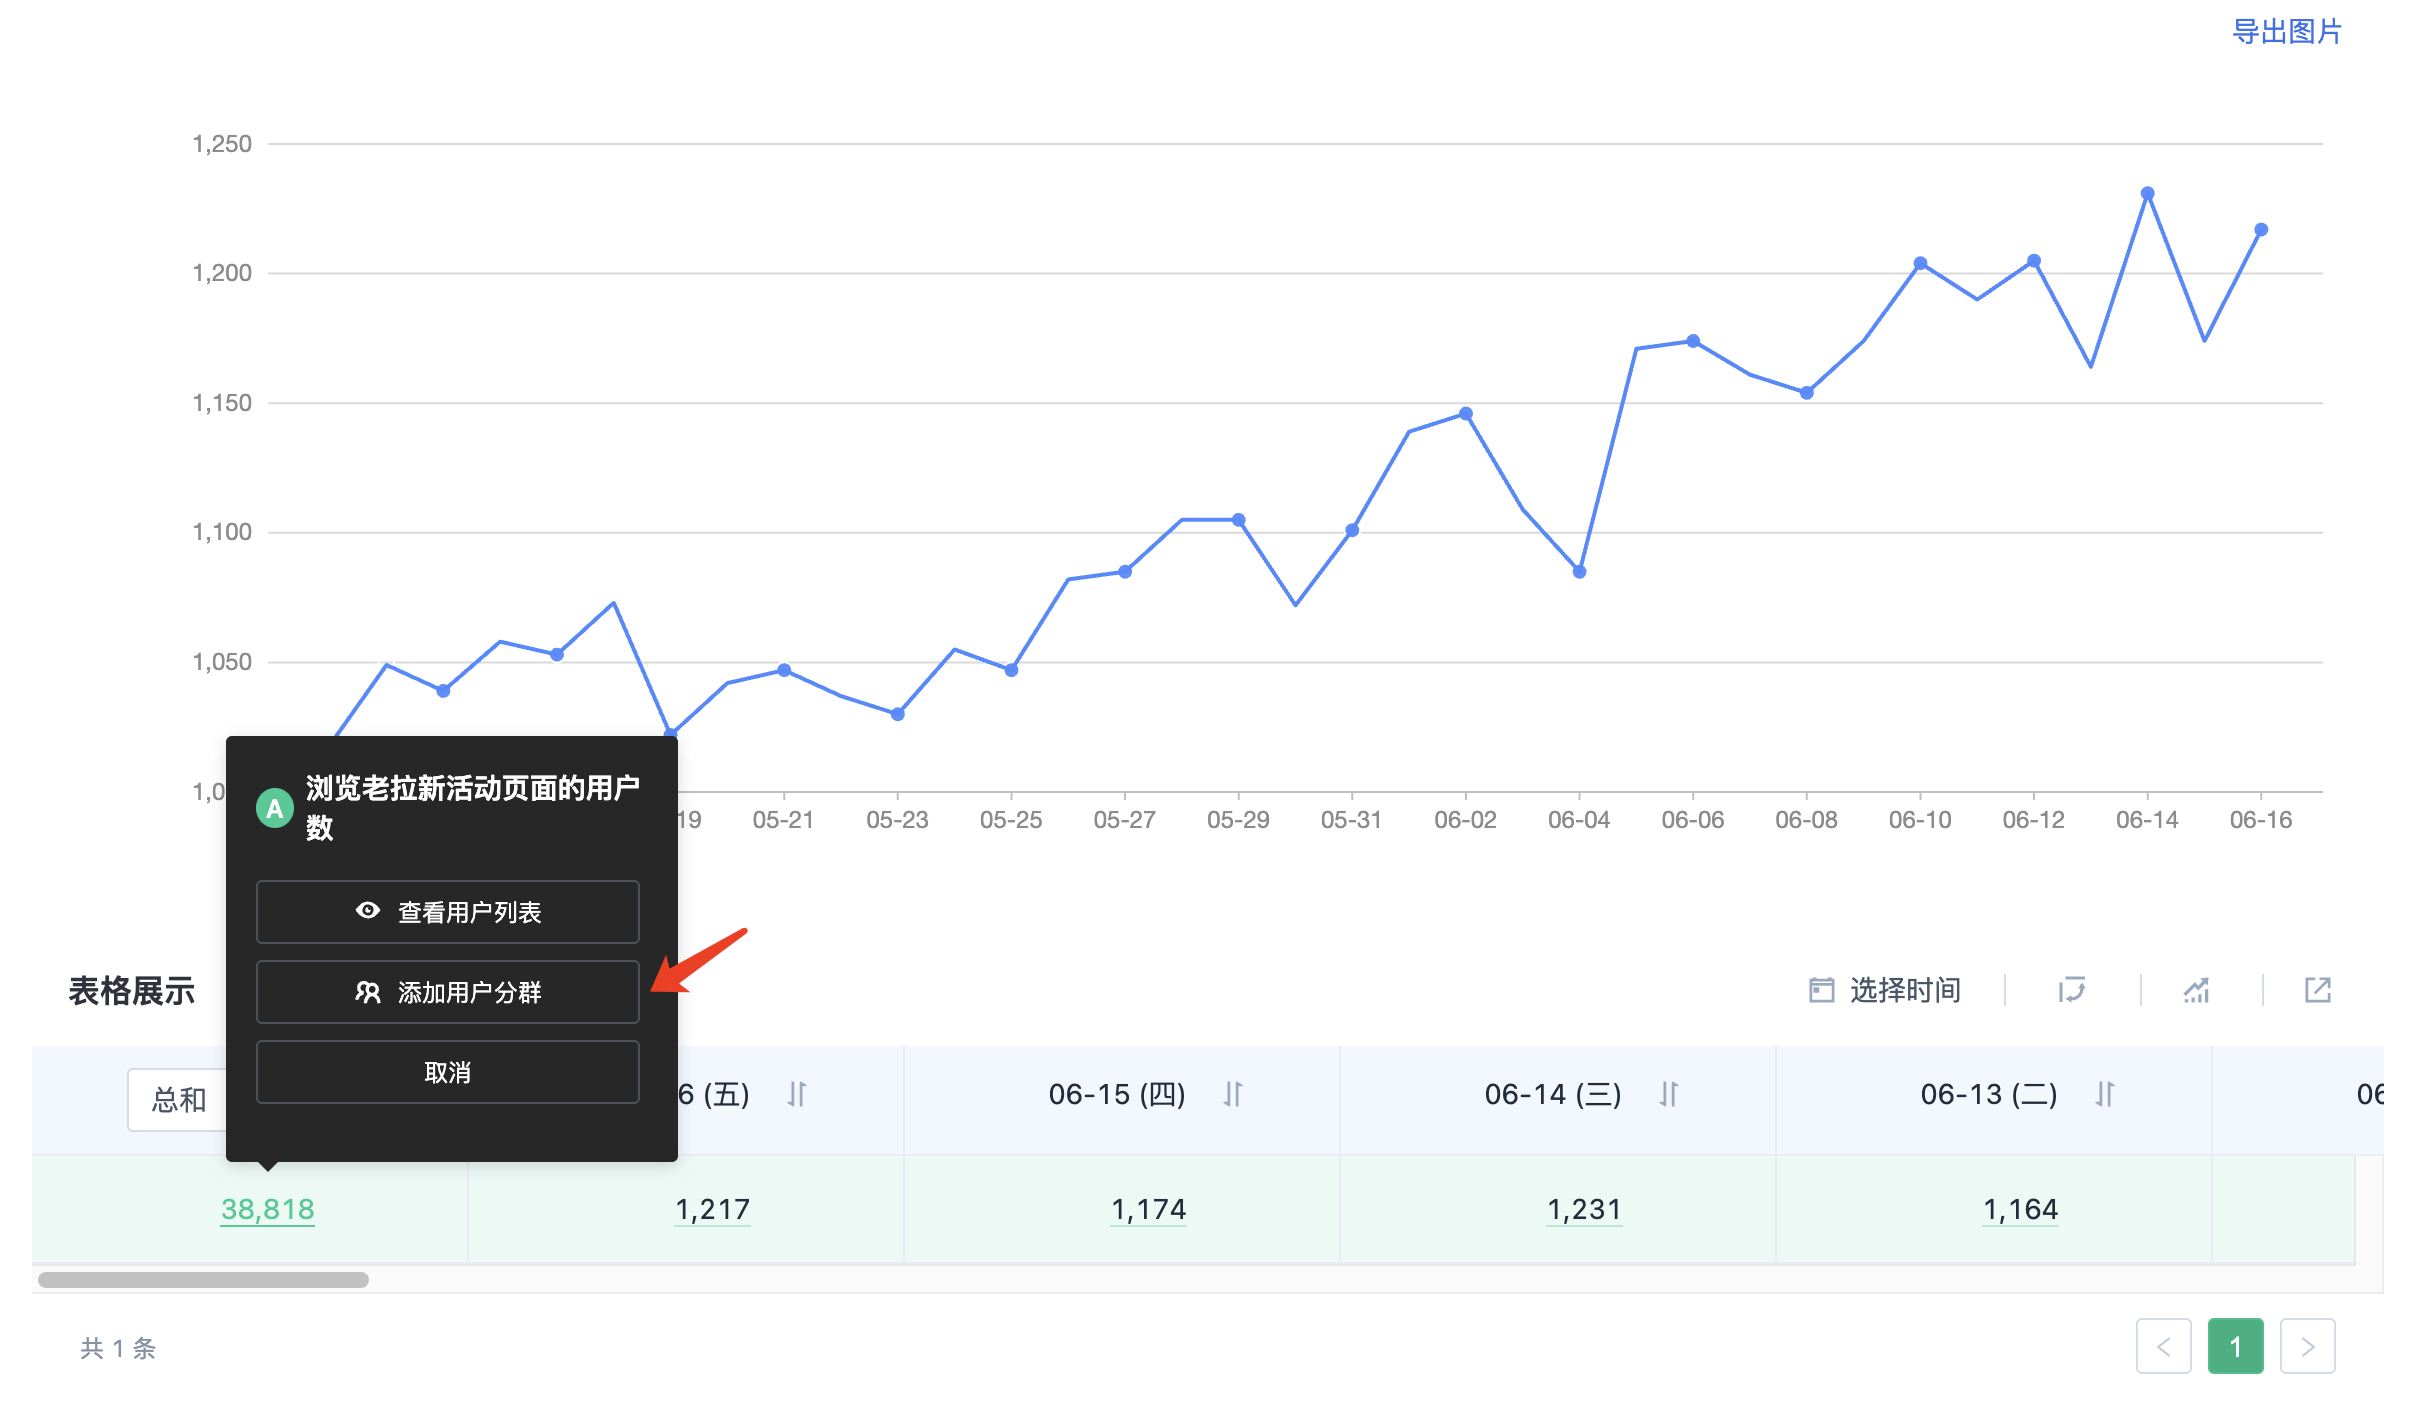
Result saving cluster means that in the analysis scenario, the user result set obtained from the analysis model is saved as a cluster for subsequent analysis tracking, secondary touch, etc. Click the underlined number of people to save a user result set as a cluster.
2.4. Update mode
Group update mode is supported manual , routine two ways.In routine cases, support custom time range, update frequency, and earliest computation time.

2.5. Calculation result storage Settings
- Manual update: By default, only one version is reserved. No storage Settings are required.
- Regular updates:
- You can set the maximum number of historical versions that can be retained
- Editing storage rules requires a separate function permission. Users without this permission can only use the default Settings when creating a cluster

2.6. Multiple time zone Settings
If your business operates overseas, there might be situations where the time zone and the server time zone do not match. You can enable the multi-time zone feature to correct time zone offset and reduce business discrepancies, obtaining more accurate results when creating segments and viewing user behavior. For instance, if your server is deployed in UTC+8, and your business primarily operates in UTC+1, when the operator creates a past 7 days active segment and selects the UTC+1 time zone, you can get the users who were active in the past 7 days active based on UTC+1 time.
Hint
This is an advanced feature and is disabled by default
2.6.1. Multi-time zone settings
Set the switchable time zone list and default time zone in Project Settings - Basic Settings.
2.6.2. Select multi-time zone when creating segments
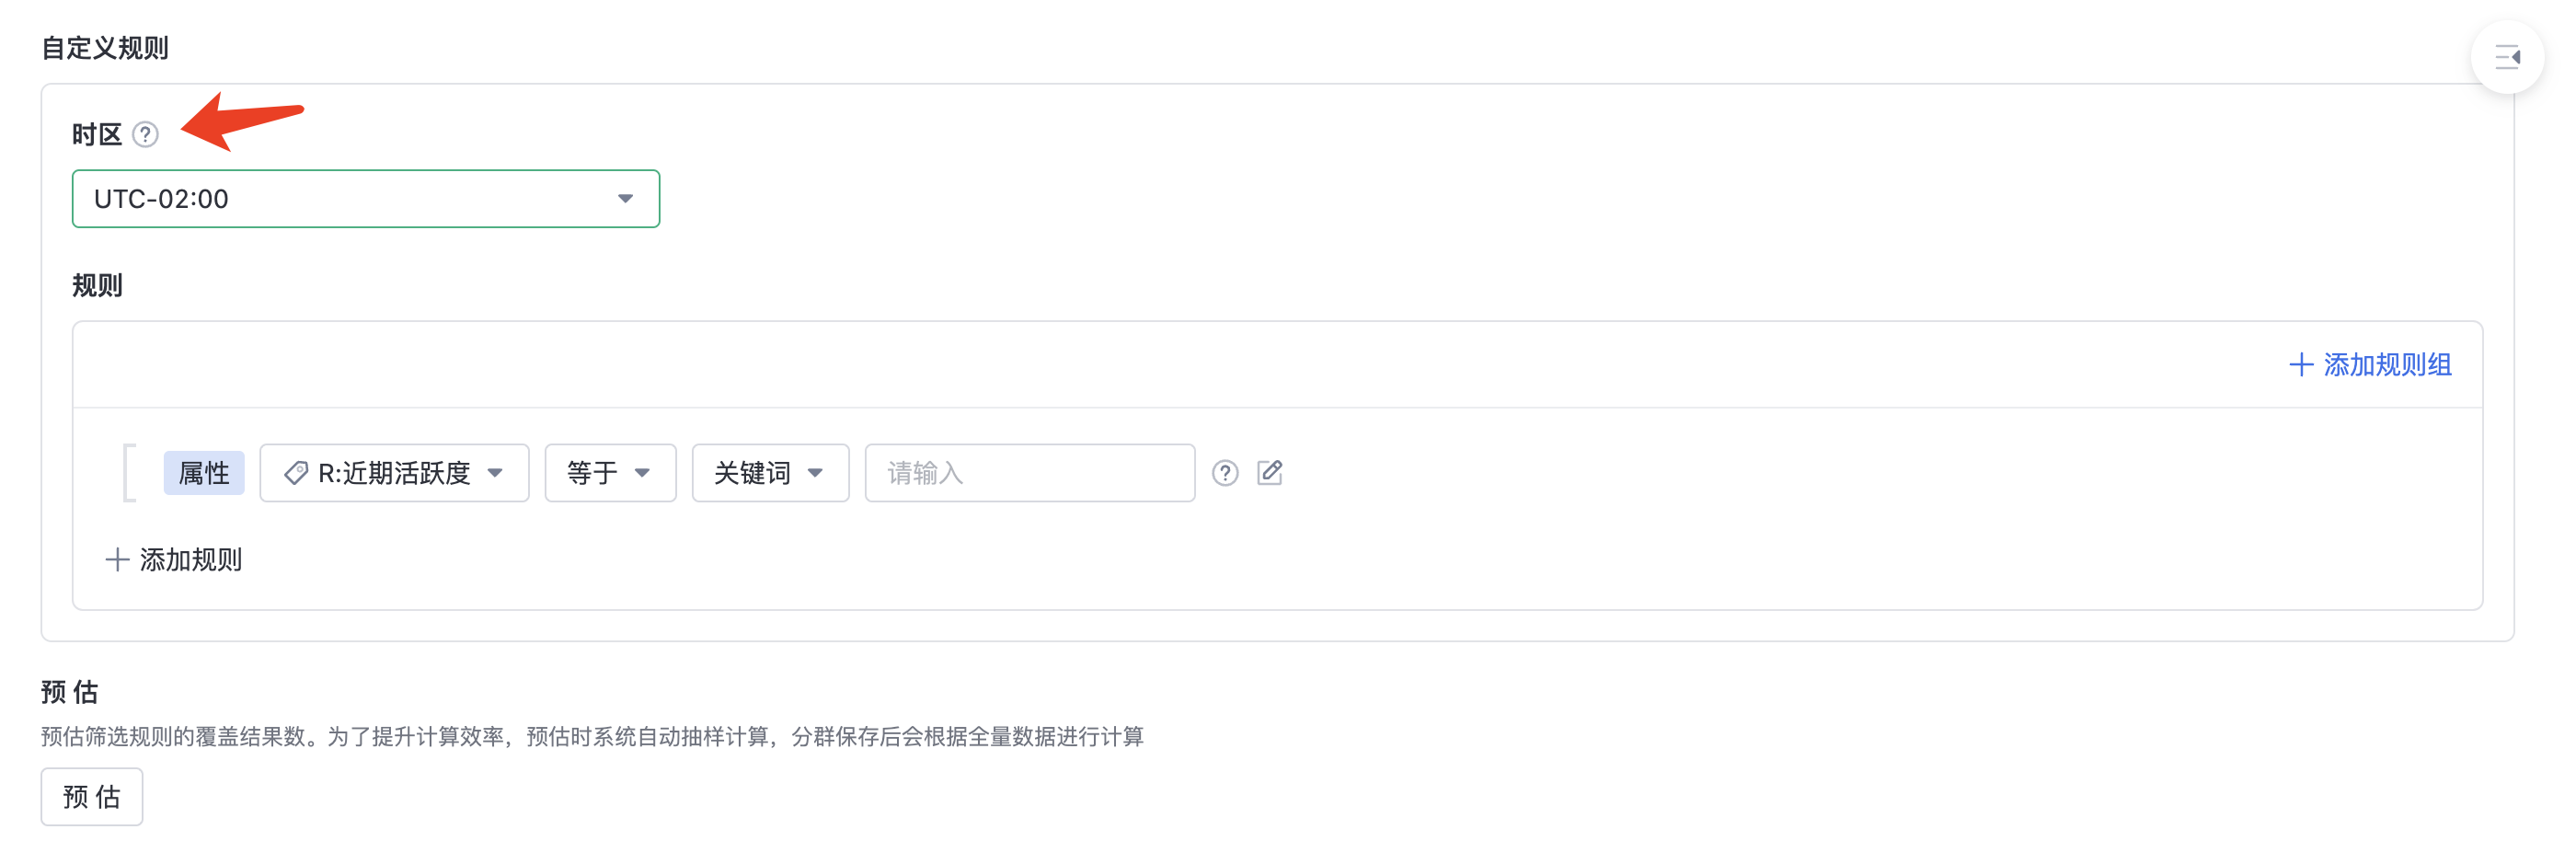
When creating segments through rules, you can specify the rule's time zone. After selection, the event occurred time and time-type event properties in the rule will follow the specified time zone offset.
The following calculations related to rules follow the specified time zone offset, including:
- Filtering events by dynamic time, such as login events occurred in the past 7 days
- Filtering events based on time-type event properties, such as an appointment event occurring and the appointment time within the next 7 days
No time zone offset when selecting static time or filtering time-type user properties.
For example: the server time zone is UTC+08:00, the time zone is set to UTC+01:00, and the rule is the users who logged in yesterday. Assuming the calculation reference time when calculating the tag is 2023-01-05 00:00 UTC+08:00 , yesterday is 2023-01-04. This rule calculates the users who completed the login event during 2023-01-04 00:00:00 - 2023-01-04 23:59:59 UTC+01:00.
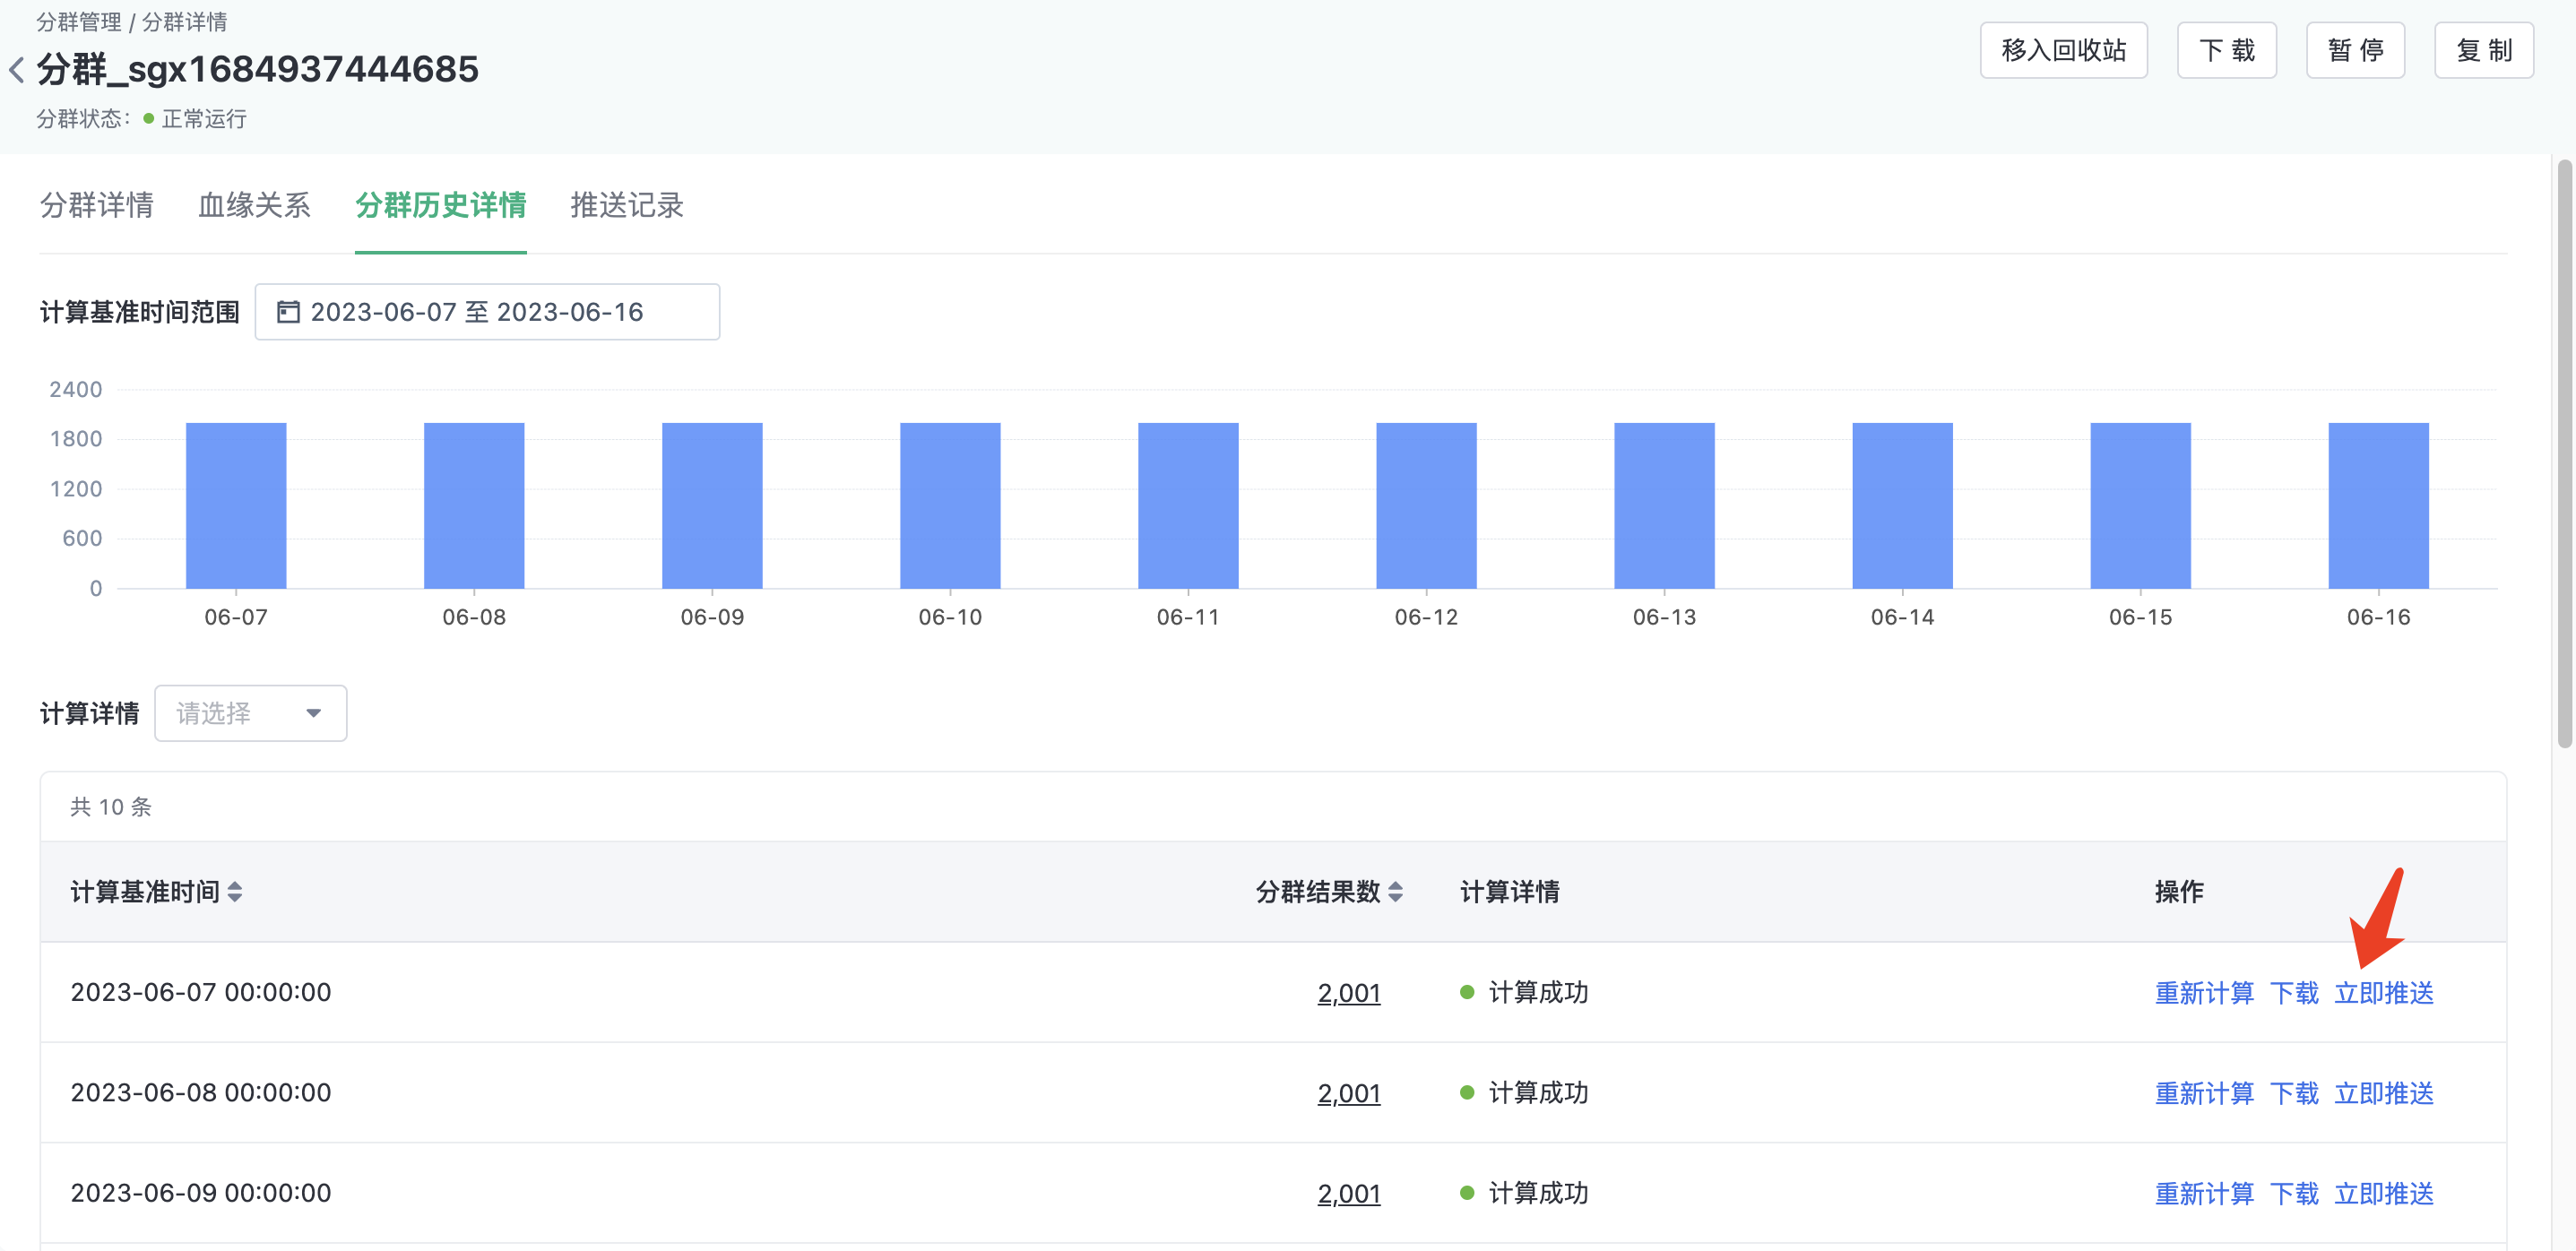
3. Management and viewing of segments
3.1. Segment list
On the Cluster list page, you can search, filter, download, set, and move the created cluster to the recycle bin.
- View: Click View, the cluster details page is displayed
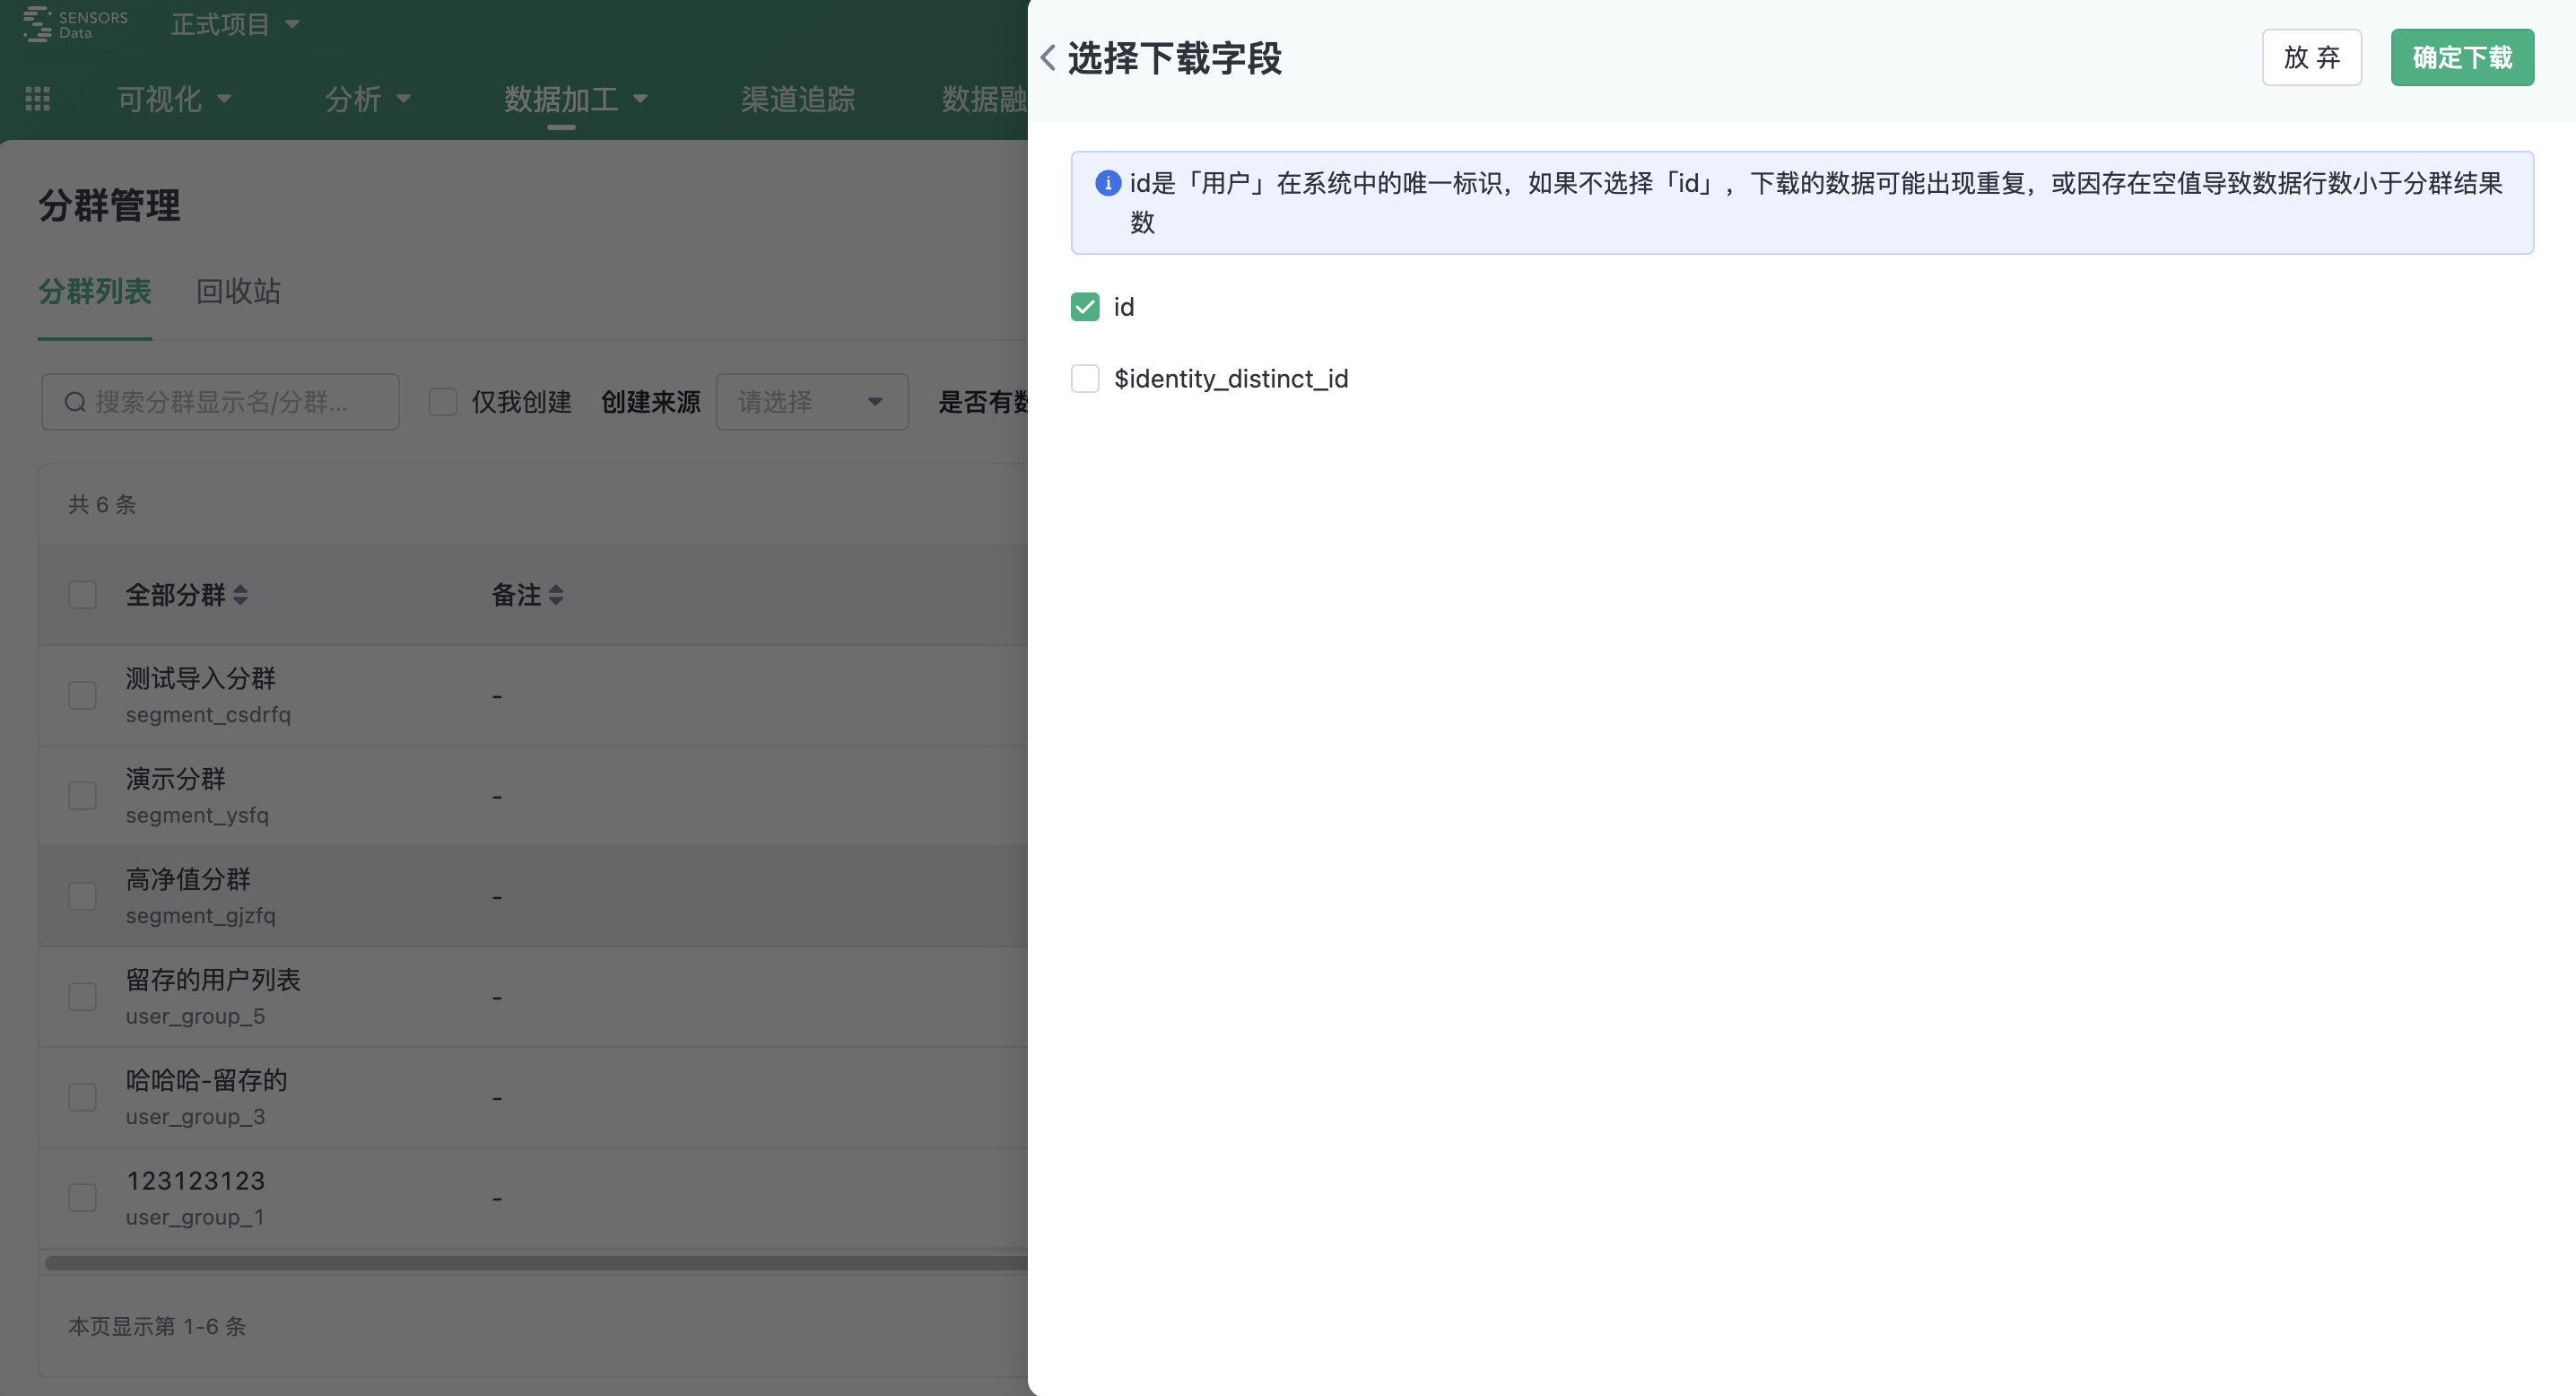
- Download: Download the cluster results. The field range for download is ID. If multiple ids exist, you can select the ID field that you want to download.
- Move to Trash: You can move clusters to the trash can, supporting batch operations
- Storage Settings: Edit storage settings for routine clusters
3.2. Trash
In the Trash, you can view clusters that have been moved to the trash, search, filter, and restore or permanently delete clusters in the trash.

- Restore: You can restore clusters moved to the trash;
- Permanently Delete: Permanently delete clusters in the trash, and data cannot be recovered after permanent deletion.
3.3. Segments Details
On the cluster details page, you can view the basic information, rules, and historical versions of the cluster and edit various information.
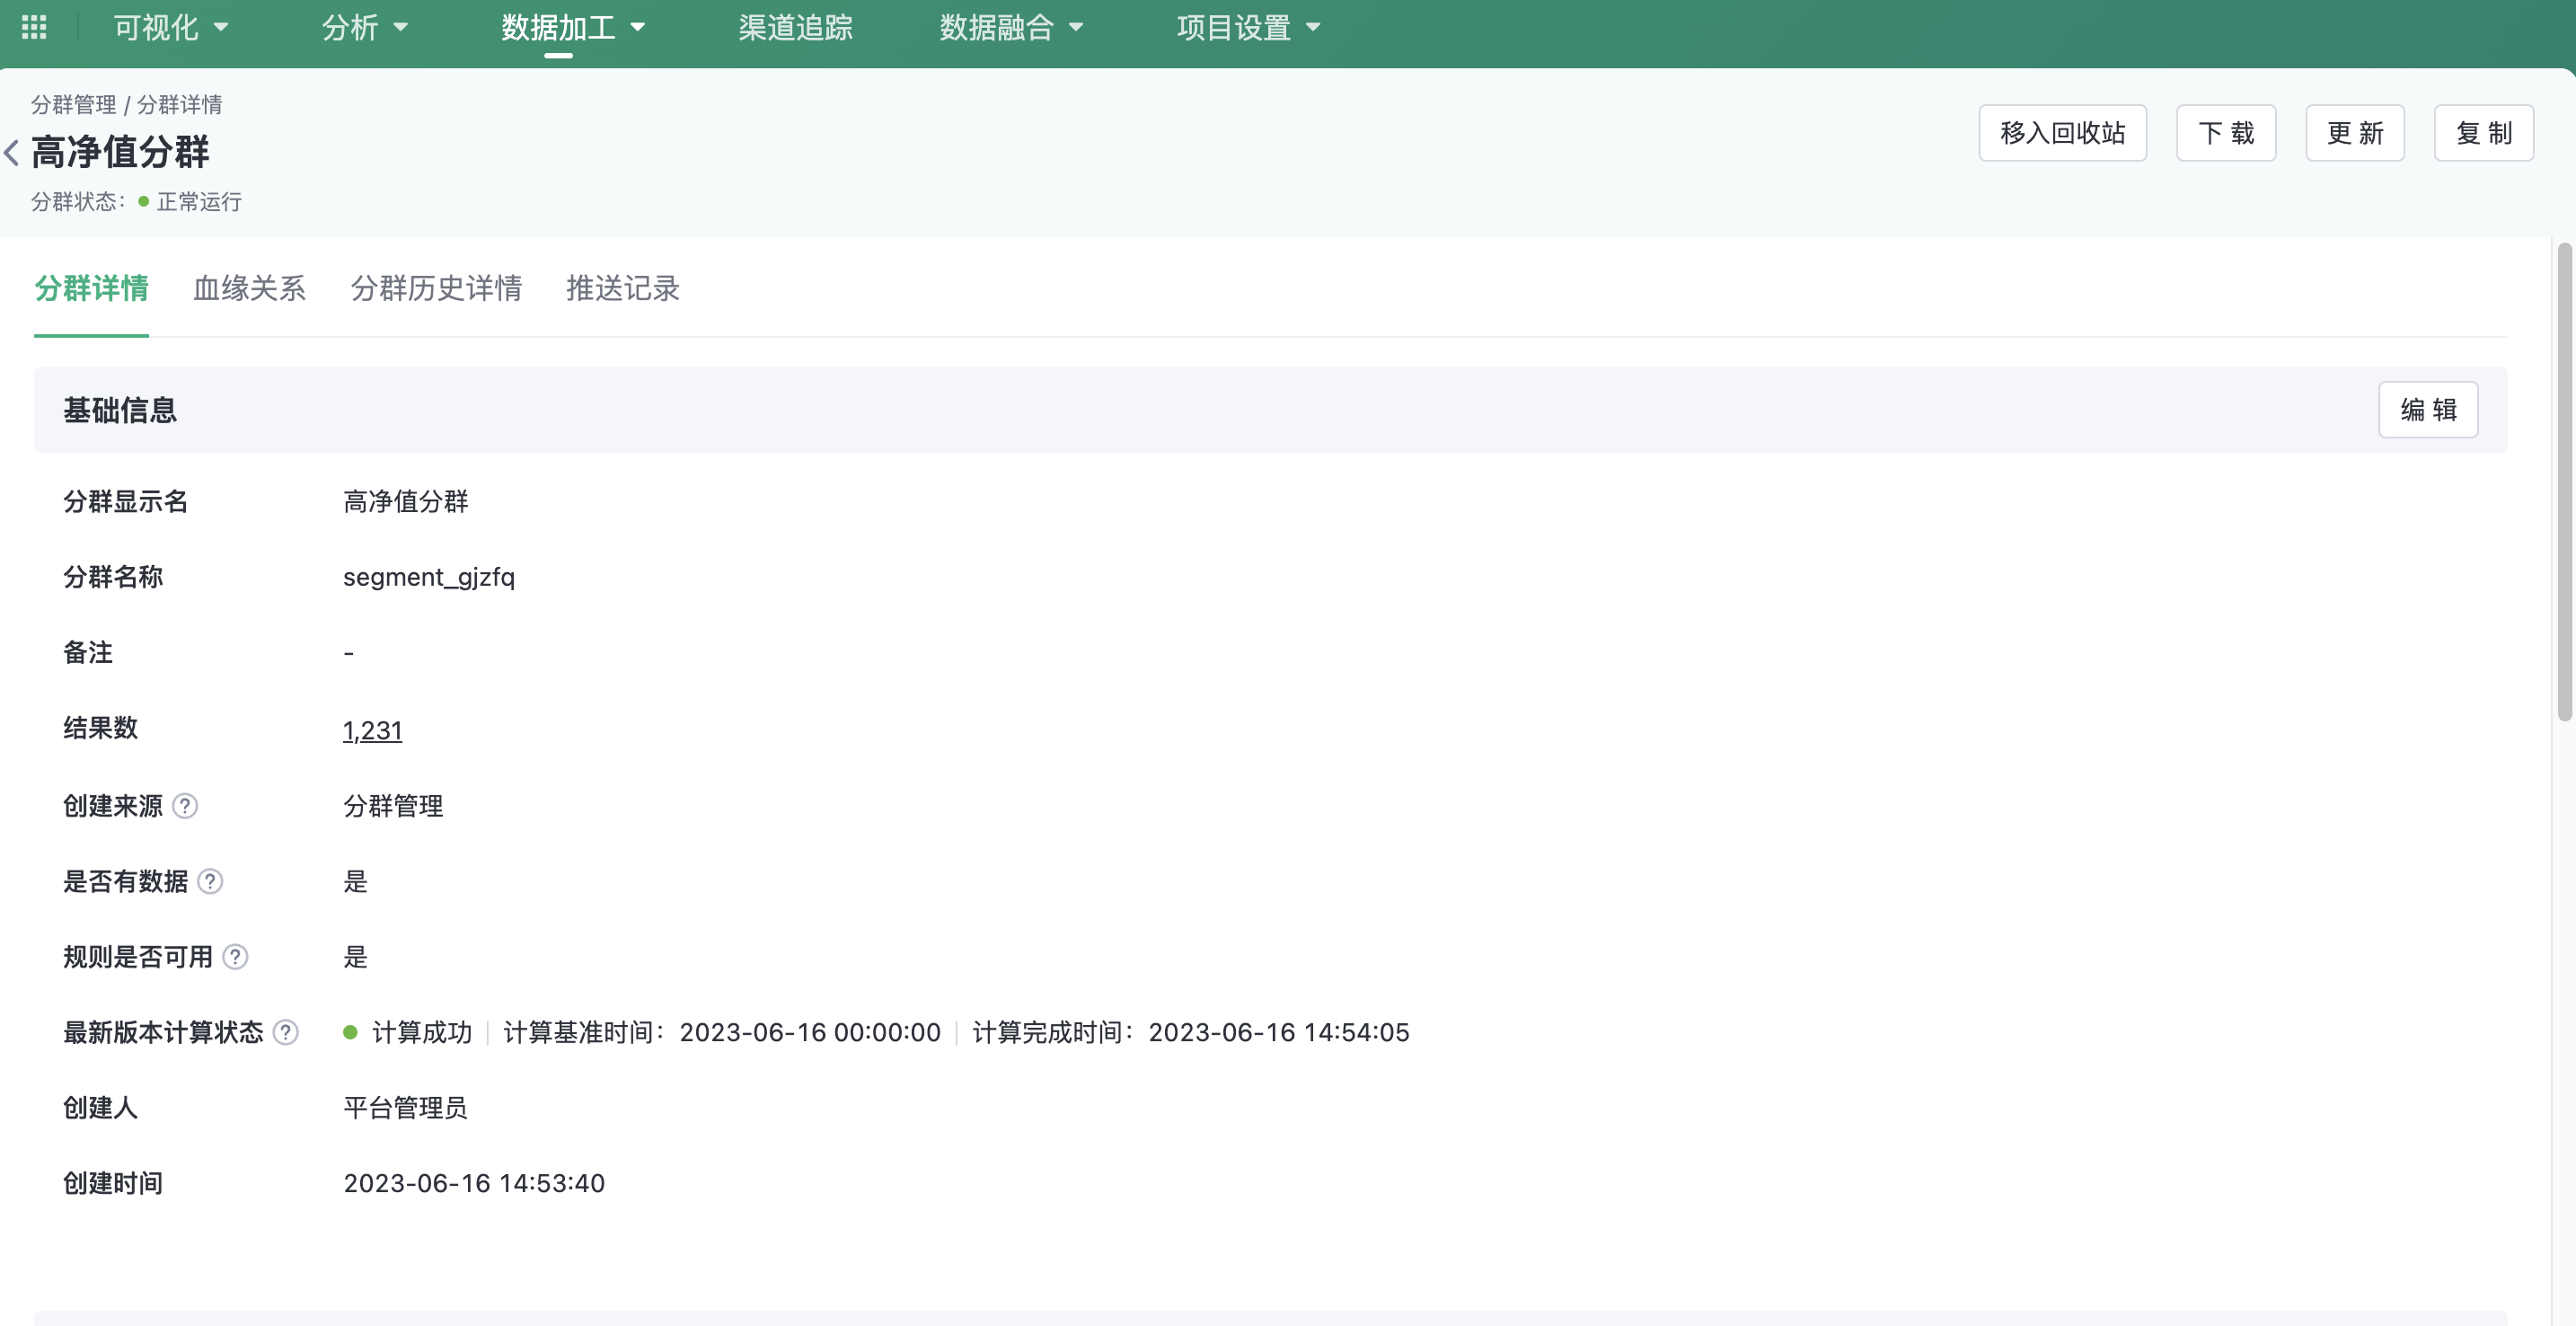
3.3.1. Segments Details
Displays cluster information such as display name, name, notes, latest version calculation status, cluster rules, and update methods.
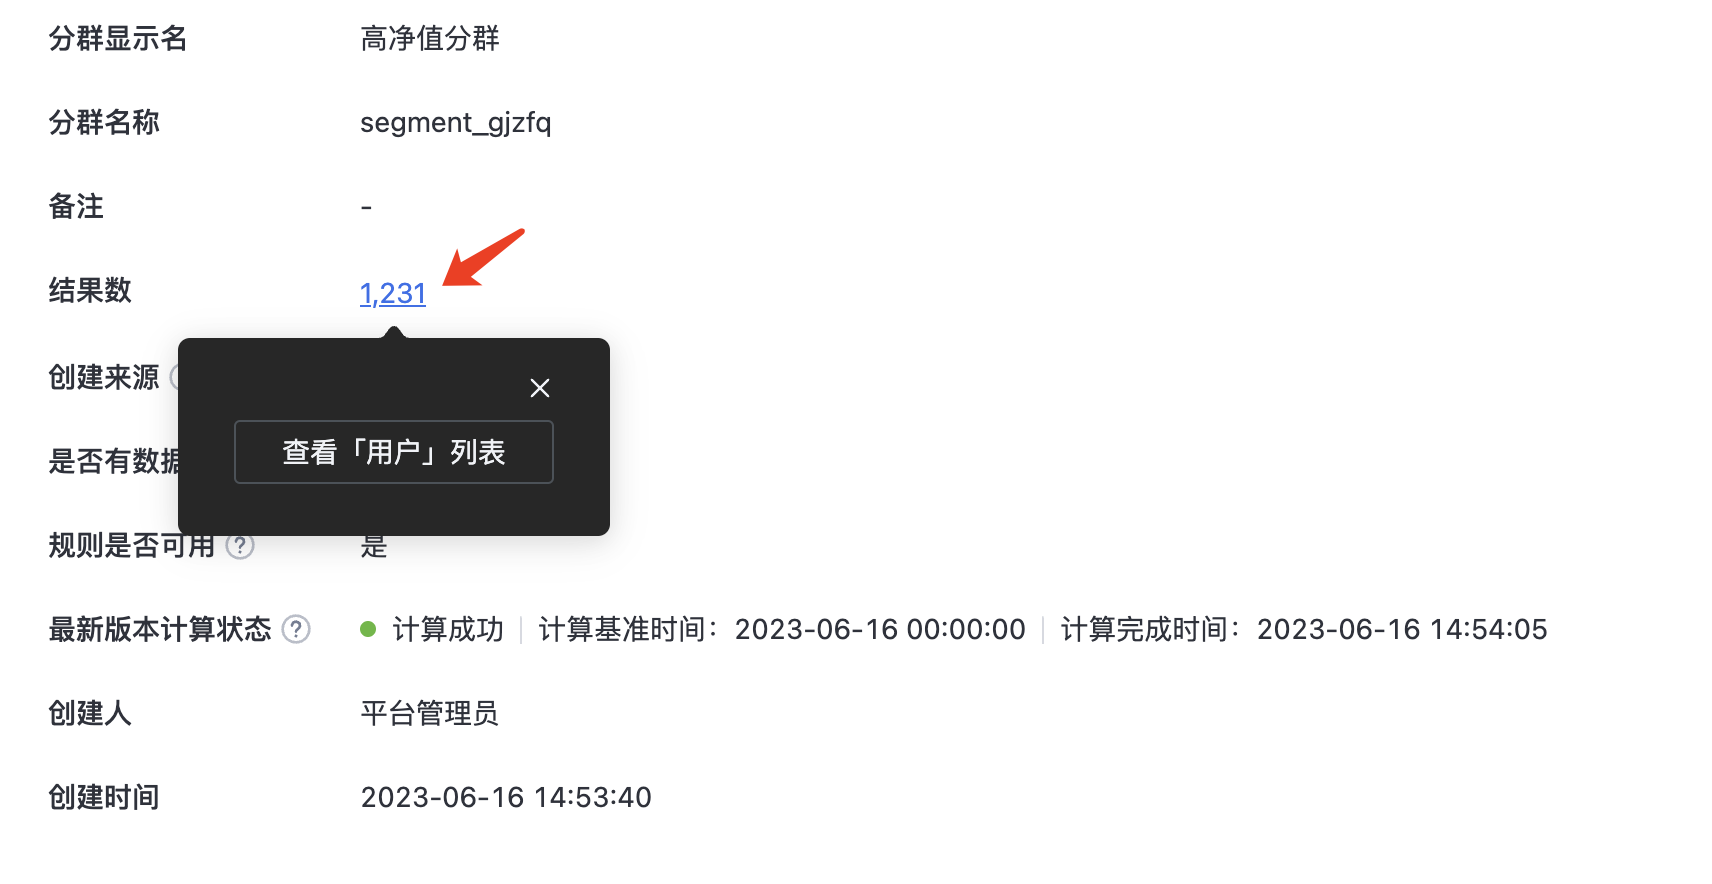
- Cluster Result Drilldown: Cluster result refers to the calculation result of the latest version of the cluster. Click on the cluster result to drill down and view the user list.
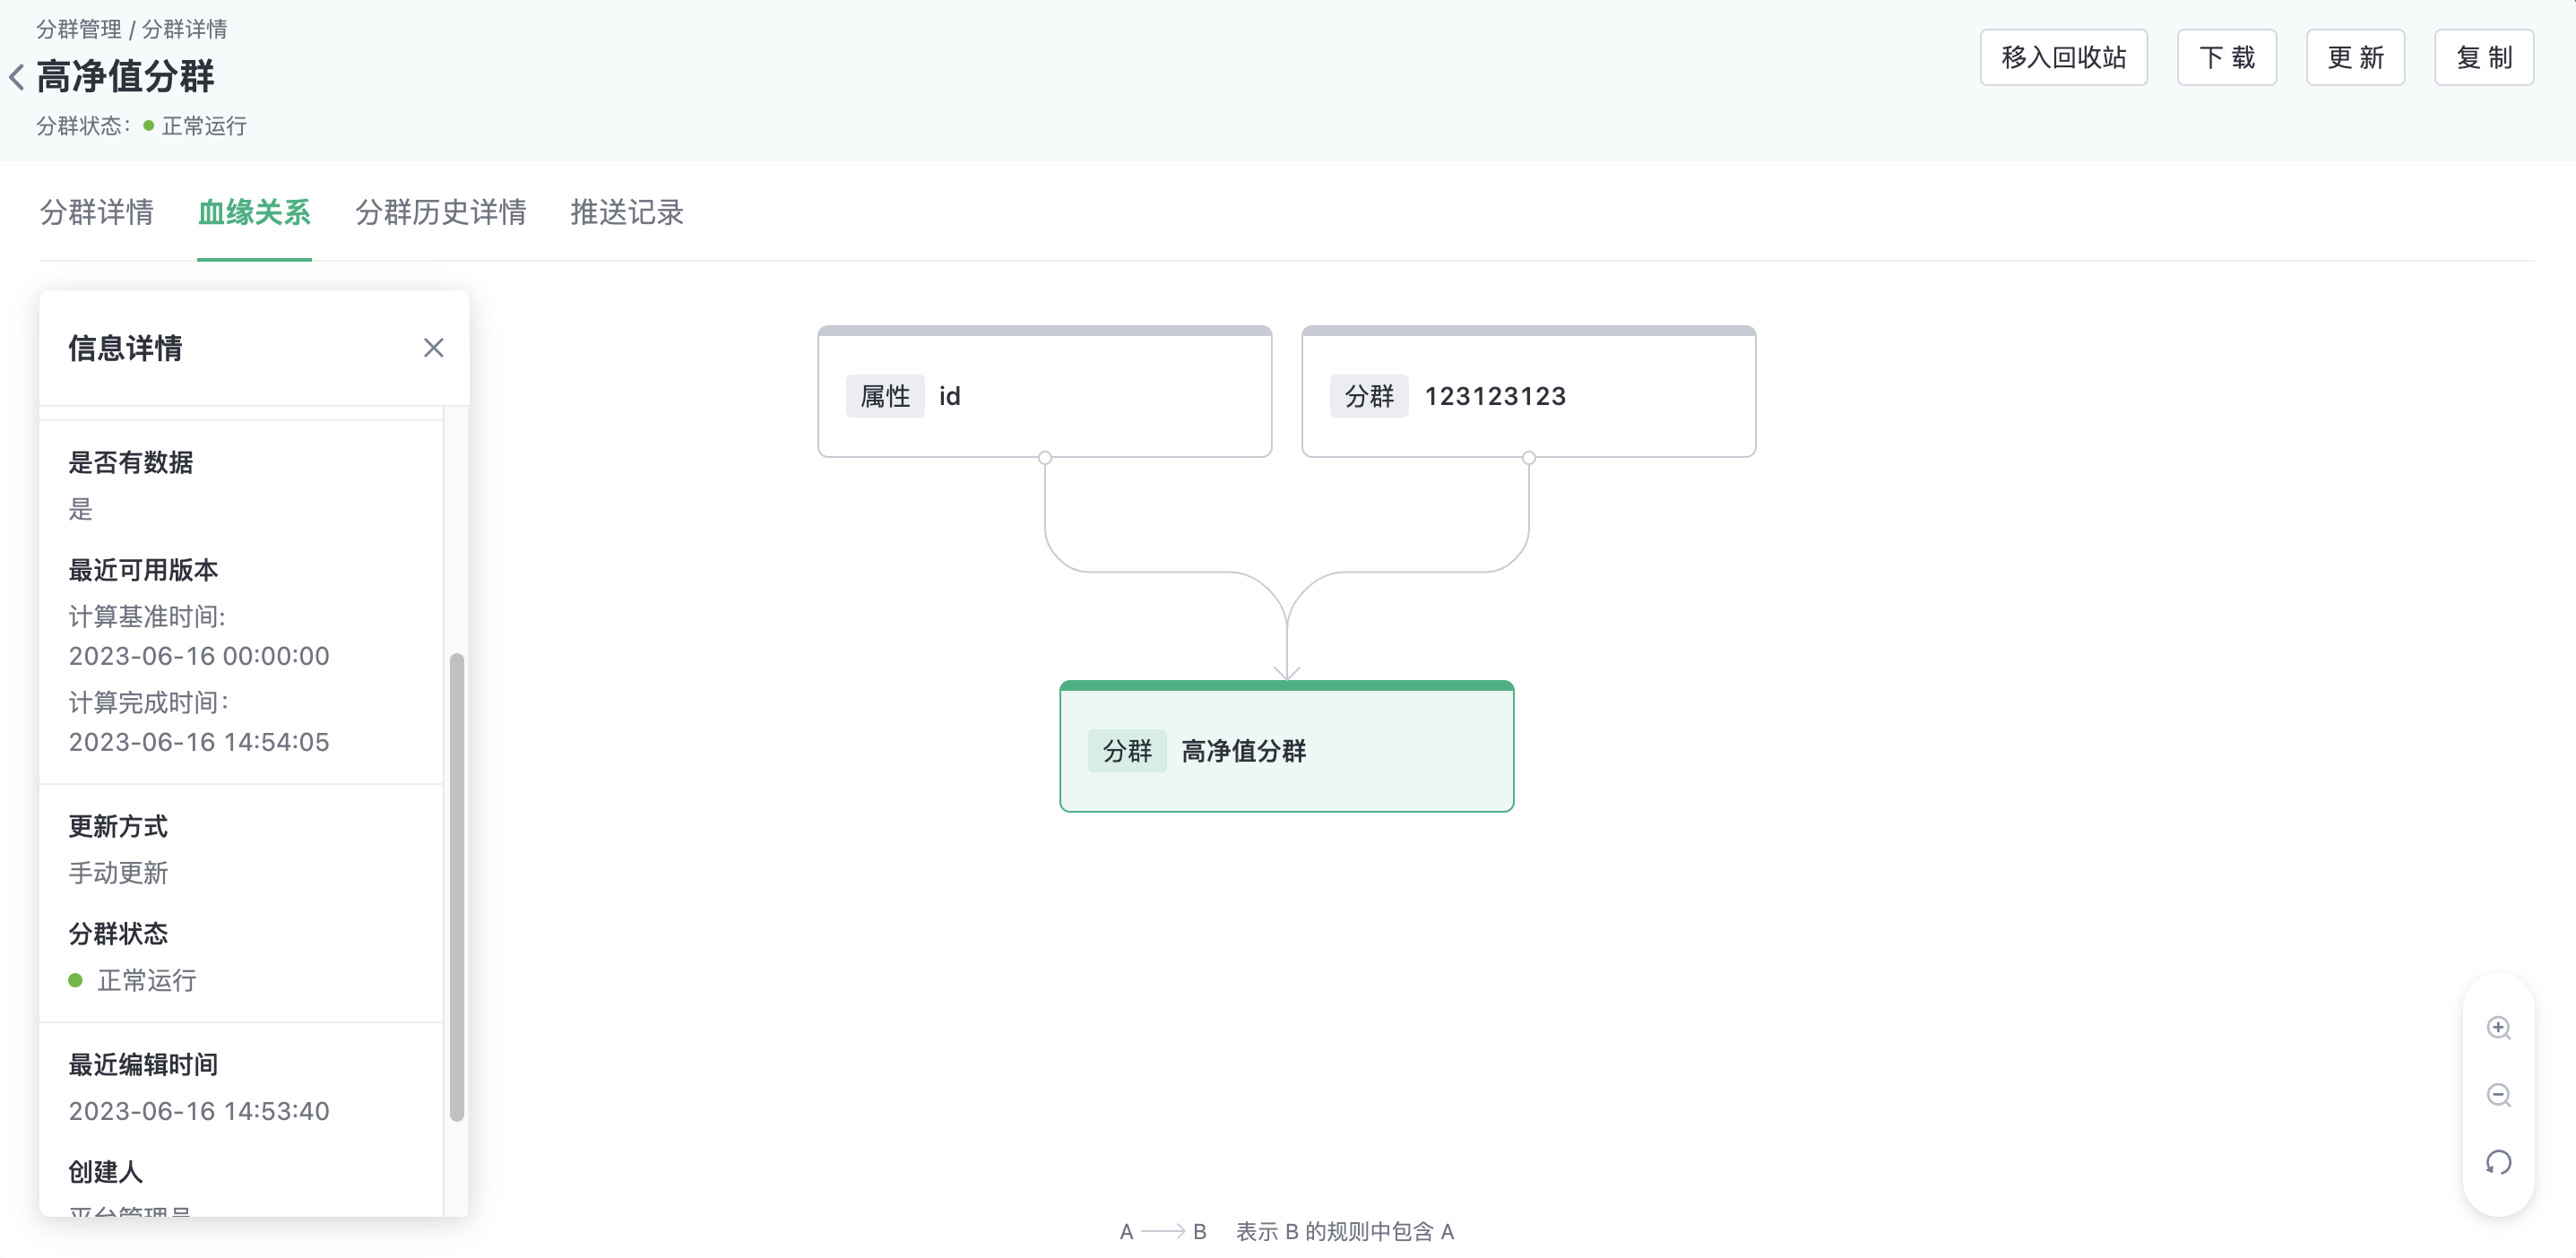
3.3.2. Lineage
On the lineage page, you can view the upstream and downstream dependencies of the cluster, and clicking on a node in the relationship graph allows you to view detailed information about that node on the left.
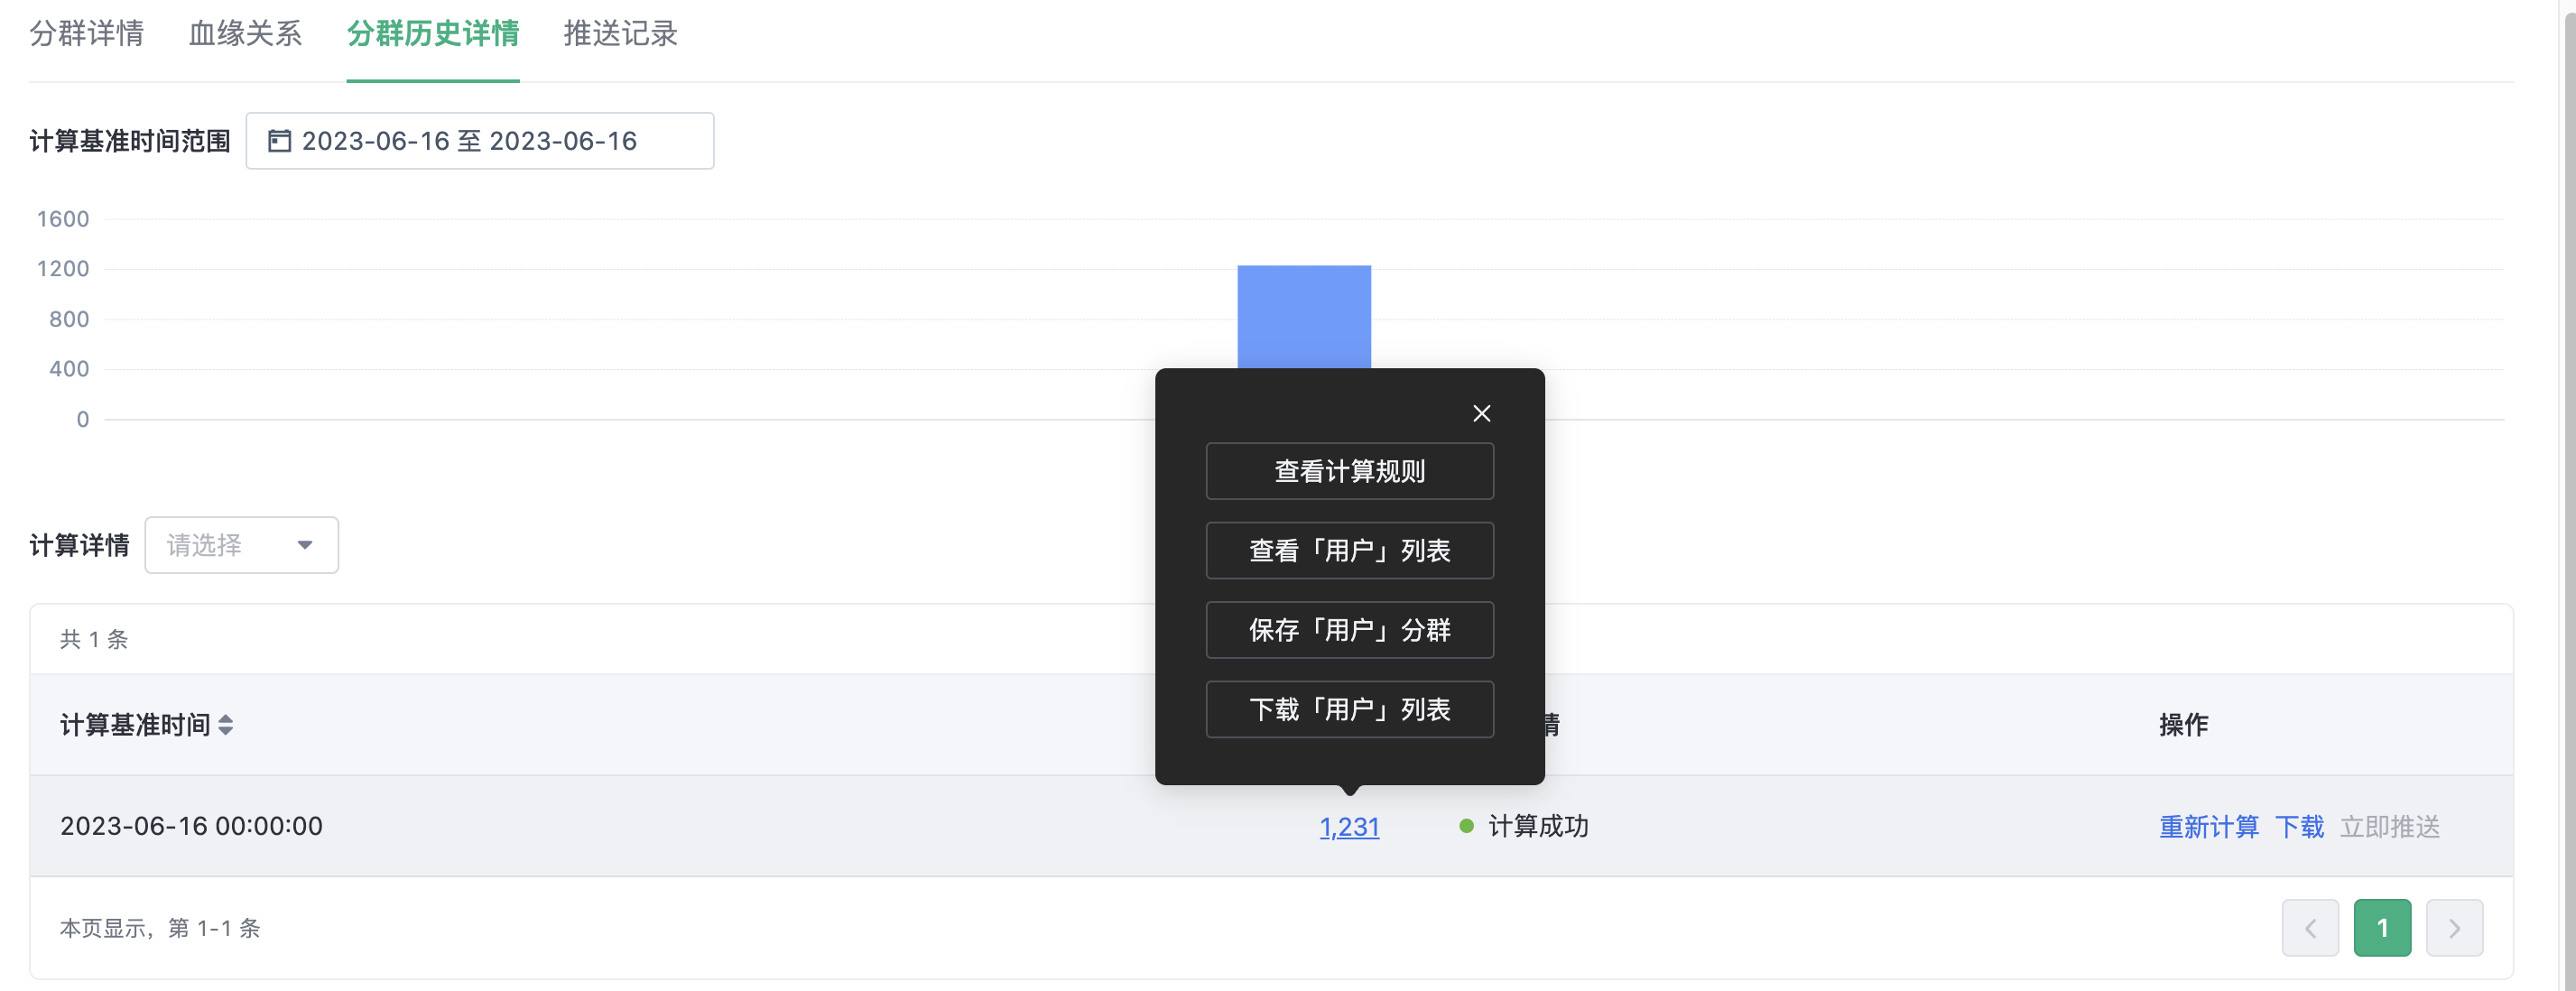
3.3.3. View historical version
You can view the historical version of a cluster and perform the following operations:
- View calculation rules of historical versions
- Drill down to see the list of users
- Saves a historical version as a new cluster
- Download user list
3.3.4. Segments editing
You can edit the basic information, rules, update mode, and calculation result storage Settings of the cluster. Among them:
- Result saving clustering does not support editing rules
- Manual clustering does not support changing the update mode
- The time range and earliest calculation time for routine clustering can be changed, but the update frequency cannot be changed
3.3.5. Other operations
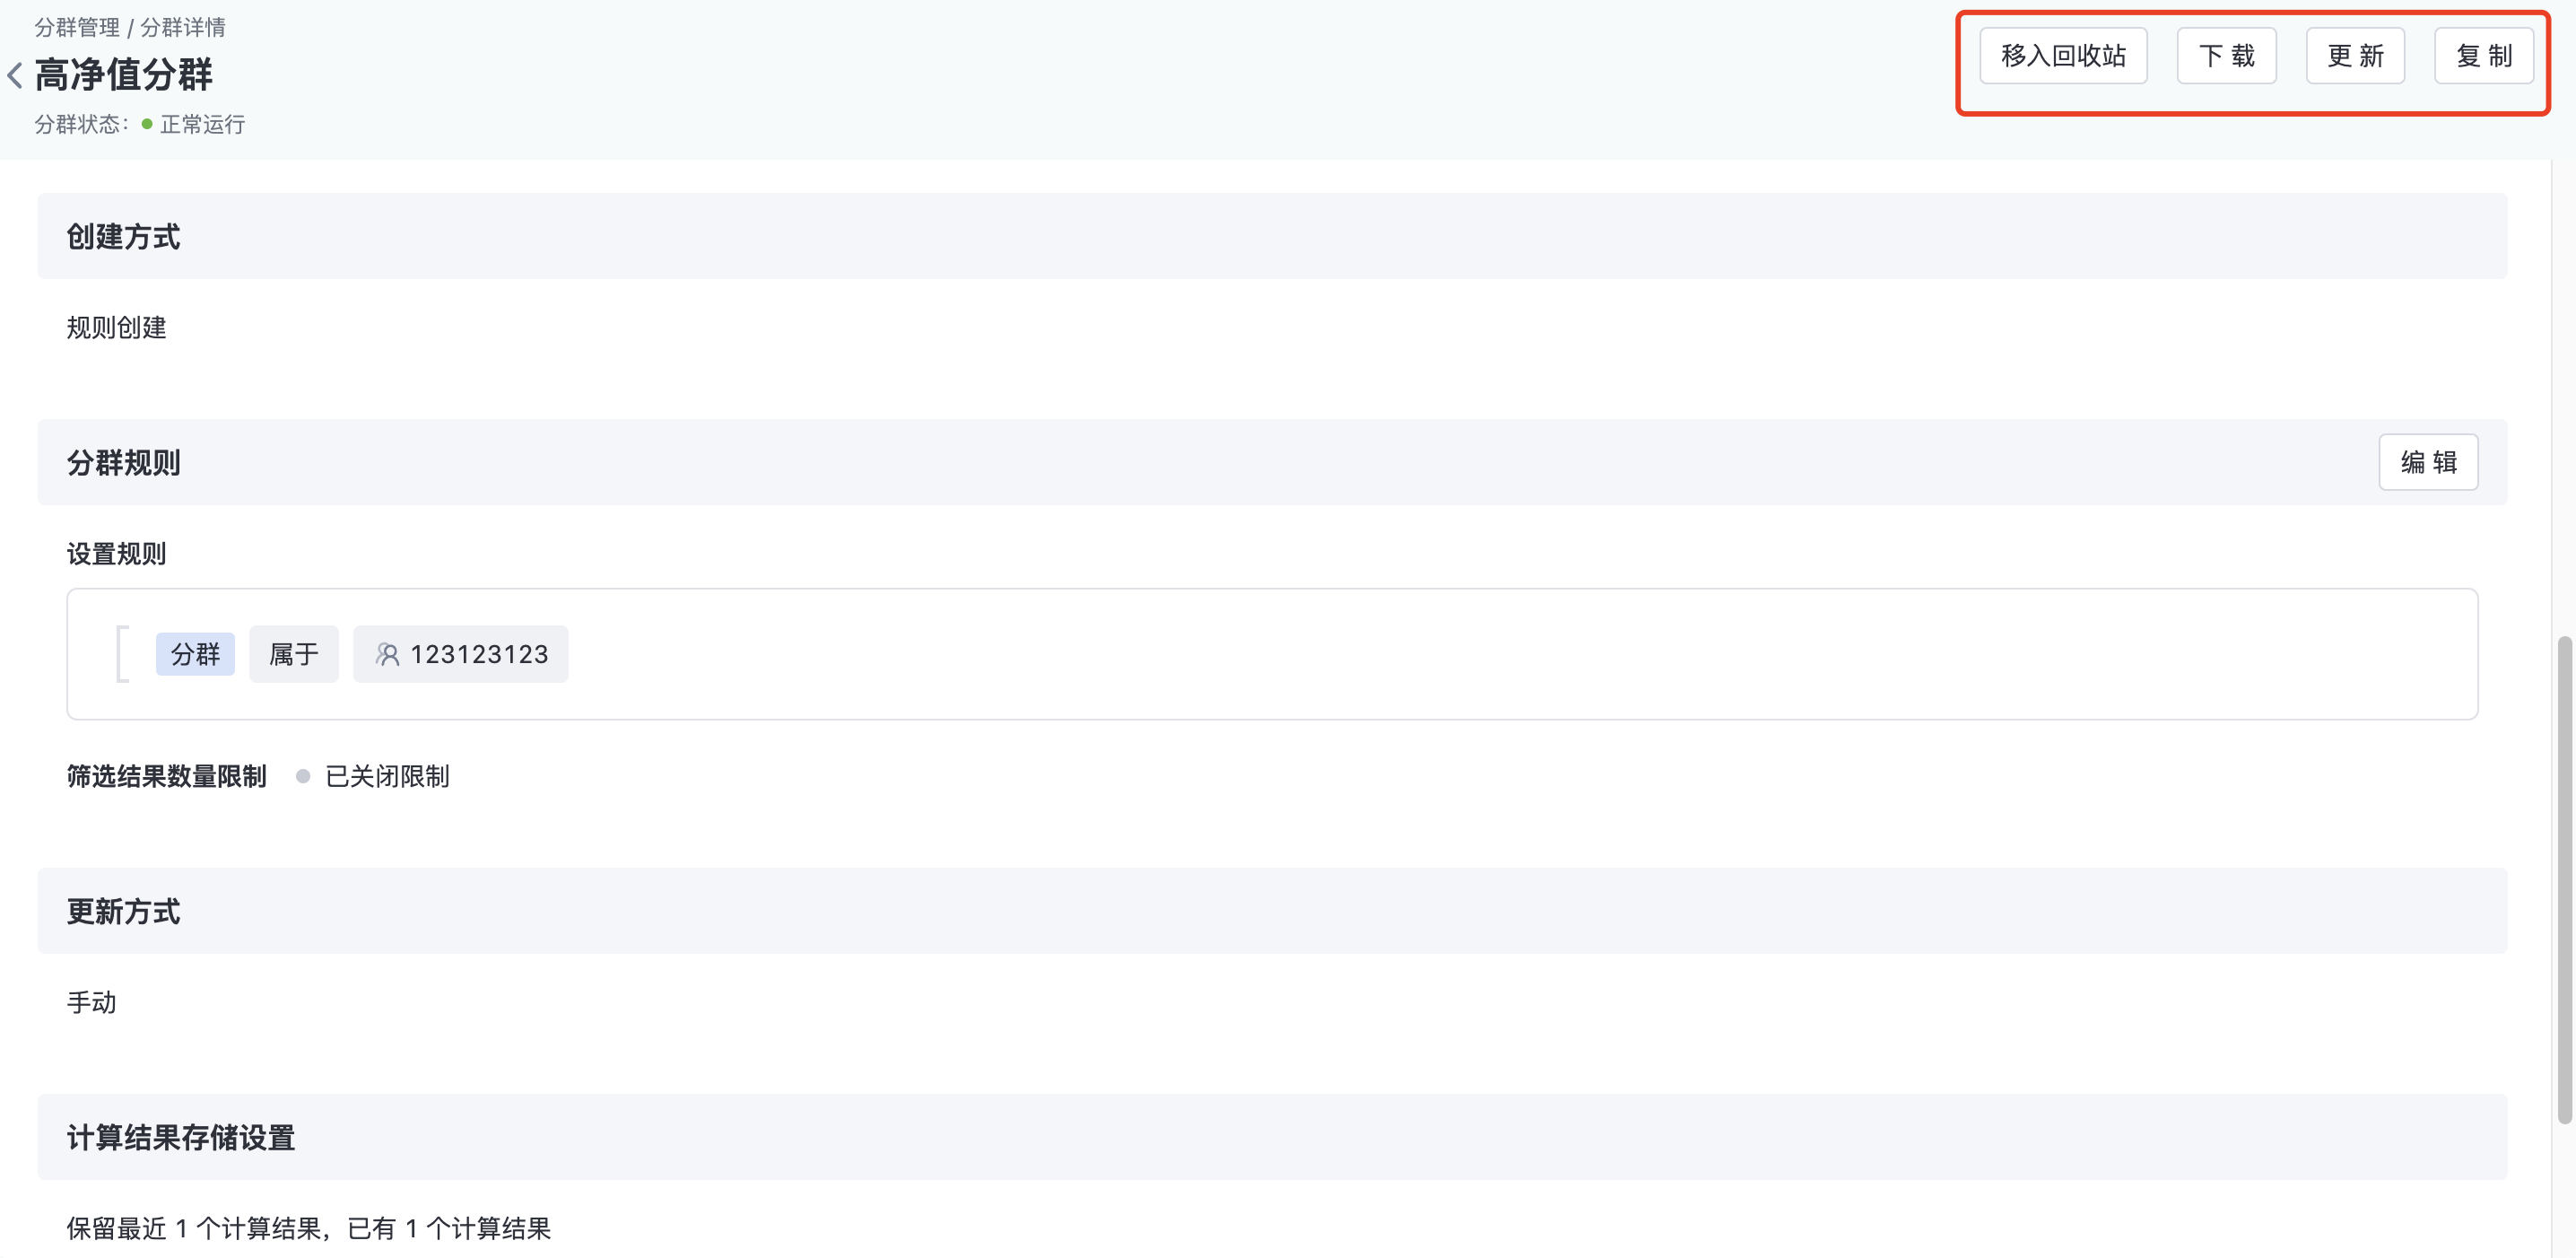
- Move to the Recycle bin: Move the group to the recycle bin
- Download: Download the number of times in the group
- Update: Update the manual cluster. The update will change the base time of the cluster, using 00:00:00 of the current date as the base time, generating a new version that overwrites the original version
- Pause/start: Pauses and starts a routine cluster. After the cluster is paused, it will not continue to update (no new version will be produced)
- Copy: Replicates the current cluster rule to create a new cluster
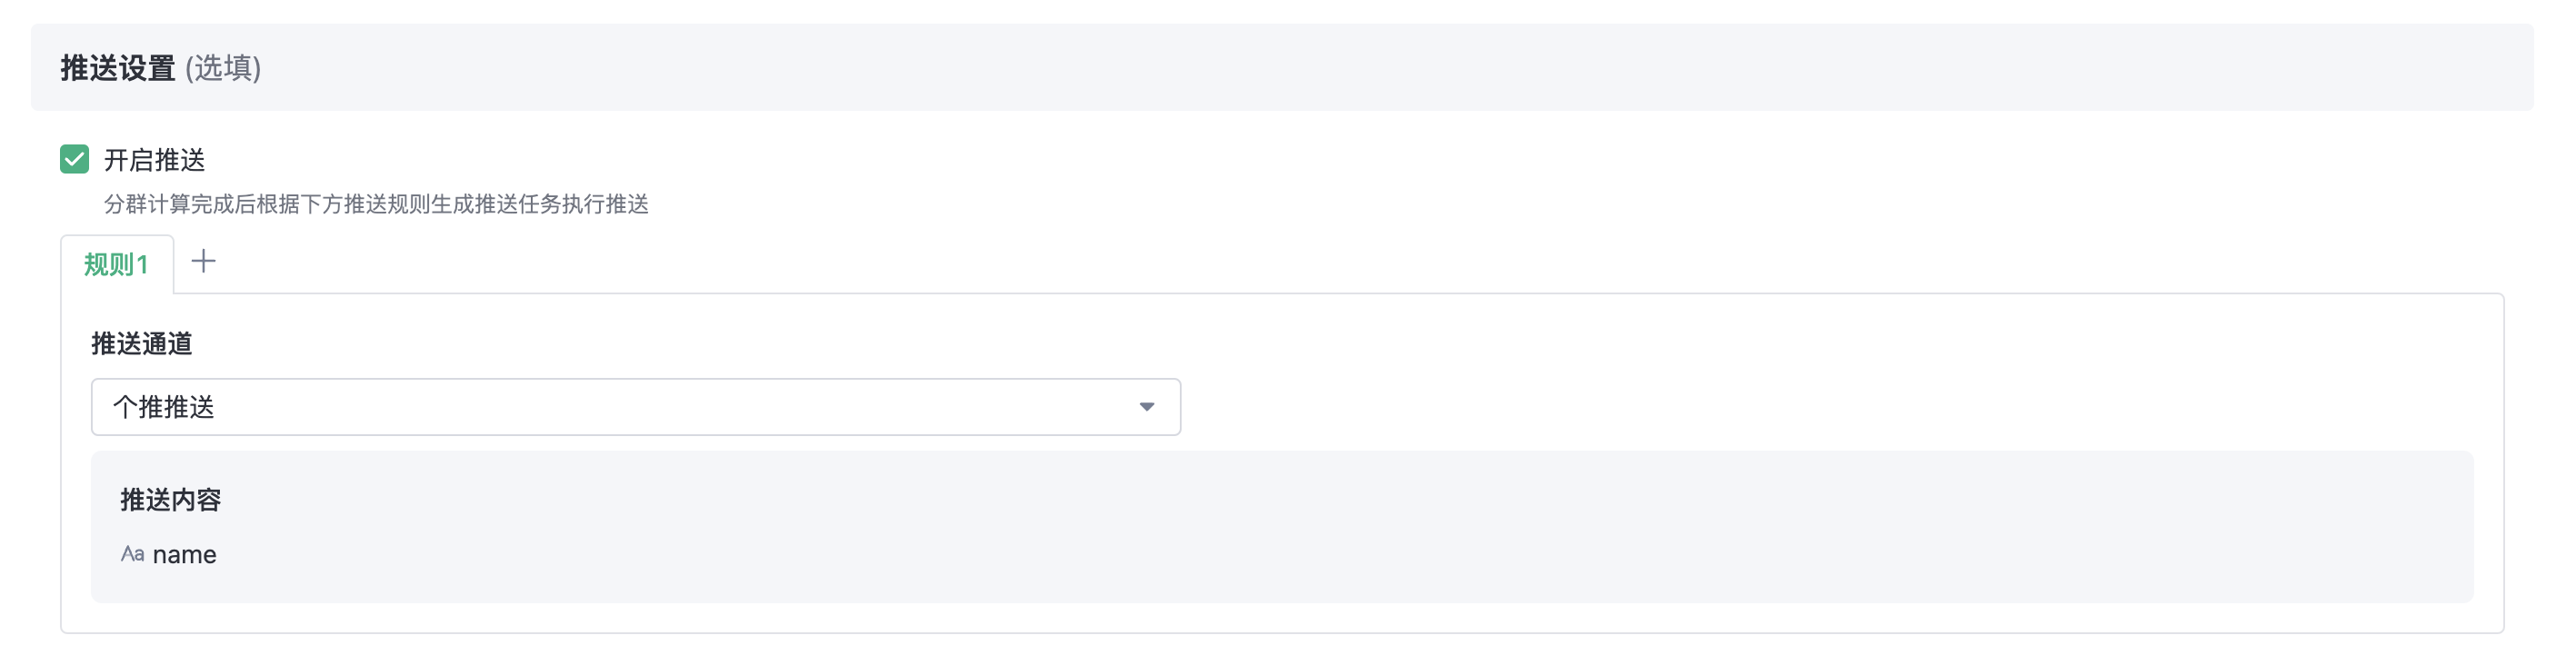
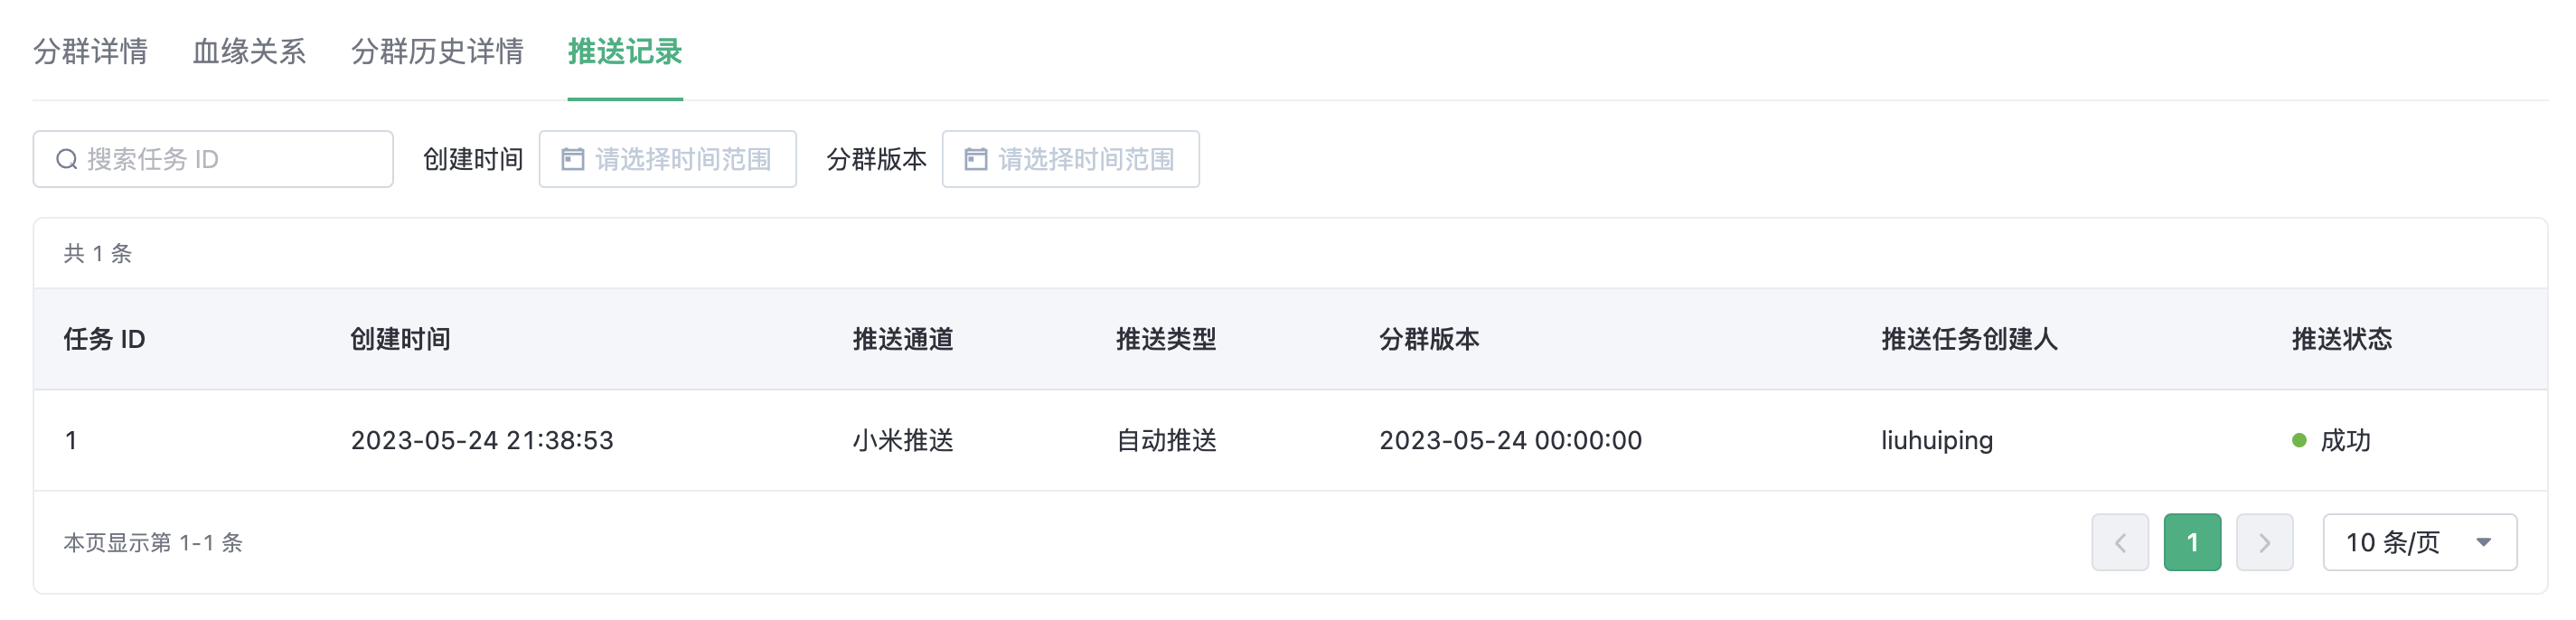
3.4. Segment Push
Segment push Allows you to transmit the results of a cluster version to the target system and then complete subsequent service actions.
When creating/editing a cluster, you can set push information. When the cluster calculation is completed, the system will automatically generate push tasks according to the set rules for push. The system has 3 built-in push channels (push, millet push, Aurora push).
In the Cluster history details, clickPush Now button to select a specific push channel and click Push, then the push task is generated and executed immediately.
In push records, you can view all push records of the current cluster. You can filter the push records by task ID, creation time, and cluster version.
4. Segment related status description
4.1. Segment state
State | Explanation |
|---|---|
| Running | Cluster tasks are running properly |
| Paused | The unique state of a routine cluster. A suspended routine cluster does not generate a new version, no longer calculate. |
4.2. Calculation state
State | Explanation |
|---|---|
| Calculating | The clustering task is being calculated |
| Calculation successful | The task calculation was successful, and this calculation result is available |
| Calculation failed | The task calculation failed. Possible reasons include the dependency on tags in the segments rules, segments calculation failure, or insufficient computing resources, etc. |
| Calculation cancelled | Calculation task terminated |
5. Permission management
5.1. Segments function permissions

Functionality can be restricted through the permission system:
- View: Whether access to the segments management module and view segmentss are allowed; the visible range of segmentss can be configured
- Create: Whether the creation of segments is allowed; the methods available for creating segments can be configured
- Import to retain unmatched IDs: When importing to create segments, whether the retain unmatched ID function can be used
- Manage: Whether managing the visible range of segments is allowed
- Calculated result storage configuration: Whether modifying the storage configuration of calculated results is allowed
- Bulk move to recycle bin: Whether segments can be bulk moved to the recycle bin
- View recycle bin: Whether access to the group recycle bin list and viewing the segments in the recycle bin are allowed
- Restore: Whether restoring segments from the recycle bin is allowed
- Delete permanently: Whether manually deleting segments from the recycle bin permanently is allowed
- Group pushing: Whether using group pushing and viewing push records are allowed
5.2. User Range
When creating a group, an enterprise may restrict the data that employees can select. The following uses a banking service scenario as an example: The head office needs to delegate the group creation capability to branches. When the branches perform group calculation, they can only use the customer data of the current branch Customers of Beijing Branch . It can be used in this scenario User Range function For permission control.
User Range That is, the filtering policy is used to define the data range that can be used in the calculation. The service application process is as follows:
- The administrator delimits a data range in advance by specifying rules, such as in the example above, the rules for the user range are:Customer Region = 'Beijing'
- Authorizes the created user range to the specified account
- An authorized account can only select data within the user range when creating a cluster
Tips
This function is an advanced function and is disabled by default.
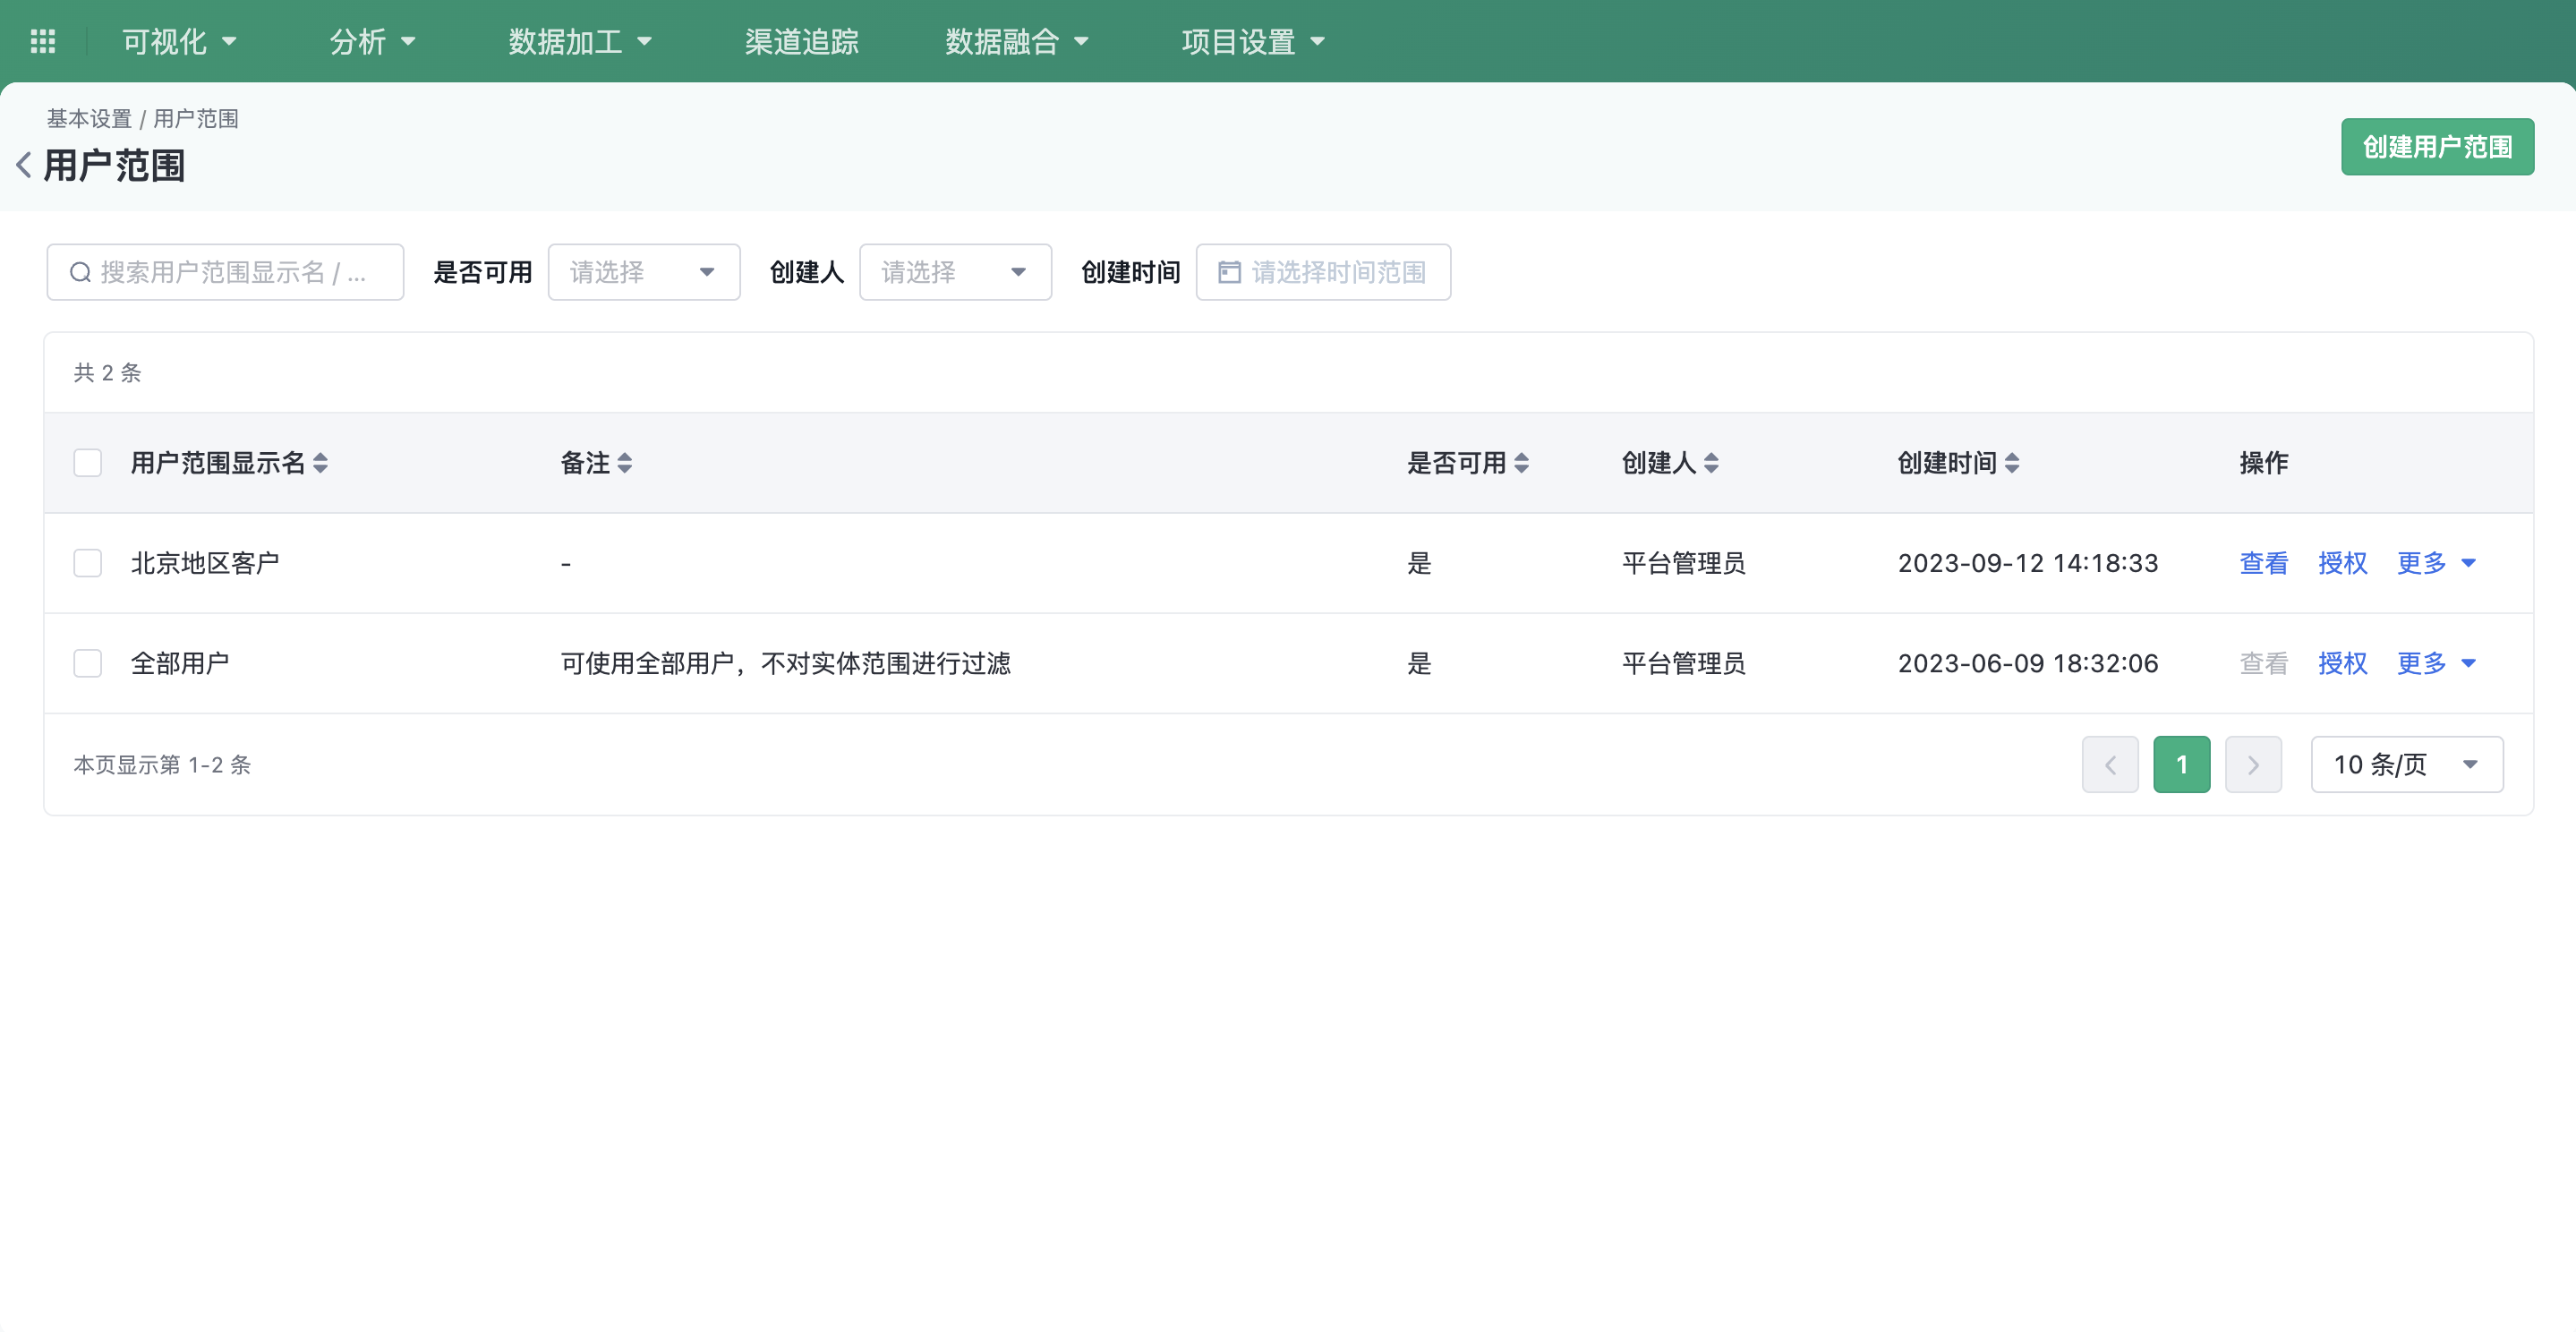
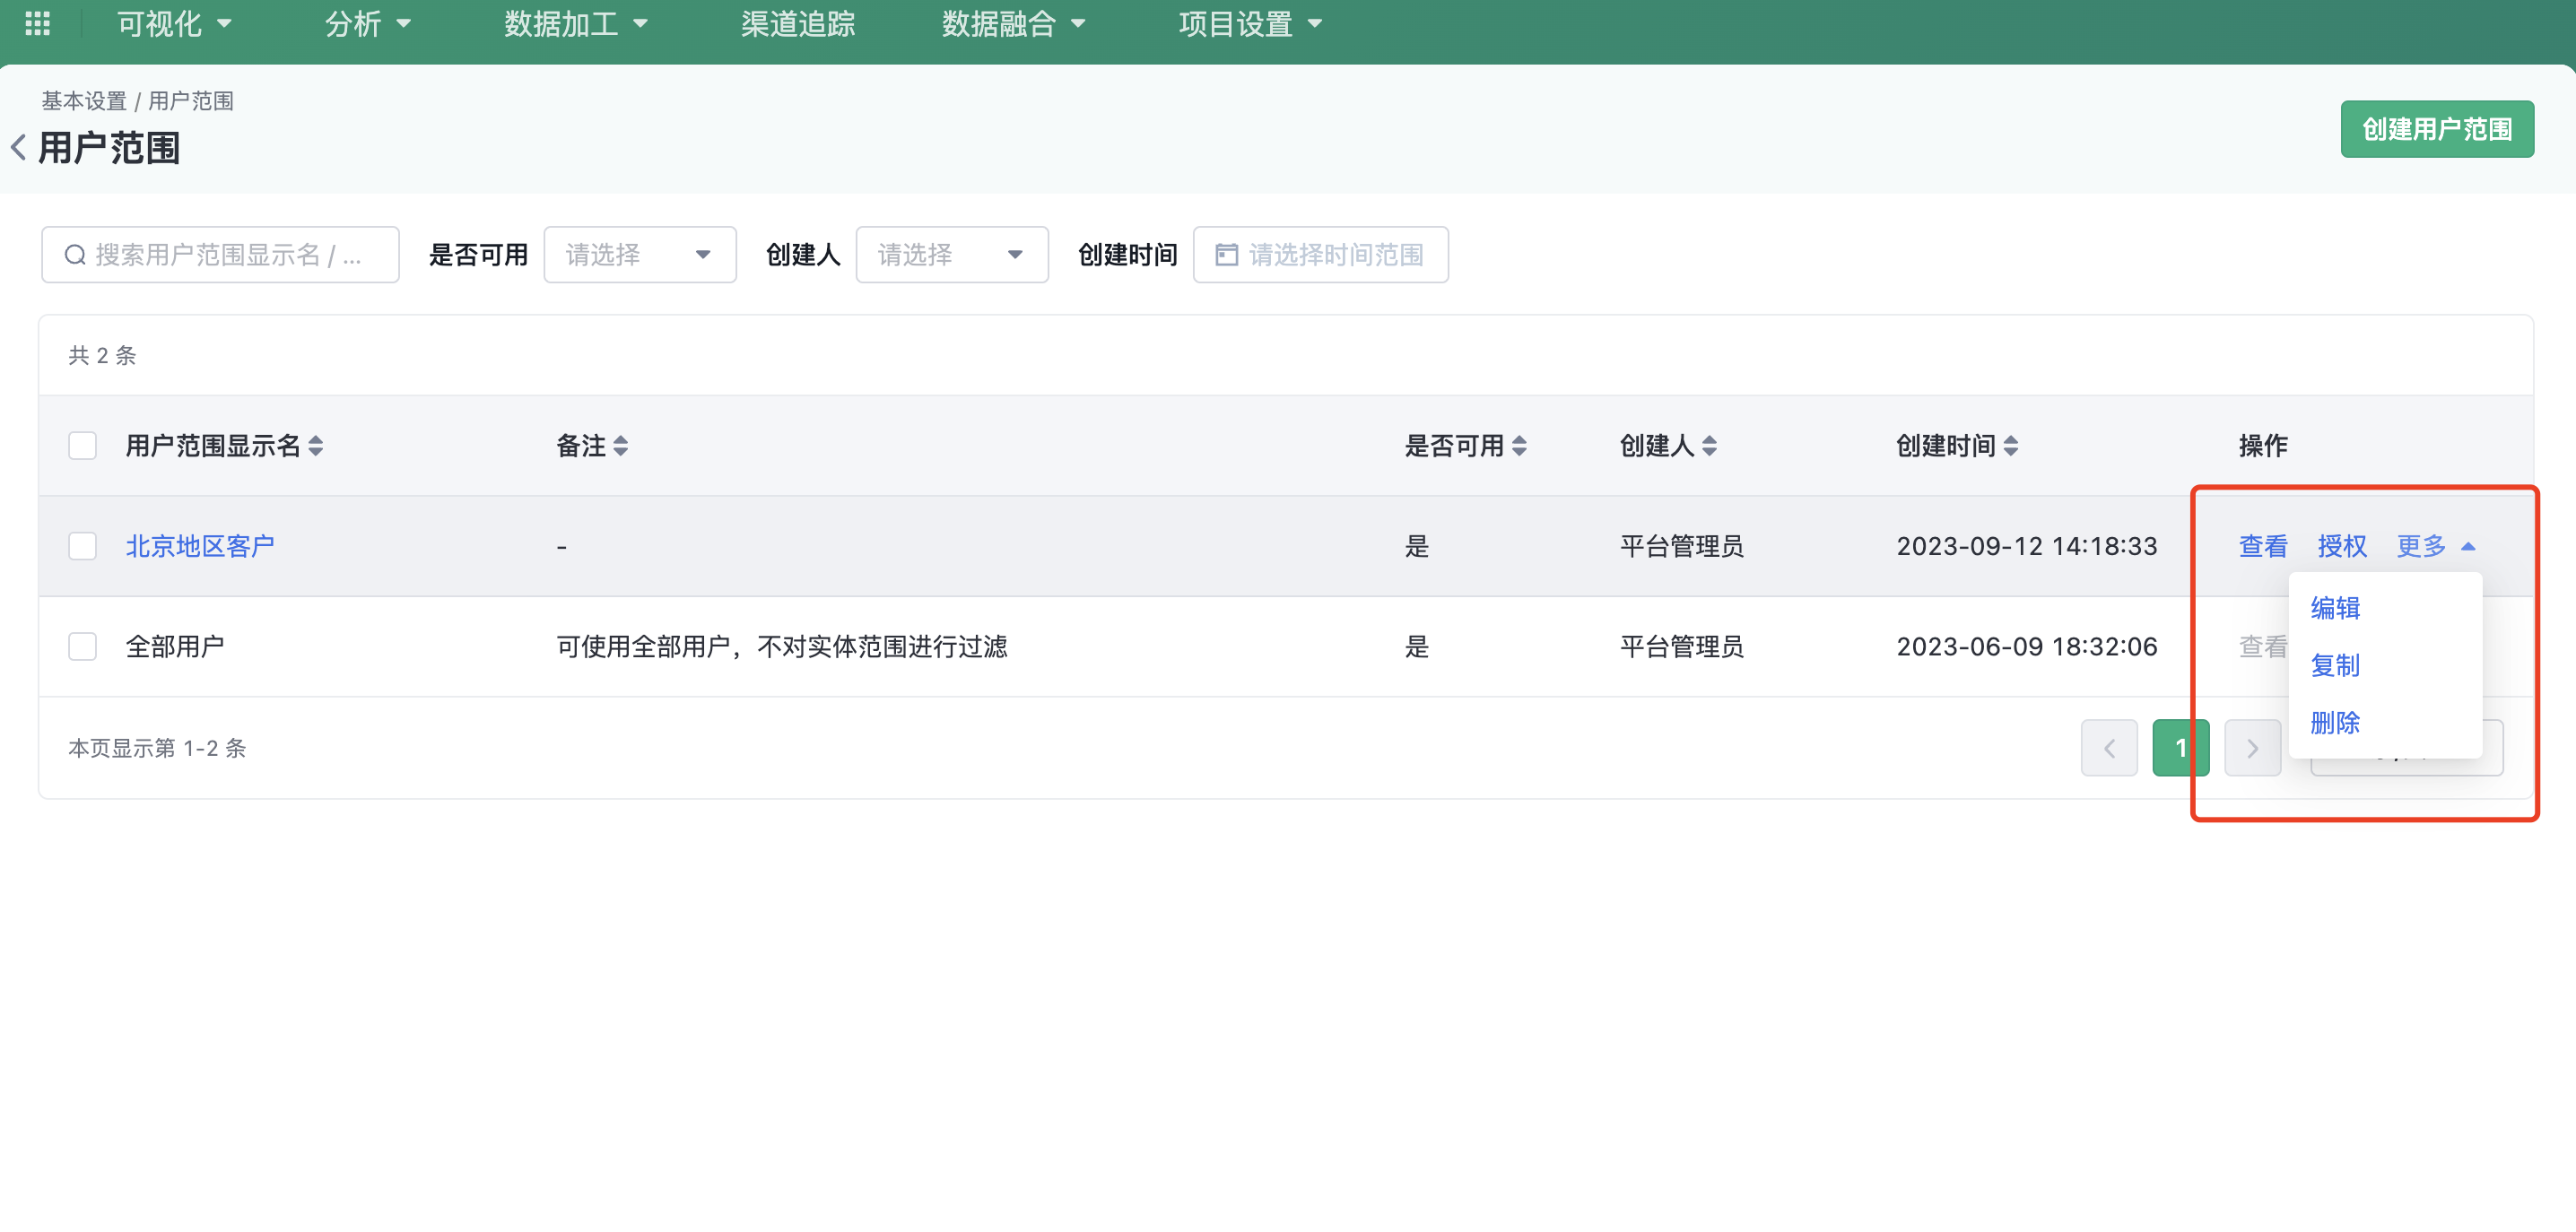
5.2.1. User scope management
Entry: Project Settings - Basic Settings - Entity Management - Entity Scope, click the entry to enter the list page.
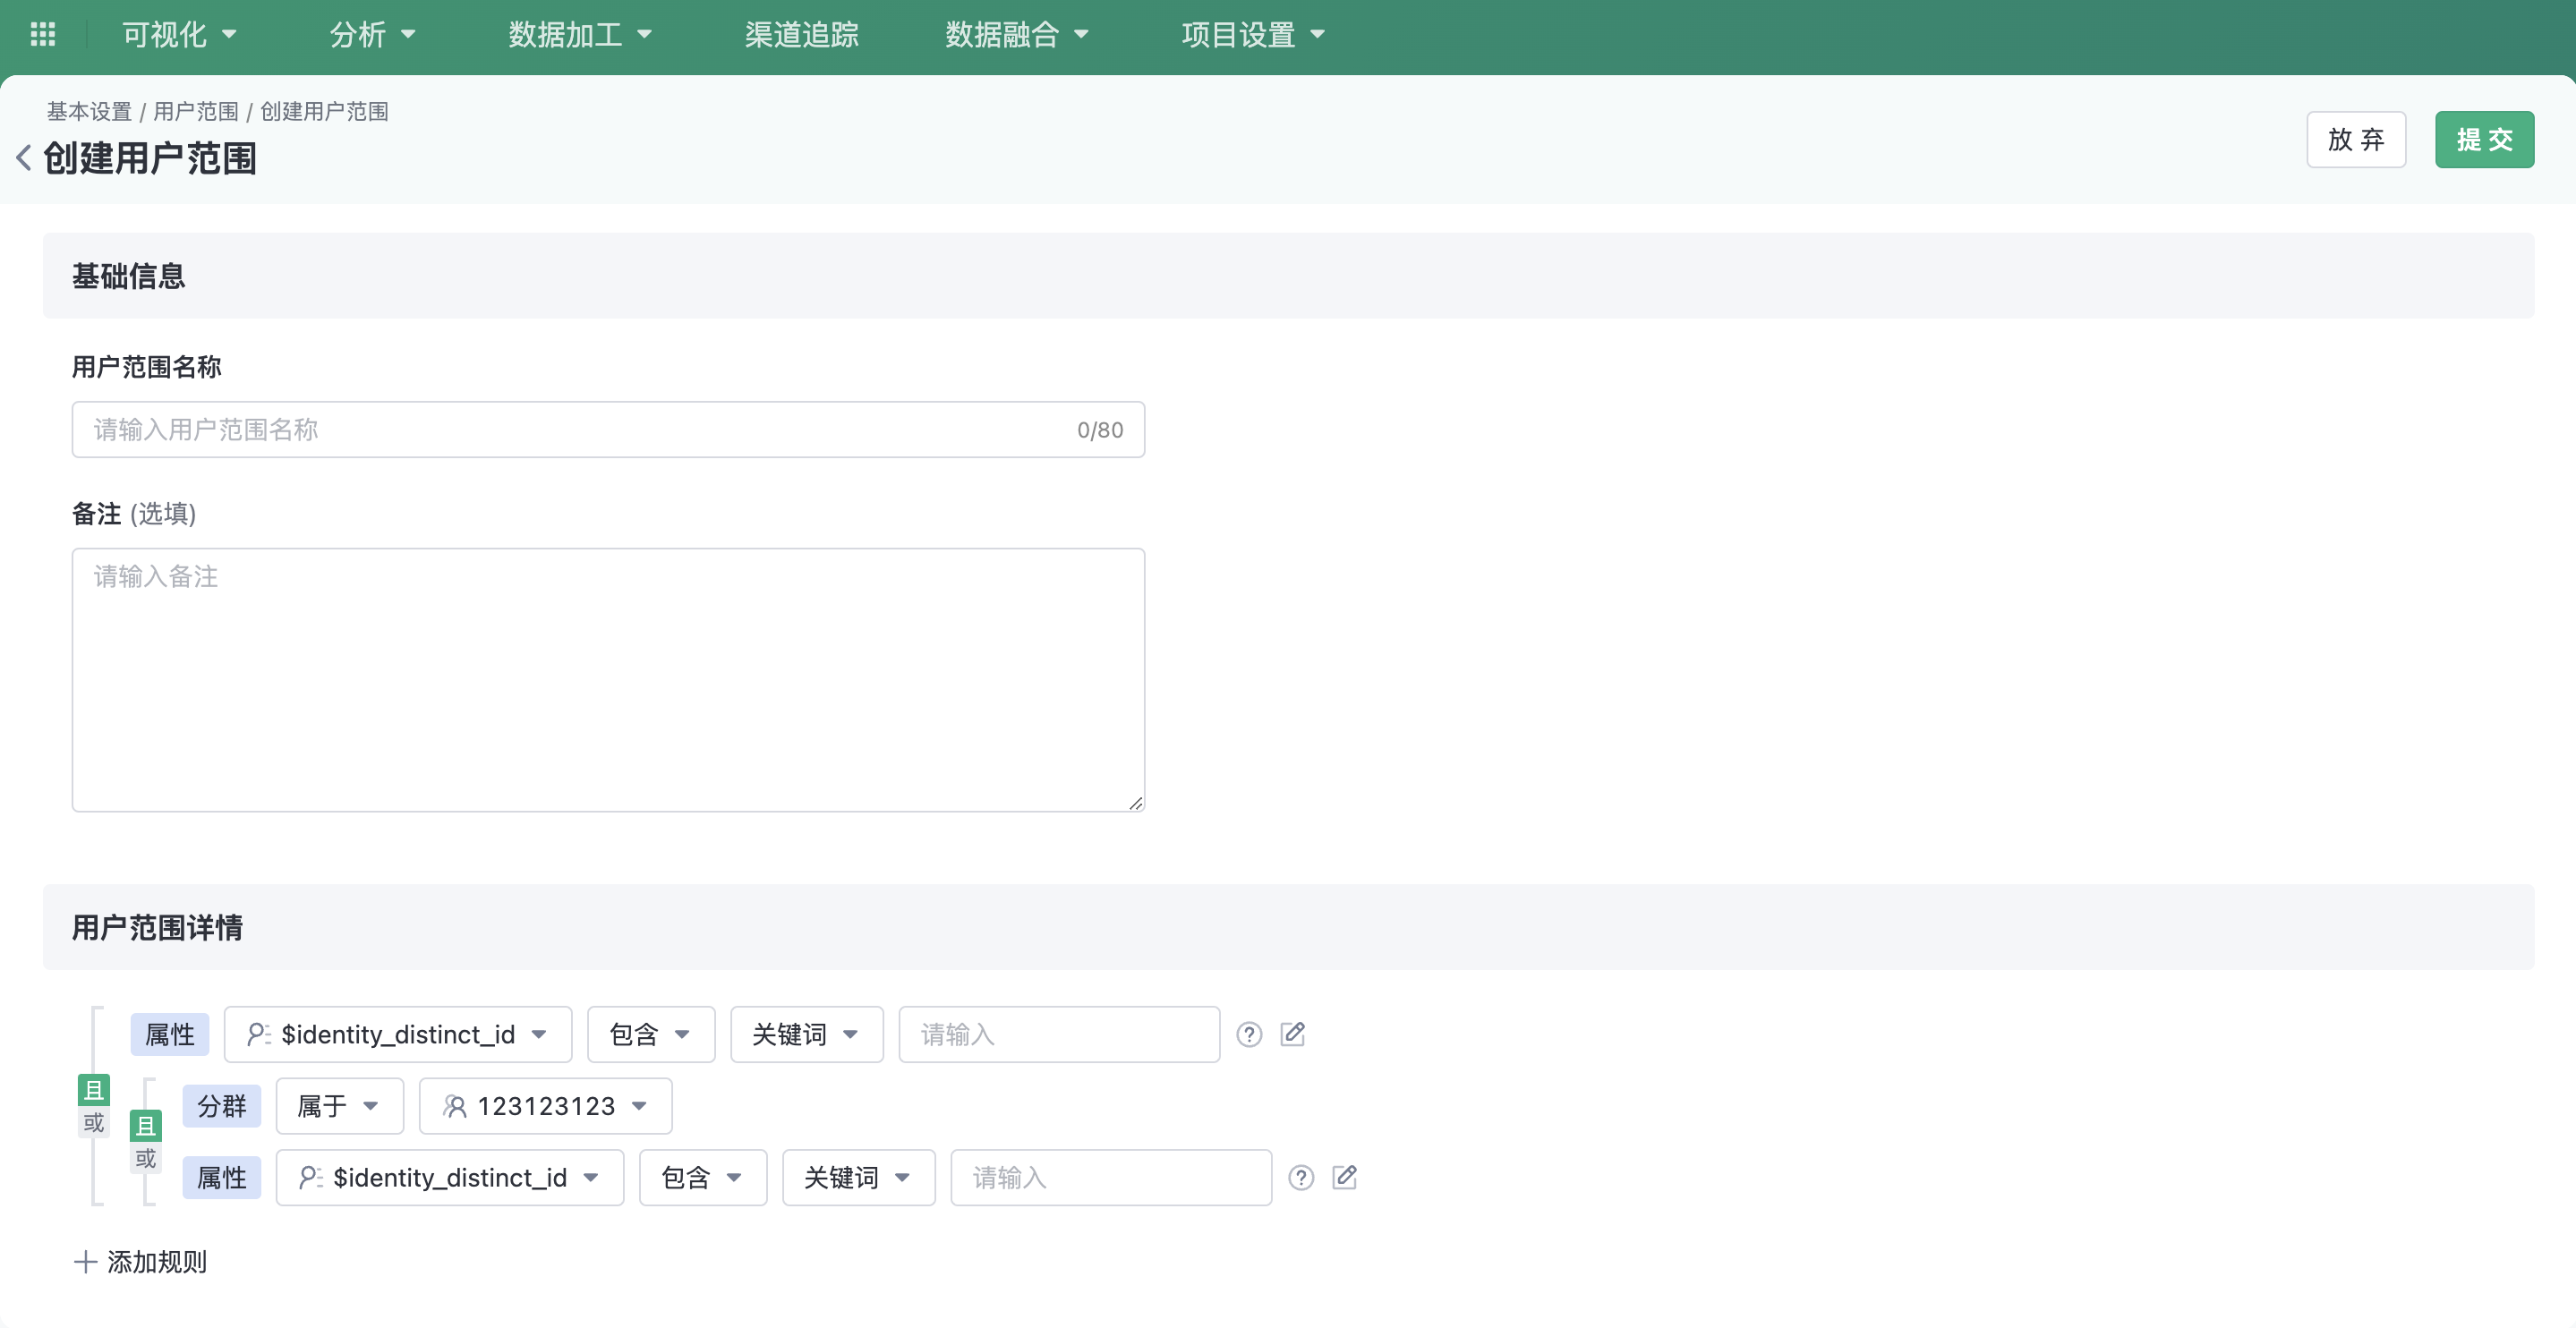
5.2.1.1. Create user range
Click on the top right corner of the page Create user range button to go to the Create page.
Multi-layer nested configuration can be performed through attributes and clusters to filter the data range.
5.2.1.2. User range list
In the user range list, you can view basic information about all user ranges. For a single user range, you can perform the following operations: View, authorize, edit, copy, and delete.
Accredit
When a user range is authorized to a specified account, it means that the account is used when the cluster is createdYou can use this user-scope rule to filter the data used in the calculation . Authorization can be based on account, role, and position. Authorized permissions include:
- Use: This user range can be used when creating a cluster
- Manage: You can edit, delete, and authorize the user range
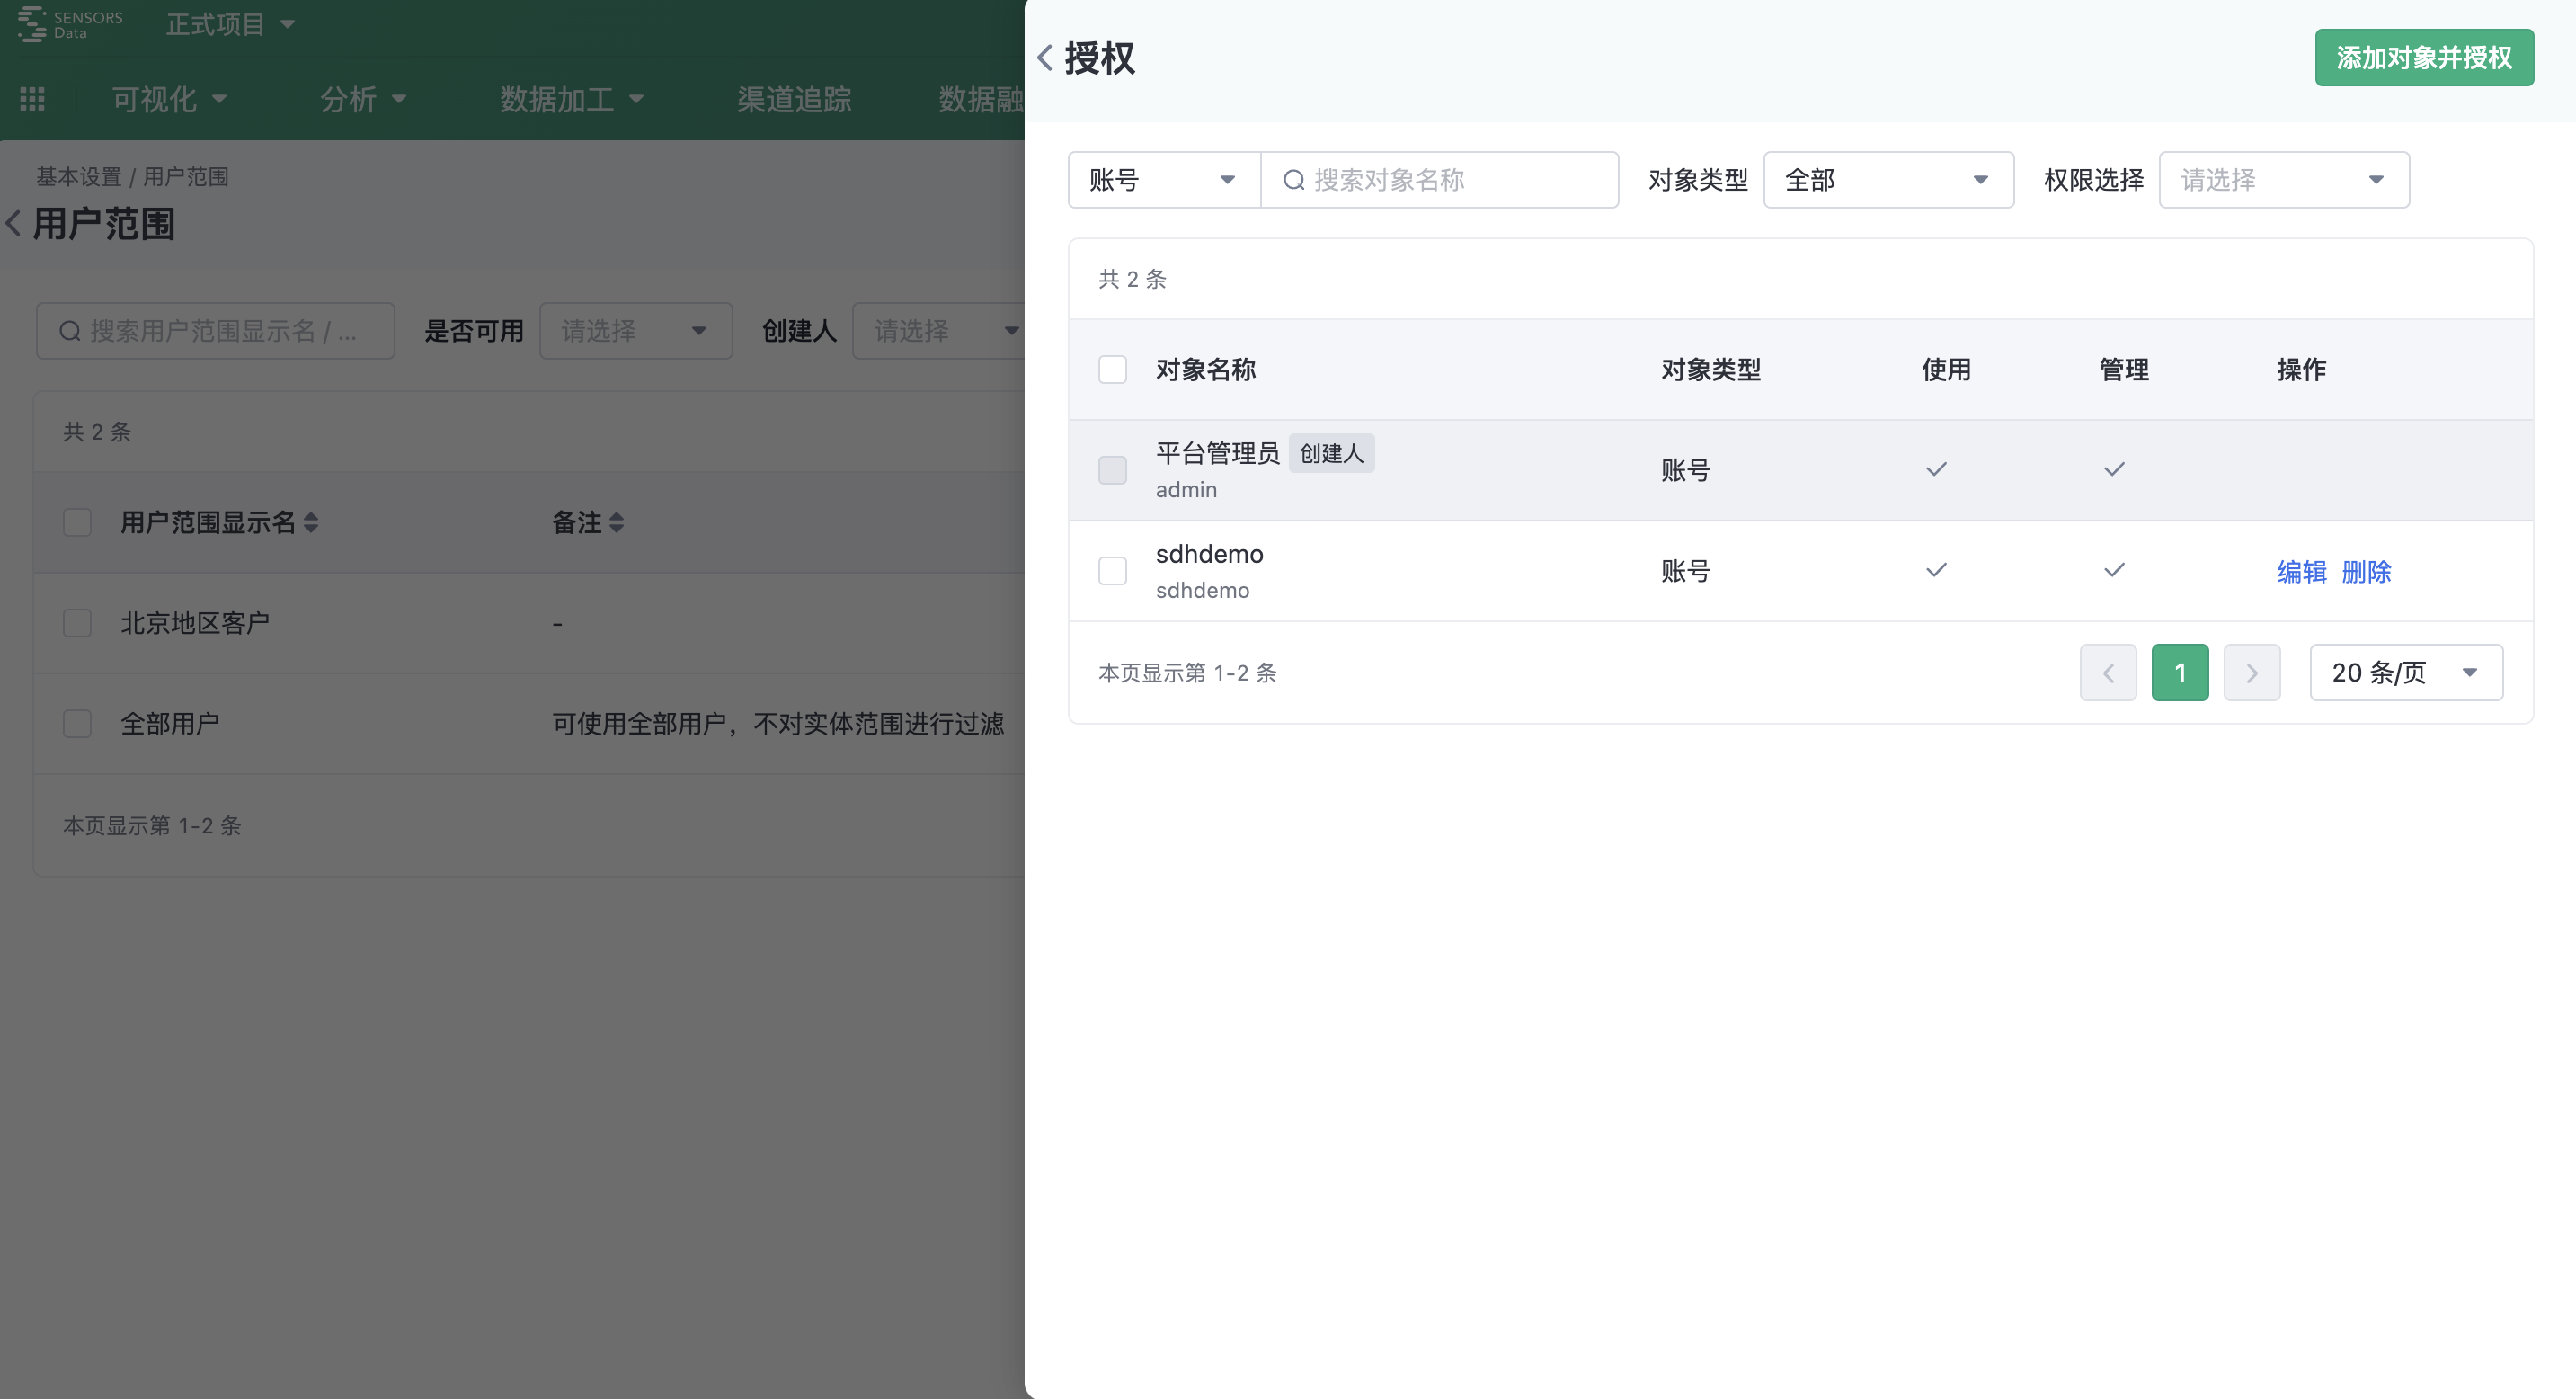
*Note: The prerequisite for successful authorization here is that the authorized object has been assigned corresponding function permissions in Role Management . For details about function permissions, see Chapter 5.2.3 of this document.
5.2.2. User-wide application
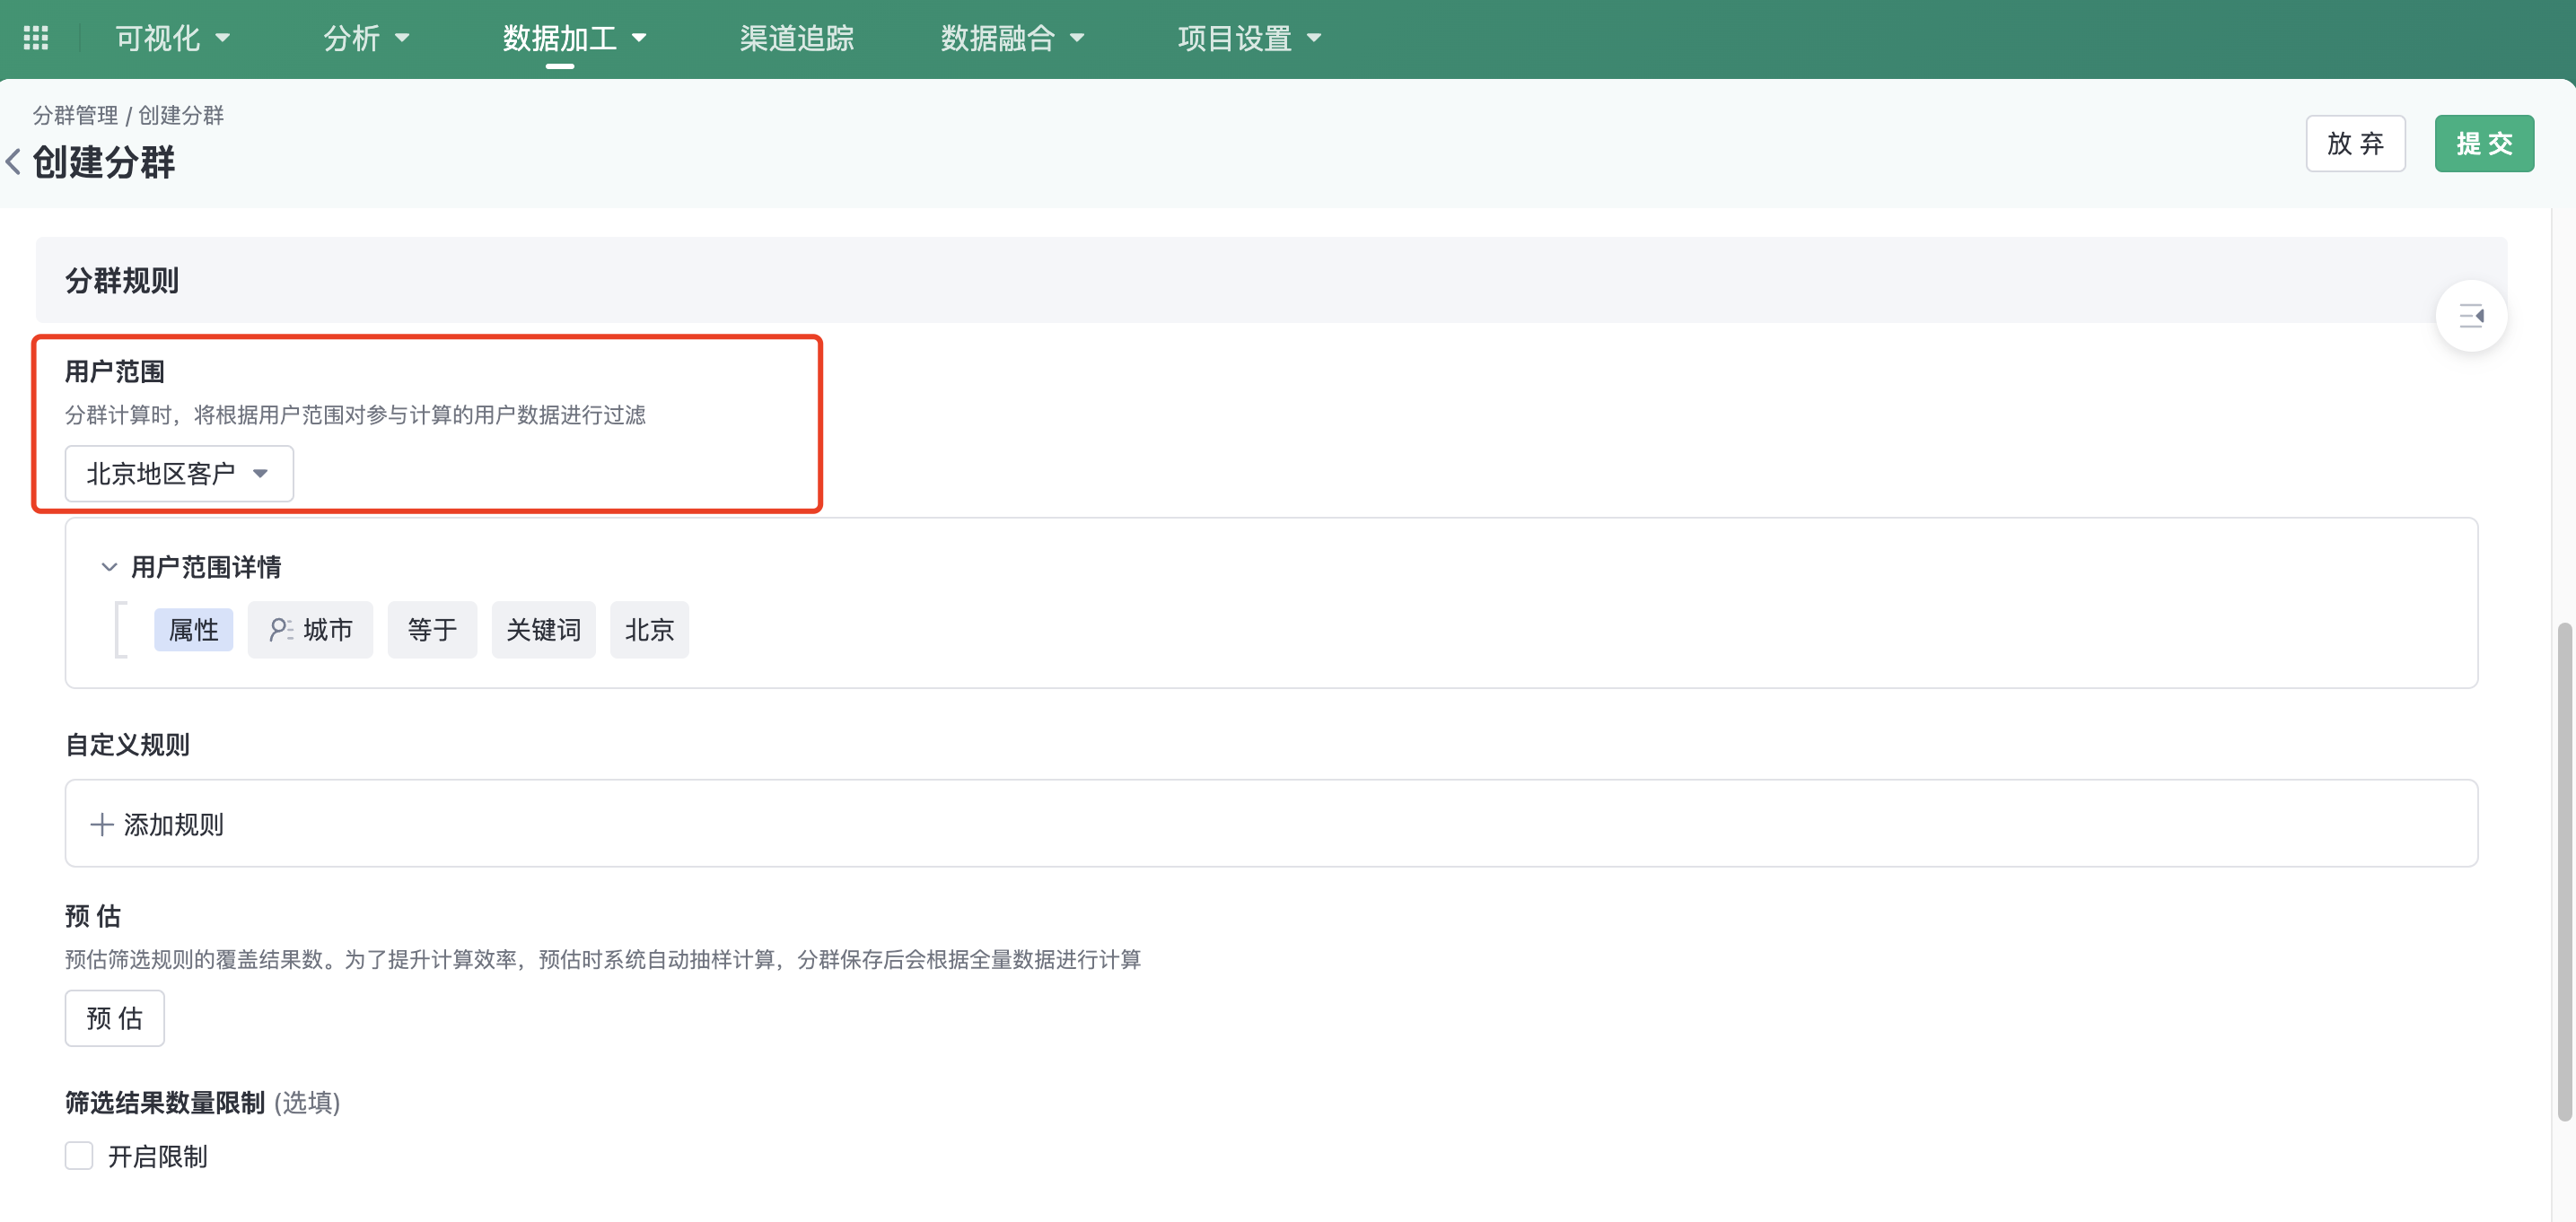
5.2.2.1. Create a cluster
When creating a cluster, you must select a user range. Click the drop-down box to select the current account has permission to use all users range. After a user range is selected and submitted successfully, custom rules are added to the range for calculation.
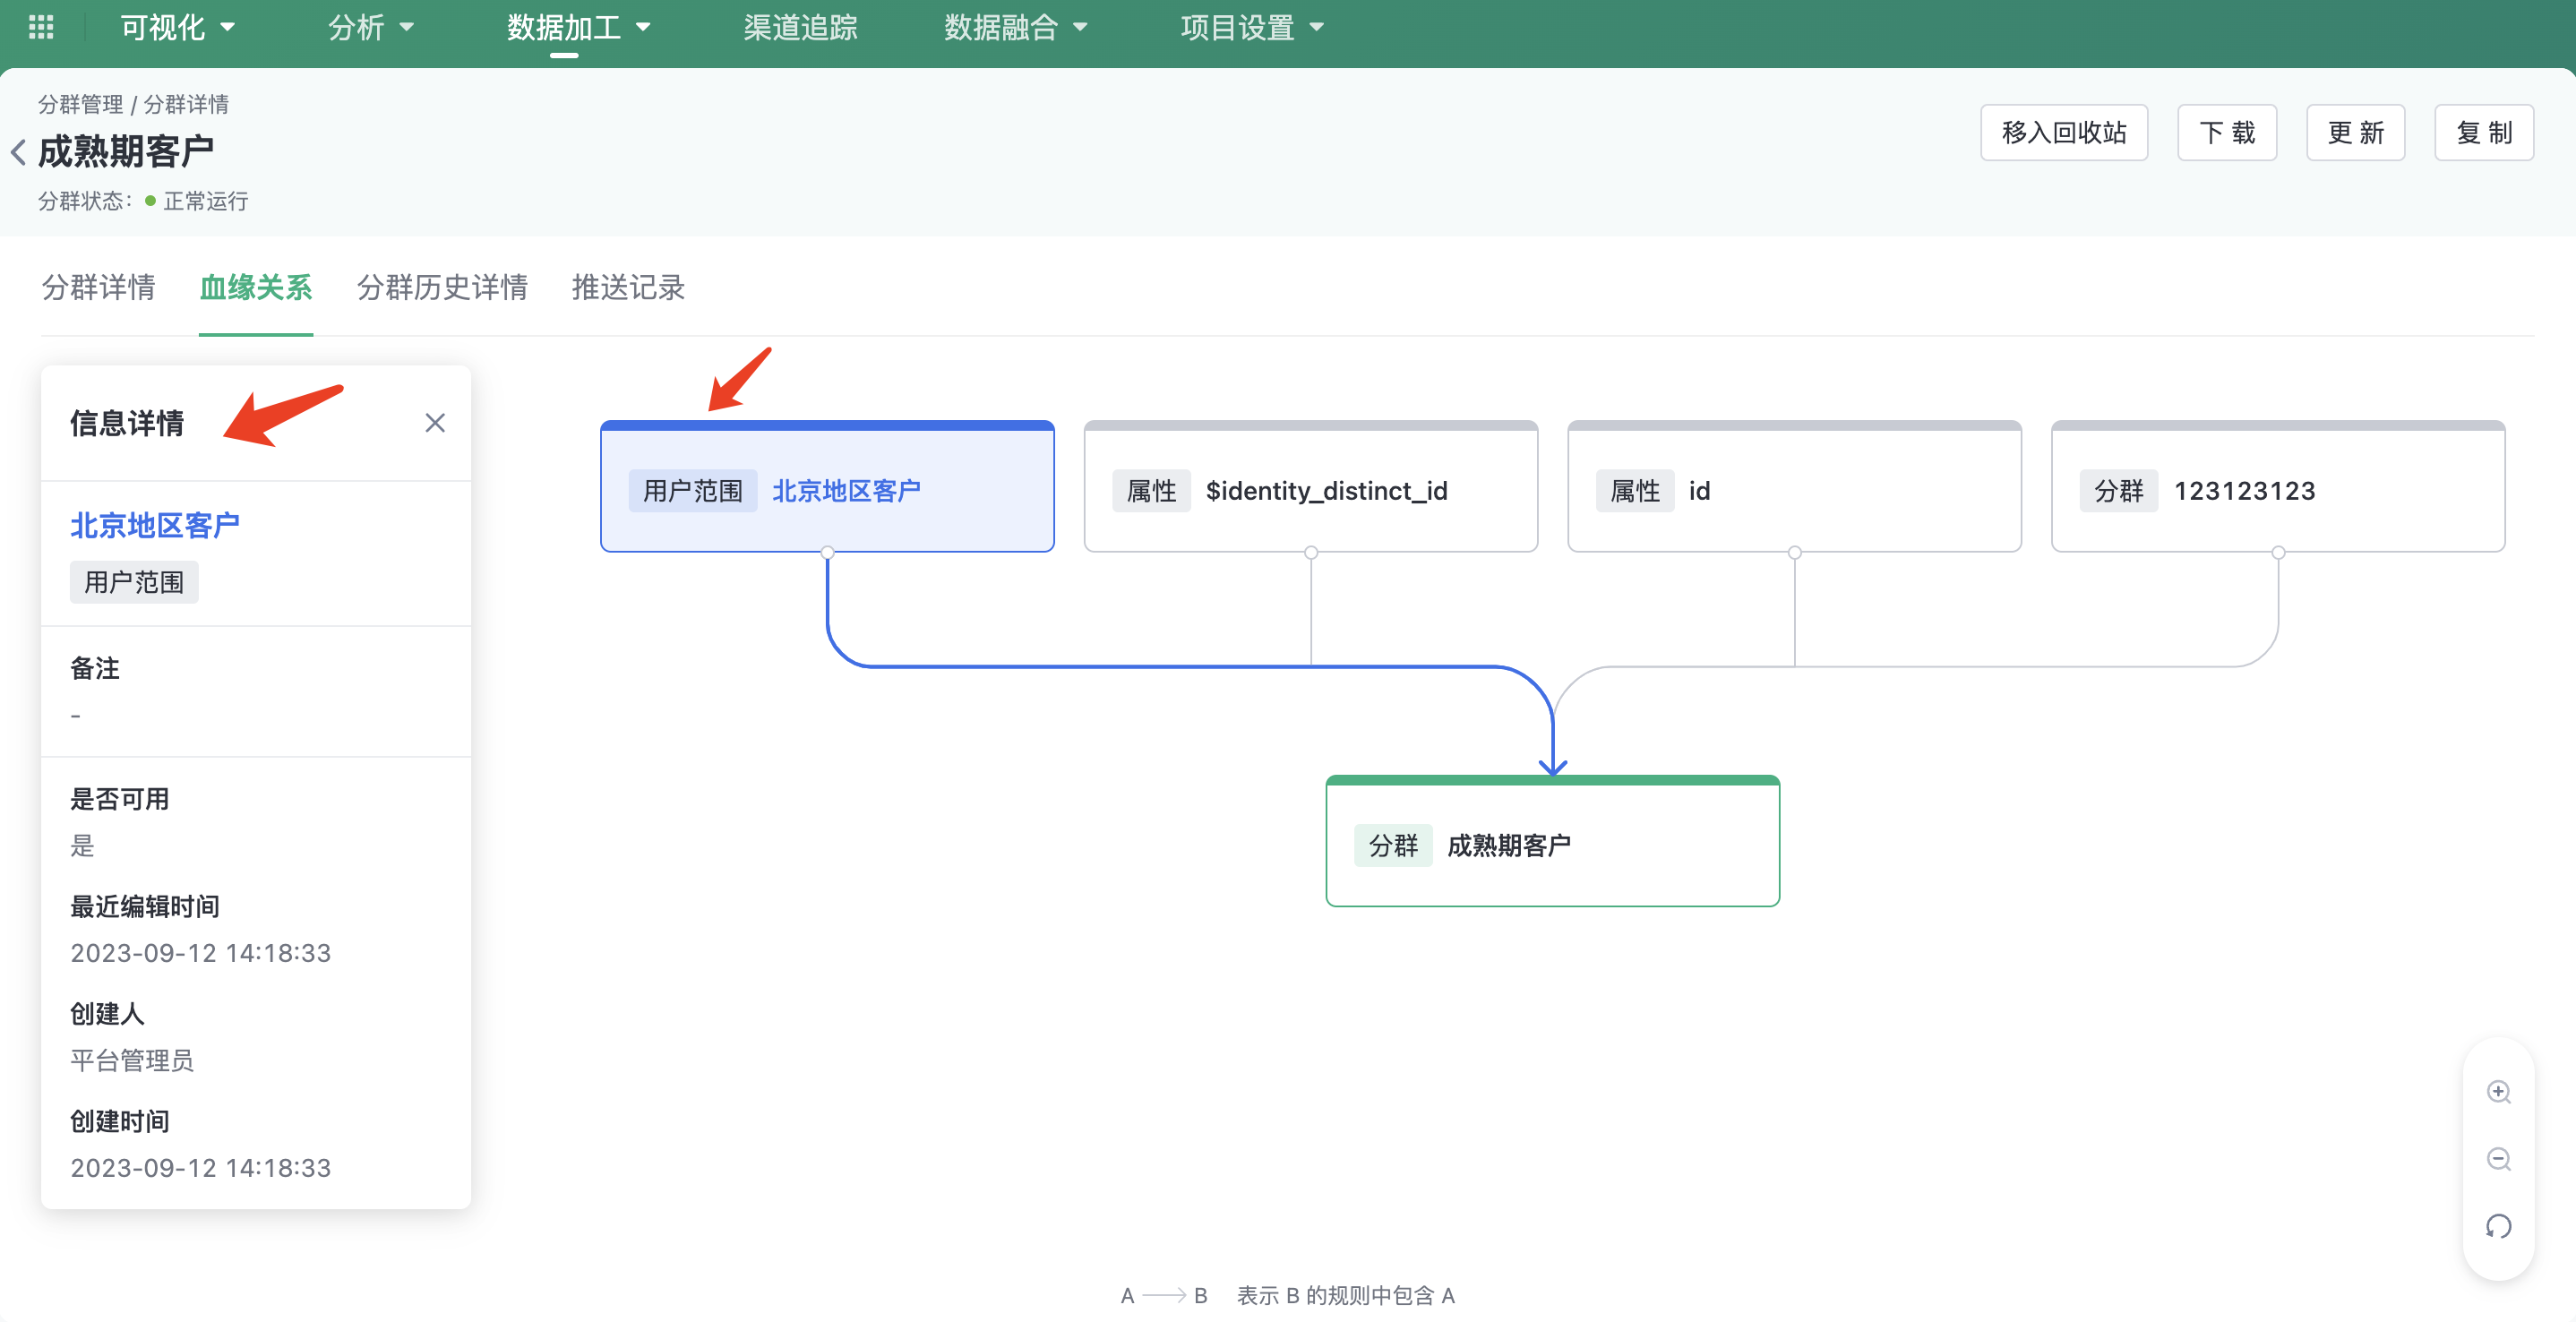
5.2.2.2. Check kinship
In the blood relationship view of the cluster, you can view the user range that the cluster depends on. Click the user range name to view its details.
5.2.3. User range function permissions
Can Role Management - Entity Management - Entity Scope Configure function permissions:
- Use: That is, the user range can be used when creating a cluster
- Management: can be found in User Range pagecreate, edit, copy, delete, and accreditoperations
After you add function permissions here, you need to log in toUser range list page authorizes the specified user range separately before it can be used and managed.

5.3. The segment results are filtered according to data permissions
The number of cluster results displayed on the cluster list page and details page is not filtered by the data permission of the current account by default. If you want to display data permission filtering for the number of cluster results, you need to enable the function switch separately.
Note: The content of this document is a technical document that provides details on how to use the Sensors product and does not include sales terms; the specific content of enterprise procurement products and technical services shall be subject to the commercial procurement contract.
